

Fusion Middleware
Analects 7:6
Musk Ox
Musk Ox is a fantastic instrumental chamber folk project from up in Canada. I recently stumbled on these guys and their guitarist Nathanael Larochette from some collaborations he did with the (now defunct, but often fantastic) Oregon-based post metal/neofolk band Agalloch. Here's a neat documentary on the making of their album Woodfall.
Another cool project is the acoustic spin off that Nathanael did from the last Agalloch album.
His solo stuff is great. Music about trees and such.

AI not I
The notion that what we call AI is somehow approaching a form on consciousness remains an absurdity: fantastical thinking by people who really ought to spend a minimal amount of time at least reading up on philosophy of mind. Generative AI fits perfectly into John Searle's Chinese Room (the main variation is probability replaces rules, which reflects the one major innovation of NLP over decades).
I don't mean to suggest the technology is not extremely useful - it is, and will become more so. But: reality check.
For the time being
Putting the decorations back into their cardboard boxes --
Some have got broken -- and carrying them up to the attic.
The holly and the mistletoe must be taken down and burnt,
And the children got ready for school. There are enough
Left-overs to do, warmed-up, for the rest of the week --
Not that we have much appetite, having drunk such a lot,
Stayed up so late, attempted -- quite unsuccessfully --
To love all of our relatives, and in general
Grossly overestimated our powers. Once again
As in previous years we have seen the actual Vision and failed
To do more than entertain it as an agreeable
Possibility, once again we have sent Him away,
Begging though to remain His disobedient servant,
The promising child who cannot keep His word for long.
The Christmas Feast is already a fading memory,
And already the mind begins to be vaguely aware
Of an unpleasant whiff of apprehension at the thought
Of Lent and Good Friday which cannot, after all, now
Be very far off. But, for the time being, here we all are,
Back in the moderate Aristotelian city
Of darning and the Eight-Fifteen, where Euclid's geometry
And Newton's mechanics would account for our experience,
And the kitchen table exists because I scrub it.
It seems to have shrunk during the holidays. The streets
Are much narrower than we remembered; we had forgotten
The office was as depressing as this. To those who have seen
The Child, however dimly, however incredulously,
The Time Being is, in a sense, the most trying time of all.
For the innocent children who whispered so excitedly
Outside the locked door where they knew the presents to be
Grew up when it opened. Now, recollecting that moment
We can repress the joy, but the guilt remains conscious;
Remembering the stable where for once in our lives
Everything became a You and nothing was an It.
And craving the sensation but ignoring the cause,
We look round for something, no matter what, to inhibit
Our self-reflection, and the obvious thing for that purpose
Would be some great suffering. So, once we have met the Son,
We are tempted ever after to pray to the Father;
"Lead us into temptation and evil for our sake."
They will come, all right, don't worry; probably in a form
That we do not expect, and certainly with a force
More dreadful than we can imagine. In the meantime
There are bills to be paid, machines to keep in repair,
Irregular verbs to learn, the Time Being to redeem
From insignificance. The happy morning is over,
The night of agony still to come; the time is noon:
When the Spirit must practice his scales of rejoicing
Without even a hostile audience, and the Soul endure
A silence that is neither for nor against her faith
That God's Will will be done, That, in spite of her prayers,
God will cheat no one, not even the world of its triumph."

Memesis and Desire
"Man is the creature who does not know what to desire, and he turns to others in order to make up his mind. We desire what others desire because we imitate their desires." Rene Girard
Faixa Marrom

Mitsuyo Maeda > Carlos Gracie Sr. > Carlos Gracie Junior > Jean Jacques Machado > Eddie Bravo > Denny Prokopos > Alex Canders
Three Carols for Nativity
Three of outstanding carols for the Christmas season.
1 In the Dark Night
A traditional Ukrainian koliady (carol): this is just heart-rendering in its simple beauty expressed in the Ukrainian language. The theme of a bright light in darkness is particularly poignant as Ukraine itself is presently plunged into darkness by the war. This holiday, I wish for peace: among Ukrainians, with brother Russians, and for the world.
In the dark night, above Bethlehem,a bright star shined out, covering the Holy Land.The Most Pure Virgin, the Holy Bride,in a poor cave gave birth to a Son.[Chorus] Sleep Jesus, sleep my little baby,Sleep my little star,About your fate, my little sweet,To you I will sing.She gently kissed and swaddled him,She put him to bed, and quietly started to sing,You will grow up, my Son, you’ll become a grown-up,And you will go out into the world, my baby.Sleep Jesus, sleep my sweet little baby,Sleep my little star,About your fate, my little sweet,To you I will sing.The Love of the Lord and God’s truth,You will bring faith to the world, to your people,The truth will live on, the shackles of sin will be shattered,[But my child], on Golgotha, my child will die.Sleep Jesus, sleep my sweet little baby,Sleep my little star,About your fate, my little sweet,To you I will sing.Sleep, Jesus, sleep my sweet little baby,Sleep my rose blossom,With hope on YouThe entire world is watching!
2 The Cherry Tree Carol
An Old English carol based on medieval legends about the Holy Family. This version is rendered in modern English and accompanied by a simple harp (Anonymous4 does another version that is a cappella in Old English, but something about this short version with the harp is just pleasant to the ears and to the soul).
3 Georgian Alilo
If you get some Georgians together for a holiday there will be singing (also, alcohol in my experience). I can't understand a word when they do, but its pretty cool.
Since Georgian is such an interesting language, I list here the lyrics / transliteration / translation from comments:
ალილო და ჰოი ალილო და ჰოოalilo da hoi alilo da hooHallelujah Hallelujahქრისტეს მახარობელნი ვართ ქრისტეშობას მოგილოცავთოოkrist’es makharobelni vart krist’eshobas mogilotsavtoo We are heralds of Christ wishing you a Merry Christmasოცდახუთსა დეკემბერსა ქრისტეიშვა ბეთლემშინაოotsdakhutsa dek’embersa krist’eishva betlemshinao On the twenty-fifth of December, Christ was born in Bethlehemანგელოზნი უგალობენ დიდება მაღალთა შინაოangelozni ugaloben dideba maghalta shinao Angels sing praises to the highest of the houseეს რომ მწყემსებმა გაიგგეს მივიდნენ და თავანი სცეს მასes rom mts’q’emsebma gaigges mividnen da tavani stses masPastors heard the good news and they went to worship Him.ვარსკვლავები ბრწყინვალებენ ანათებენ ბეთლემსაოოvarsk’vlavebi brts’q’invaleben anateben betlemsaooThe stars are shining, Illuminating Belém!შორი ქვენიდან მოსულმა მოგვებმა ძღვენი შესწირესshori kvenidan mosulma mogvebma dzghveni shests’iresComing from distant lands, The magicians gave Him a giftქრისტეს მახარობელნი ვართ ქრისტეშობას მოგილოცავთოkrist’es makharobelni vart krist’eshobas mogilotsavtoWe are heralds of Christ wishing you a Merry Christmasოცდახუთსა დეკემბერსა ქრისტე იშვა ბეთლემშინაოotsdakhutsa dek’embersa krist’e ishva betlemshinaoOn the twenty-fifth of December, Christ was born in Bethlehem
While Christmas is properly celebrated on January 7, being an American, I'm stuck with this weekend ending the season. Fortunately I am not stuck with the commercial music/dreck that American culture imposes on the season: the 12 days of Christmas until Epiphany/Theophany are still a good time to continue to enjoy this fine singing with all that behind us.
Secure your application from Argo CD to Kubernetes
GitOps is a popular framework for managing and securing the application development pipeline. For many who have embarked on a GitOps journey, a common question is: “how can I secure my pipeline when everything is automated?”
The GitOps framework is a concept where any code commits or changes are done through Git, which then triggers an automated pipeline that builds and deploys applications on Kubernetes. Because there are few touch points for development and security teams in the pipeline, its security needs to be mandated to ensure the deployed applications have as few vulnerabilities as possible.
This blog covers how Snyk can provide application security in GitOps, focusing on a popular tool, Argo CD. In this scenario, Snyk runs an IaC scan to ensure the to-be-deployed application is safe before deployment, and stops the build if it is not. Snyk also can monitor the deployed applications across different namespaces in Kubernetes in an automated fashion.
https://snyk.io/blog/secure-apps-from-argocd-to-kubernetes/
DakhaBrakha
A barely related side note: as a case study in creative folk-culture appropriation to modern forms, I recommend the Ukrainian musical film Hutsulka Ksenya. The plot revolves a young American whose late father leaves him his fortune on the condition he marry a Ukrainian woman. Distinctly unenthusiastic he visits the Carpathian region (presumably Zakarpattia Oblast, from which the Pavlik family emigrated) and falls for a young Hutsul woman.... I won't say more, its a terribly creative film and thoroughly enjoyable.
Hutsuls, as an aside, are not strictly speaking Ukrainians in the ethno-cultural sense, but in the broader sense of Ukraine as a multi-cultural nation.
Isaac of Syria in Dostoevsky
On recurring theme is an attempt to uncover the influences behind the portrait of the staretz Zosima. Many figures have been sited, including the famous Tikon of Zadonsk, of which there is an entire book dedicated to the topic. To my mind, however, the most obvious parallel to the teachings of Zosima is the 7th century ascetic Isaac of Syria. There could not be more clear parallels between his ascetic writings and the long chapter on Zosima's homilies in Karamazov. I liberally quote from two sites with supporting details and illustrations
------------------
There is an interesting connection between St Isaac of Syria and Dostoevsky. The latter owned an 1858 edition of the Slavonic translation of the Homilies by St Paisius Velichkovsky (Victor Terras, A Karamazov Companion: Commentary on the Genesis, Language, and Style of Dostoevsky’s Novel [Madison: U of Wisconsin, 1981], p. 22). Furthermore, Dostoevsky mentions St Isaac’s Ascetical Homilies by name twice in The Brothers Karamazov. The first time is in Part I, Book III, Chapter 1, ‘In the Servants’ Quarters’, where the narrator observes that Grigory Vasilievich, Fyodor Karamazov’s manservant, ‘somewhere obtained a copy of the homilies and sermons of “Our God-bearing Father, Isaac the Syrian”, which he read persistently over many years, understanding almost nothing at all of it, but perhaps precisely for that reason prizing and loving it all the more’ (Fyodor Dostoevsky, The Brothers Karamazov, trans. Richard Pevear and Larissa Volokhonsky [NY: Vintage, 1991], p. 96). Dostoevsky then mentions the book again in 4.11.8, this time in the rather more sinister context of Ivan’s third meeting with Smerdyakov, when the latter 'took from the table that thick, yellow book, the only one lying on it, the one Ivan had noticed as he came in, and placed it on top of the bills. The title of the book was The Homilies of Our Father among the Saints, Isaac the Syrian. Ivan Fyodorovich read it mechanically' (Dostoevsky, p. 625).
But more importantly, Victor Terras has pinpointed a number of St Isaac’s teachings that make a definite appearance in the words of Elder Zosima in II.VI.3, especially in (g) ‘Of Prayer, Love, and the Touching of Other Worlds’ (Dostoevsky, pp. 318-20), and (i) ‘Of Hell and Hell Fire: A Mystical Discourse’ (Dostoevsky, pp. 322-4). Terras quotes the following passage from ‘Homily Twenty-Seven’ as being ‘important for the argument of The Brothers Karamazov’ (Terras, p. 23):
Sin, Gehenna, and Death do not exist at all with God, for they are effects, not substances. Sin is the fruit of free will. There was a time when sin did not exist, and there will be a time when it will not exist. Gehenna is the fruit of sin. At some point in time it had a beginning, but its end is not known. Death, however, is a dispensation of the wisdom of the Creator. It will rule only a short time over nature; then it will be totally abolished. Satan’s name derives from voluntarily turning aside [the Syriac etymological meaning of satan] from the truth; it is not an indication that he exists as such naturally. (Ascetical Homilies, p. 133)
Terras may, however, be on the wrong trail with this particular passage, though not perhaps with the rest of his parallels, since according to a note in the translation, this particular homily only exists in Syriac (Ascetical Homilies, p. 133), and does not appear to have been available in any translation Dostoevsky would have read (Introduction, Ascetical Homilies, pp. lxxvi-lxxvii). Another interesting, though less important, discrepancy, is that Pevear and Volokhonsky, in their note on the name of St Paisius (he is referenced in I.I.5 [Dostoevsky, p. 27], and footnoted on p. 780 of Pevear’s and Volokhonsky’s translation), date Dostoevsky’s edition of the Elder’s translation of St Isaac to 1854 rather than 1858. Furthermore, J.M.E. Featherstone lists among St Paisius's works, Svjatago otca našego Isaaka Sirina episkopa byvšago ninevijskago, slova duxovno-podvižničeskija perevedennyja s grečeskago.... (Moscow, 1854), thus making Pevear and Volokhonsky's date more likely, it would seem ('Select Bibliography', The Life of Paisij Velyčkovs'kyj, trans. J.M.E. Featherstone [Cambridge, MA: Harvard U, 1989], p. 163 ).
I just wanted to highlight briefly this interesting connection. At an even deeper level, however, it has been picked up on, for one, by Archimandrite Vasileios of Iveron. Having considered the ‘artistic’ gifts of St Isaac and the spiritual insight of Dostoevsky, he concludes, ‘Thus, whether you read Abba Isaac, or Dostoevsky, in the end you get the same message, grace and consolation’ (‘Από τον Αββά Ισαάκ’, p. 100).
source: http://logismoitouaaron.blogspot.com/2009/02/this-glory-of-orientst-isaac-syrian.html
Though the teachings of Elder Zosima from Dostoevsky’s Brothers Karmazov seem exotic to many western readers and possibly unorthodox, they in fact show a remarkable similarity to those of a favorite 7th century eastern saint, St Isaac the Syrian. We know that Dostoevsky owned a newly-available translation of St Isaac’s Ascetical Homilies, and this volume is in fact mentioned by name twice in the novel, though in seemingly inconsequential contexts. Dostoevsky was no doubt deeply affected by the saint’s spirituality, and I think Zosima’s principle views in fact reflect and are indebted to those of St Isaac. Below I will list some of these distinctive views, with illustrating quotes from both the fictional Elder Zosima and St Isaac himself. (And note: these were simply the quotes that I could find very easily; I’m sure more digging would find even more striking parallels)
Love for all creation:
Elder Zosima: “Love God’s creation, love every atom of it separately, and love it also as a whole; love every green leaf, every ray of God’s light; love the animals and the plants and love every inanimate object. If you come to love all things, you will perceive God’s mystery inherent in all things; once you have perceived it, you will understand it better and better every day. And finally you will love the whole world with a total, universal love.”
St Isaac: “What is a merciful heart? It is a heart on fire for the whole of creation, for humanity, for the birds, for the animals, for demons, and for all that exists. By the recollection of them the eyes of a merciful person pour forth tears in abundance. By the strong and vehement mercy that grips such a person’s heart, and by such great compassion, the heart is humbled and one cannot bear to hear or to see any injury or slight sorrow in any in creation. For this reason, such a person offers up tearful prayer continually even for irrational beasts, for the enemies of the truth, and for those who harm her or him, that they be protected and receive mercy. And in like manner such a person prays for the family of reptiles because of the great compassion that burns without measure in a heart that is in the likeness of God.”
Responsibility for all:
Elder Zosima: “There is only one salvation for you: take yourself up, and make yourself responsible for all the sins of men. For indeed it is so, my friend, and the moment you make yourself sincerely responsible for everything and everyone, you will see at once that it is really so, that it is you who are guilty on behalf of all and for all. Whereas by shifting your own laziness and powerlessness onto others, you will end by sharing in Satan’s pride and murmuring against God. ”
St Isaac: “Be a partaker of the sufferings of all…Rebuke no one, revile no one, not even those who live very wickedly. Spread your cloak over those who fall into sin, each and every one, and shield them. And if you cannot take the fault on yourself and accept punishment in their place, do not destroy their character.”
Love is Paradise on Earth:
Elder Zosima: “”Gentlemen,” I cried suddenly from the bottom of my heart, “look at the divine gifts around us: the clear sky, the fresh air, the tender grass, the birds, nature is beautiful and sinless, and we, we alone, are godless and foolish, and do not understand that life is paradise, for we need only wish to understand, and it will come at once in all its beauty, and we shall embrace each other and weep”
St Isaac: “Paradise is the love of God, wherein is the enjoyment of all blessedness, and there the blessed Paul partook of supernatural nourishment…Wherefore, the man who lives in love reaps life from God, and while yet in this world, he even now breathes the air of the resurrection; in this air the righteous will delight in the resurrection. Love is the Kingdom, whereof the Lord mystically promised His disciples to eat in His Kingdom. For when we hear Him say, “Ye shall eat and drink at the table of my Kingdom,” what do we suppose we shall eat, if not love? Love is sufficient to nourish a man instead of food and drink.”
Non-literal ‘fire’ of hell:
Elder Zosima: “Fathers and teachers, I ask myself: “What is hell?” And I answer thus: “The suffering of being no longer able to love.”…People speak of the material flames of hell. I do not explore this mystery, and I fear it, but I think that if there were material flames, truly people would be glad to have them, for, as I fancy, in material torment they might forget, at least for a moment, their far more terrible spiritual torment. And yet it is impossible to take this spiritual torment from them, for this torment is not external but is within them”
St Isaac: “As for me I say that those who are tormented in hell are tormented by the invasion of love. What is there more bitter and violent than the pains of love? Those who feel they have sinned against love bear in themselves a damnation much heavier than the most dreaded punishments. The suffering with which sinning against love afflicts the heart is more keenly felt than any other torment. It is absurd to assume that the sinners in hell are deprived of God’s love. Love is offered impartially. But by its very power it acts in two ways. It torments sinners, as happens here on earth when we are tormented by the presence of a friend to whom we have been unfaithful. And it gives joy to those who have been faithful. That is what the torment of hell is in my opinion: remorse”
source: https://onancientpaths.wordpress.com/2013/07/27/the-elder-zosima-and-st-isaac-the-syrian/
Note for self: Snyk scan from ArgoCD
Demo
https://github.com/papicella/springbootemployee-api/tree/master/argocd
Demo Job on K8s to perform Snyk IaC Scan
apiVersion: batch/v1
kind: Job
metadata:
  name: snyk-iac-scan
  annotations:
    argocd.argoproj.io/hook: PreSync
spec:
  ttlSecondsAfterFinished: 600
  template:
    spec:
      containers:
        - name: snyk-cli
          image: snyk/snyk-cli:npm
          command: ["/bin/sh","-c"]
          args:
            - git clone https://github.com/papicella/springbootemployee-api.git;
              snyk auth $SNYK_TOKEN;
              snyk iac test springbootemployee-api/argocd/employee-K8s.yaml || true;
          env:
            - name: SNYK_TOKEN
              valueFrom:
                secretKeyRef:
                  name: snyk-token
                  key: token
      restartPolicy: Never
  backoffLimit: 0

Using Pulumi to automate the Snyk Kubernetes integration for containers
Better late than never finally got around to posting this today.
In this blog post, we will walk through the process of using Pulumi, a new open source tool that allows developers to build code in multiple languages like JavaScript, Typescript, Python, and Go to create all that is required to configure the Kubernetes integration in Snyk Container.
https://snyk.io/blog/automate-snyk-kubernetes-pulumi/
Intentionality Mind and Nature
"Neither doctrine nor metaphysics need be immediately invoked to see the impossibility of rational agency within a sphere of pure nature; a simple phenomenology of what it is we do when we act intentionally should suffice. The rational will, when freely moved, is always purposive; it acts always toward an end: conceived, perceived, imagined, hoped for, resolved upon. Its every act is already, necessarily, an act of recognition, judgment, evaluation, and decision, and is therefore also a tacit or explicit reference to a larger, more transcendent realm of values, meanings, and rational longings. Desire and knowledge are always, in a single impulse, directed to some purpose present to the mind, even if only vaguely. Any act lacking such purposiveness is by definition not an act of rational freedom. There are, moreover, only two possible ways of pursuing a purpose: either as an end in itself or for the sake of an end beyond itself. But no finite object or purpose can wholly attract the rational will in the latter way; no finite thing is desirable simply in itself as an ultimate end. It may, in relative terms, constitute a more compelling end that makes a less compelling end nonetheless instrumentally desirable, but it can never constitute an end in itself. It too requires an end beyond itself to be compelling in any measure; it too can evoke desire only on account of some yet higher, more primordial, more general disposition of reason’s appetites. Even what pleases us most immediately can be intentionally desired only within the context of a rational longing for the Good itself. If not for some always more original orientation toward an always more final end, the will would never act in regard to finite objects at all. Immanent desires are always in a sense deferred toward some more remote, more transcendent purpose. All concretely limited aspirations of the will are sustained within formally limitless aspirations of the will. In the end, then, the only objects of desire that are not reducible to other, more general objects of desire, and that are thus desirable entirely in and of themselves, are those universal, unconditional, and exalted ideals, those transcendentals, that constitute being’s abstract perfections. One may not be, in any given instant, immediately conscious that one’s rational appetites have been excited by these transcendental ends; I am not talking about a psychological state of the empirical ego; but those ends are the constant and pervasive preoccupation of the rational will in the deepest springs of its nature, the source of that “delectable perturbation” that grants us a conceptual grasp of finite things precisely by constantly carrying us restlessly beyond them and thereby denying them even a provisional ultimacy.
In fact, we cannot even possess the barest rational cognizance of the world we inhabit except insofar as we have always already, in our rational intentions, exceeded the world. Intentional recognition is always already interpretation, and interpretation is always already judgment. The intellect is not a passive mirror reflecting a reality that simply composes itself for us within our experience; rather, intellect is itself an agency that converts the storm of sense-intuitions into a comprehensible order through a constant process of interpretation. And it is able to do this by virtue of its always more original, tacit recognition of an object of rational longing—say, Truth itself—that appears nowhere within the natural order, but toward which the mind nevertheless naturally reaches out, as to its only possible place of final rest. All proximate objects are known to us, and so desired or disregarded or rejected, in light of that anticipated finality. Even to seek to know, to organize experience into reflection, is a venture of the reasoning will toward that absolute horizon of intelligibility. And since truly rational desire can never be a purely spontaneous eruption of the will without purpose, it must exhibit its final cause in the transcendental structure of its operation. Rational experience, from the first, is a movement of rapture, of ecstasy toward ends that must be understood as—because they must necessarily be desired as—nothing less than the perfections of being, ultimately convertible with one another in the fullness of reality’s one source and end. Thus the world as something available to our intentionality comes to us in the interval that lies between the mind’s indivisible unity of apprehension and the irreducibly transcendental horizon of its intention—between, that is, the first cause of movement in the mind and the mind’s natural telos, both of which lie outside the composite totality of nature."
DB Hart, You are Gods. University of Notre Dame Press, April 2022
Mother of Mercy

Find and fix vulnerabilities in your CI/CD pipeline with Snyk and Harness
Integrating the Snyk developer-focused security platform into Harness’ unified delivery pipeline workflow ensures security and compliance testing is part of every release. This allows you to prevent applications with vulnerable dependencies and code from making their way into production. With modern tooling like Snyk and Harness, you can find, fix, and remediate through a CI/CD pipeline and mitigate the risk to the business without affecting your ability to release software quickly.
Created a new Snyk Blog with the harness team as per the link below.
https://snyk.io/blog/find-fix-vulnerabilities-ci-cd-pipeline-snyk-harness/
Using harness CI to run a series of Snyk Tests
When DevOps emerged more than 10 years ago, the main focus was to bridge the gaps between Dev and Ops teams by introducing automation to the processes of building, testing and deployment of applications.
As development teams continue to deliver more rapidly and more frequently, security teams are finding it difficult to keep up and often end up being the bottleneck in the delivery pipeline. For this reason, bringing security early into the DevOps process from the outset – in other words, embracing a DevSecOps culture within a business – has become increasingly important.
Applications have changed as cloud-native technologies like Containers, Kubernetes, and the use of Infrastructure as Code technologies like Terraform, Cloudformation, ARM templates are now the norm. These elements are now built and customized by developers and live in their Source Code Management repositories.
In this demo below I show you how Harness CI along with Snyk can help setup a DevSecOps Pipeline well before we even think about deployment.
Note: We are using the public GitHub repo below
https://github.com/papicella/springbootemployee-api
1. First we need to identify our user token within Snyk. For enterprise customers you can setup service accounts and retrieve a token which we will require later. For non enterprise Snyk accounts you can just use the main User Token. Both methods of how to obtain this are defined below.
Service Accounts
https://docs.snyk.io/features/integrations/managing-integrations/service-accounts
For those without access to service accounts you can obtain your Snyk user Token as follows
https://docs.snyk.io/features/snyk-cli/install-the-snyk-cli/authenticate-the-cli-with-your-account
2. In harness let's define a few secrets one being our Snyk Token we retrieved in step 1, also my GitHub token

3. Our builds need to run somewhere in this example we are using a connector to our K8s cluster which is defined at the "Organization" level within Harness


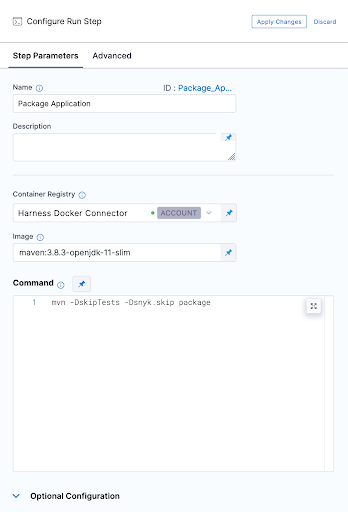
4. Our first execution step is simply going to package the application. Our Spring Boot application is using maven and has a single pom.xml file. Notice below that we have to use a Docker connector for a "Build-> Run" step , here I am using an account level Docker connector
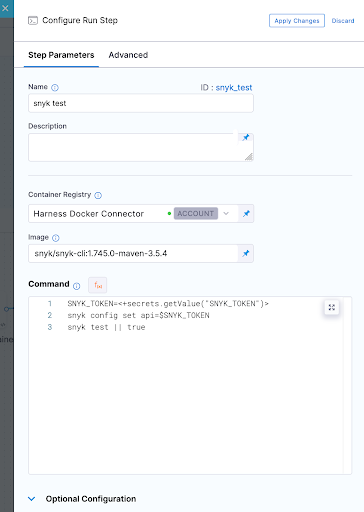
5. Now we can run our first Snyk Test. In this simple example we don't fail the build at all and ensure we pass a SUCCESS exit code for our Snyk Open Source test which will pick up the one and only pom.xml file in the repo. I am also using Snyk Docker image that includes the Snyk CLI and Maven to perform this test.
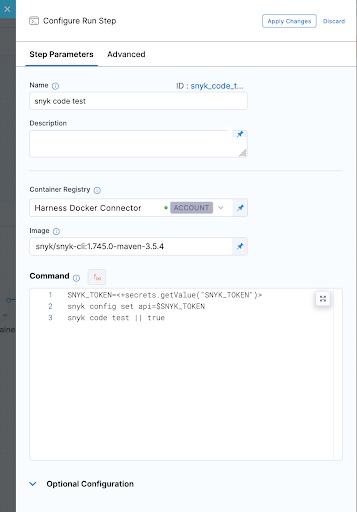
6. So jumping right ahead let's quickly take a look at our other 3 tests.
Snyk Code Test
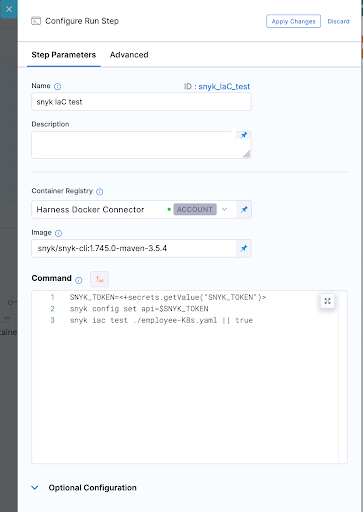
Snyk IaC test
Snyk Container Test
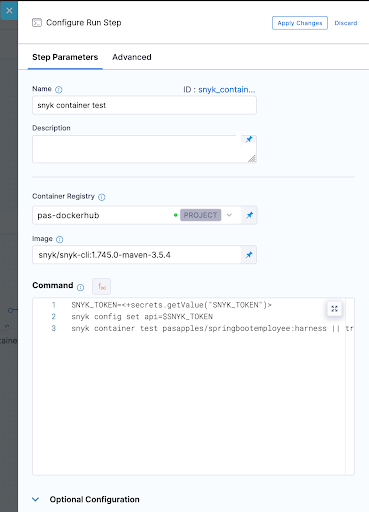
In all these Snyk Tests we ensure nothing fails instead we just report on vulnerabilities. WE could also set our severity threshold as part of our tests as shown below.
--severity-threshold=medium
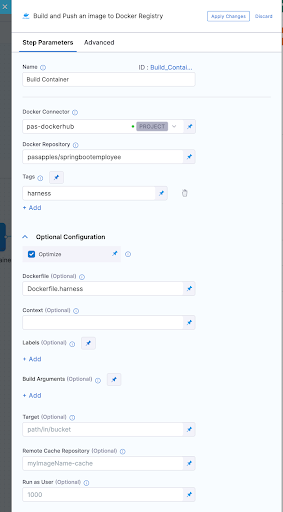
7. In order to run the container test we had to build our container image which was done using a "Build and push image to Dockerhub" step as shown below
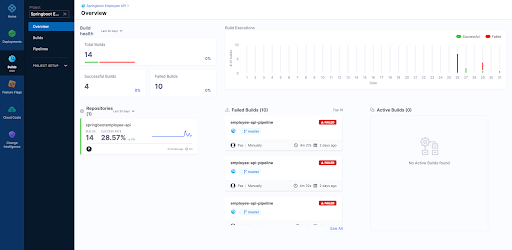
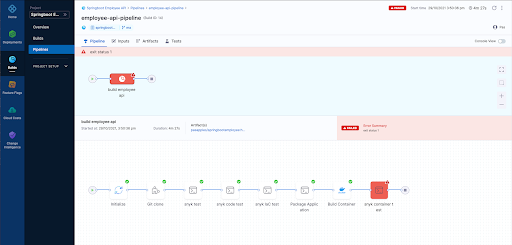
8. Now after running a few builds our Overview page on Harness UI nicely summarises what has passed versus what has failed for us.
9. Finally we can view each build as follows

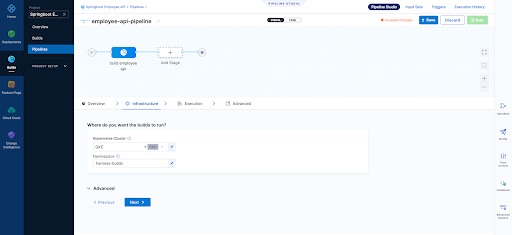
Overview Page
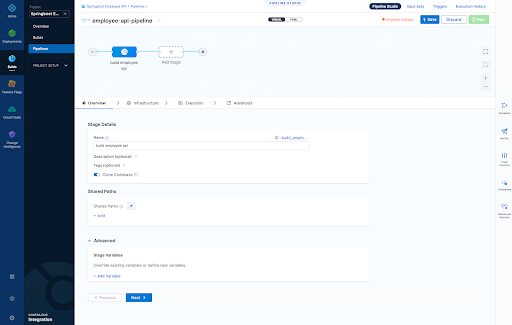
Infrastructure Page - Here we define where are harness delegate running in a K8s cluster which is just one of the options here when it comes to a worker node for the pipeline steps we run
- Snyk Open Source Test
- Snyk Code Test
- Snyk IaC Test
- Snyk Container Test
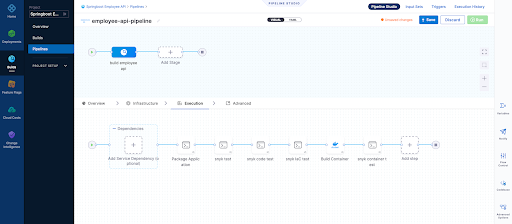
Pipeline Result Page
For those that wish to see the whole pipeline YAML here it is below:
pipeline: name: employee-api-pipeline identifier: employeeapipipeline projectIdentifier: Springboot_Employee_API orgIdentifier: default tags: {} properties: ci: codebase: connectorRef: pasgithub repoName: springbootemployee-api build: <+input> stages: - stage: name: build employee api identifier: build_employee_api description: "" type: CI spec: cloneCodebase: true infrastructure: type: KubernetesDirect spec: connectorRef: org.GKE namespace: harness-builds execution: steps: - step: type: Run name: Package Application identifier: Package_Application spec: connectorRef: account.harnessImage image: maven:3.8.3-openjdk-11-slim command: mvn -DskipTests -Dsnyk.skip package privileged: false - step: type: Run name: snyk test identifier: snyk_test spec: connectorRef: account.harnessImage image: snyk/snyk-cli:1.745.0-maven-3.5.4 command: |- SNYK_TOKEN=<+secrets.getValue("SNYK_TOKEN")> snyk config set api=$SNYK_TOKEN snyk test || true privileged: false failureStrategies: [] - step: type: Run name: snyk code test identifier: snyk_code_test spec: connectorRef: account.harnessImage image: snyk/snyk-cli:1.745.0-maven-3.5.4 command: |- SNYK_TOKEN=<+secrets.getValue("SNYK_TOKEN")> snyk config set api=$SNYK_TOKEN snyk code test || true privileged: false when: stageStatus: Success failureStrategies: [] - step: type: Run name: snyk IaC test identifier: snyk_IaC_test spec: connectorRef: account.harnessImage image: snyk/snyk-cli:1.745.0-maven-3.5.4 command: |- SNYK_TOKEN=<+secrets.getValue("SNYK_TOKEN")> snyk config set api=$SNYK_TOKEN snyk iac test ./employee-K8s.yaml || true privileged: false when: stageStatus: Success failureStrategies: [] - step: type: BuildAndPushDockerRegistry name: Build Container identifier: Build_Container spec: connectorRef: pasdockerhub repo: pasapples/springbootemployee tags: - harness dockerfile: Dockerfile.harness optimize: true - step: type: Run name: snyk container test identifier: snyk_container_test spec: connectorRef: pasdockerhub image: snyk/snyk-cli:1.745.0-maven-3.5.4 command: |- SNYK_TOKEN=<+secrets.getValue("SNYK_TOKEN")> snyk config set api=$SNYK_TOKEN snyk container test pasapples/springbootemployee:harness || true privileged: false resources: limits: memory: 2048Mi variables: []
Snyk
Harness
Using Buildkite to perform Snyk Open Source and Snyk Code (SAST) tests
Buildkite is a platform for running fast, secure, and scalable continuous integration pipelines on your own infrastructure. In the example below I will run my Buildkite pipeline on my Macbook to perform two Snyk Tests, one for Open-Source dependancies and the other a SAST test of the code itself.
Snyk is an open source security platform designed to help software-driven businesses enhance developer security.
You will need an account on Snyk and Buildkite to follow the steps below.
Steps1. First in Snyk let's create a Service Account which will be the Snyk token I will use to authenticate with. You can use the Snyk API Token but the service account is all you need to run "Snyk Tests" so makes sense to use that.

2. Next let's store that Service Account token somewhere where I can safely inject that into my pipeline at the appropriate step. In this example I am using "Google Secret Manager" but there are other choices of course.

Note: We will be using the secret NAME shortly "PAS_BUILDKITE_SA_SNYK_TOKEN"
3. You will need a Buildkite agent on your local Infrastructure in my case I using my Macbook so that's done as follows
https://buildkite.com/docs/agent/v3/macos
4. You're now ready to create a pipeline. A pipeline is a template of the steps you want to run. There are many types of steps, some run scripts, some define conditional logic, and others wait for user input. When you run a pipeline, a build is created. Each of the steps in the pipeline end up as jobs in the build, which then get distributed to available agents.
In the example below our pipeline is created from a GitHub repo and then select the default branch. At that point incoming webhooks are sent to Buildkite by source control providers (GitHub, GitLab, Bitbucket, etc.) to trigger builds, in this scenario we using GitHub

5. Let's go ahead and actually just edit the build steps using YAML. My final YAML is as follows and I explain below why it looks this way but in short I just want to run two snyk tests rather then actually deploy anything for this demo.
Few things to note here:
- I am using a GCP secret manager plugin to retrieve my Snyk SA token with a name as follows "PAS_BUILDKITE_SA_SNYK_TOKEN"
- I am using a Google Service Account JSON so I can authenticate with GCP and retrieve my secret "SNYK_SA_TOKEN_VAR", you will need to use a Service Account with privileges to at least READ from Google Secret Manager
- I am using some local non sensitive ENV variables which get used at the appropriate time
- I have three commands of which the first command sets my Snyk API token for the Snyk CLI
- I have not installed the Snyk CLI because it already exists on my Macbook
- I am only looking for my Snyk tests to fail if it finds any CRITICAL issues only
- I should be running a "mvn package" here but I can still execute a "snyk test" without it for demo purposes as we have a pom..xml
- I could also build a container in the pipeline from the source code and then run a "snyk container test" as well, in fact I could even run "snyk iac test" against any IaC files in the repo as well
- If a test fails we can easily run "snyk monitor" to load the results into the Snyk App but for this demo we don't do that
6. Now we can manually run a build or wait for triggering event on our repo, here is some screen shots of what it looks like including some failures where we find vulnerabilities in a separate node.js repo


It makes more sense to create a Buildkite plugin for Snyk rather than execute commands using a script and here is an example of one below. Having said that the commands you run to execute a "snyk test" are simple enough to include in the pipeline YML without the need for a plugin here especially if you have infrastructure already setup with the ability to run the "snyk cli". A plugin would be the right approach here though as per the example below.
https://github.com/seek-oss/snyk-buildkite-plugin

Hopefully you have seen how easy it is to continuously avoid known vulnerabilities in your dependencies and code, by integrating Snyk into your continuous integration pipeline with Buildkite.
More InformationUsing the Elastic Snyk module to visualize Snyk imported project data with Elastic Kibana
Snyk is an open source security platform designed to help software-driven businesses enhance developer security
- vulnerabilities fileset: Collects all found vulnerabilities for the related organizations and projects
- audit fileset: Collects audit logging from Snyk, this can be actions like users, permissions, groups, api access and more.
- Sets the default paths to the log files (but don’t worry, you can override the defaults)
- Makes sure each multiline log event gets sent as a single event
- Uses ingest node to parse and process the log lines, shaping the data into a structure suitable for visualizing in Kibana
Here is how to get started with this currently BETA module
Steps1. First you will need an account on Snyk App and have imported a few projects so you have some vulnerability data to get started with. Here is an example of some imported projects which already exist in my Snyk App Account.

2. You will need an Elastic Cluster best way to get one of those if you don't have one is to head to the Elastic Cloud Service for a free trial
3. Next we need to install Elastic Filebeat. The quick start guide here is the best way to do that
https://www.elastic.co/guide/en/beats/filebeat/current/filebeat-installation-configuration.html
Couple of things here
- You need to run this command to enable the snyk module as shown below. In this example the module is already enabled so the output would differ the first time you run this.
Module snyk is already enabled
- Make sure you have configured connectivity to your Elastic Cluster as per the doc above. The example below is for the Elastic Cloud Service itself.
cloud.auth: "filebeat_setup:YOUR_PASSWORD"
4. With Elastic Filebeat installed and configured now we can setup the Snyk module to do that we perform the following.
Edit "./modules.d/snyk.yml"
The following link shows how to configure the snyk.yml file and what settings are available
https://www.elastic.co/guide/en/beats/filebeat/current/filebeat-module-snyk.html
Example Config to get started with:


5. At this point we can start Elastic Filebeat as shown below.
6. If we head to Kibana and go into the "Discover" Page we will see data flowing into the cluster by setting "event.module = snyk" on the "filebeat-*" index pattern as shown below.

Or maybe we want to use Dev Tools itself


7. Finally a Dashboard of some graphs as we monitor the "Snyk Data" coming into the cluster

Next Steps?
Kibana gives you the freedom to select the way you give shape to your data. With its interactive visualizations, start with one question and see where it leads you!!!. If it was me I would go straight to Kibana Lens. Kibana Lens is an easy-to-use, intuitive UI that simplifies the process of data visualization through a drag-and-drop experience it allowed me to create the dashboard page above in under 3 minutes even without knowing where to start.
https://www.elastic.co/kibana/kibana-lens
Want all your vulnerability data form the Snyk Platform within your Elastic Stack the "Elastic Snyk Module" will do that for you in a few easy steps.
More Information