Marcelo Ochoa
This place is a notepad for sharing experience, code and other related stuff to Oracle, Java and XML technologies.Marcelo Ochoahttp://www.blogger.com/profile/03410152050718914588noreply@blogger.comBlogger69125
Updated: 3 weeks 4 days ago
We moved to @Medium
Since August 2017 We are moved to Medium, some of the reason are great described into this blog post "3 reasons we moved our startup blog to Medium". You are invited to see the new channel, greetings.
Applying the first RU (Release Update) for Oracle Database 12.2.0.1 on Docker environment
There is great post on Applying the first RU for Oracle Database 12.2.0.1 written by my friend Mike.
But this post is about on how to apply this important patch on Docker environment using official Oracle Docker images.
First, some time DBAs have fear on applying patches for two important thing:
Well, on Docker environment this two points are quickly answered:
Let see in action, first check that you have the two Oracle Database Release 2 images ready at your local repository:
If you have a running container with the official R2 base image oracle/database:12.2.0.1-ee, the start script may be look like:
note that your datafiles reside outside the container as usual to survive the stop/start/rm container life-cycle which obviously make sense for an production database.
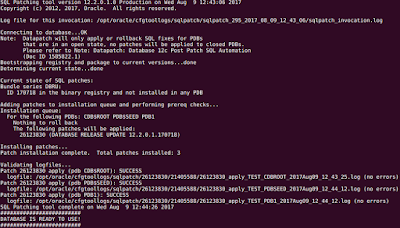
Now I will patch this database with first RU patchset, for doing that a run command will point to the image patched with 26123830 patchset, here an screenshot:
here the process for applying a patch:
database downtime is about:
Not bad for my modest laptop.
But what are under the hood on the new patched imaged with the RDBMS RU included?
First there is an official script provided by Oracle to apply generic patches to the official image, here the link at GitHub, but this script doesn't take into account the post-processing task during first startup time, so I decided to provide mine using this Dockerfile and modified startDB.sh script.
Here the explanation of Dockerfile, first the Docker image tagged oracle/database:12.2.0.1-ee-26123830 is built on top of oracle/database:12.2.0.1-ee.
FROM oracle/database:12.2.0.1-ee
For building a new image with the patch applied on binary/libs file is simple as calling docker with:
docker build -t "oracle/database:12.2.0.1-ee-26123830" .Note that the process described above could be executed by an experimented DBA or a DevOps operator, and the process of stopping a production database and starting again with the patch installed could be executed by a novel DBA or any other operator.
But this post is about on how to apply this important patch on Docker environment using official Oracle Docker images.
First, some time DBAs have fear on applying patches for two important thing:
- What happen if something goes wrong, how to rollback this process quickly on production
- Which is my downtime, also apply on production systems where minutes means money
Well, on Docker environment this two points are quickly answered:
- You could rollback the patch on binaries by simply stop your Docker container started with the RU image and go back using the official image, remember that on Docker environment bin/libs are part of the layered file-system where your container start and it acts like an SVN branch, if you want to go back with the changes made on the binary files modified by a patch you can rollback this change stopping your container and starting again using the previous used image.
- The downtime as I will show below is only the time involving by shutdown your database, and starting it again with the new image, the time for patching your binaries are NOT part of your downtime, when the database startup for the first time with a new patched image there is only a fixed time of datapatch utility which is called once.
Let see in action, first check that you have the two Oracle Database Release 2 images ready at your local repository:
If you have a running container with the official R2 base image oracle/database:12.2.0.1-ee, the start script may be look like:
note that your datafiles reside outside the container as usual to survive the stop/start/rm container life-cycle which obviously make sense for an production database.
Now I will patch this database with first RU patchset, for doing that a run command will point to the image patched with 26123830 patchset, here an screenshot:
here the process for applying a patch:
database downtime is about:
- 0m4.869s (docker rm -f demo)
- 0m8.503s (docker run with new image, ./run-demo-patch.sh file)
- 1m20s (time taken by SQL Patching tool starting time 12:43:06, ending time 12:44:26)
Not bad for my modest laptop.
But what are under the hood on the new patched imaged with the RDBMS RU included?
First there is an official script provided by Oracle to apply generic patches to the official image, here the link at GitHub, but this script doesn't take into account the post-processing task during first startup time, so I decided to provide mine using this Dockerfile and modified startDB.sh script.
Here the explanation of Dockerfile, first the Docker image tagged oracle/database:12.2.0.1-ee-26123830 is built on top of oracle/database:12.2.0.1-ee.
FROM oracle/database:12.2.0.1-ee
next we have to put a downloaded patch zip file in this directory and is referenced with the line:
ENV PATCH_FILE=p26123830_122010_Linux-x86-64.zip
then the Docker script file continues with Mike's suggestions and leaves a similar entry point for this container as in the official Dockerfile.ee script.
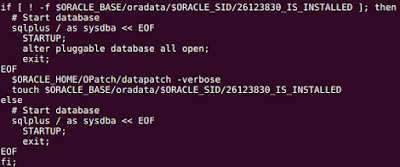
Finally startDB.sh script was modified to have a hook which control if the post apply stage of the patch was applied or not, here the logic:
docker build -t "oracle/database:12.2.0.1-ee-26123830" .Note that the process described above could be executed by an experimented DBA or a DevOps operator, and the process of stopping a production database and starting again with the patch installed could be executed by a novel DBA or any other operator.
Using DataPump on Oracle/Docker environment
 Image: oracletechnocampus blogContinuing with my previous post about Doing full hot backups with RMan now is time for Data Pump.
The example is how to backup a full schema from a RDBMS running as Docker container, let see, a DB started using:
$ docker run --name test \
-p 1521:1521 -p 5500:5500 \
-e ORACLE_SID=TEST \
-e ORACLE_PDB=PDB1 \
-e ORACLE_PWD=Oracle2017\! \
-v /home/data/db/test:/opt/oracle/oradata \
oracle/database:12.2.0.1-eeOnce the DB is ready to use and assuming that there is an SCOTT schema with one table for testing the steps for doing a full schema backup using DataPump are:
- Create a RDBMS directory object to allows backups on the container external directory
SQL> !mkdir -p /opt/oracle/oradata/backup
SQL> create directory bdir as '/opt/oracle/oradata/backup';
SQL> exit
- Start DataPump doing a full schema backup:
....
Total estimation using BLOCKS method: 13 MB
....
. . exported "SCOTT"."TEST_SOURCE_BIG" 10.92 MB 135795 rows
Dump file set for SYSTEM.SYS_EXPORT_SCHEMA_01 is:
/opt/oracle/oradata/backup/prod/scott.dmp
Job "SYSTEM"."SYS_EXPORT_SCHEMA_01" successfully completed at Wed Jun 7 19:13:18 2017 elapsed 0 00:01:03
ready, a full schema backup will be outside your container at /home/data/db/test/backup.
-rw-r----- 1 oracle oinstall 11743232 jun 7 16:13 scott.dmp
-rw-r--r-- 1 oracle oinstall 1983 jun 7 16:13 scott.log
Building my own Container Cloud Services on top of Oracle Cloud IaaS
Two weeks ago I presented in the ArOUG Cloud Day at Buenos Aires an introduction to Oracle Container Cloud Services (OCCS) and Oracle IaaS Compute management using console and API.
For this presentation I showed how to implement your Container Cloud Services (CCS) directly on top of IaaS compute.
Let's compare OCCS and my own CCS, here how they look like:
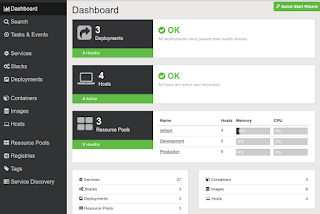 OCCS welcome page
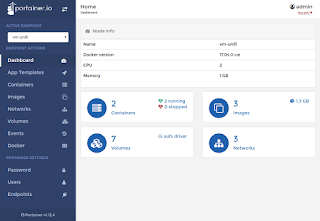 My CCS welcome pagethey look similar :), my own CCS is implemented using Portainer.io project.
Going deeper with both implementations I can resume the pros/cons as:
OCCS:
My CCS:
On the other side my CCS best feature is that supports Swarm and command line operation if you connect to the host OS using ssh, with Swarm support you have a serious implementation for Docker data center solution, specially compared with other orchestration solutions like Kubernetes, see this great post about Docker Swarm exceeds Kubernetes performance at scale.
If you want to test by your self my CCS I extended the scripts of my previous post Managing Oracle Cloud IaaS - The API way to include a Portainer console up and running after deployment of the ES cluster and Swarm Visualizer.
The scripts are available at my GitHub repository, basically it deploys Portainer console at the end of the script deploy-cluster.sh using this command line:
docker run -d --name portainer -p 9000:9000 -v /var/run/docker.sock:/var/run/docker.sock portainer/portainer -H unix:///var/run/docker.sock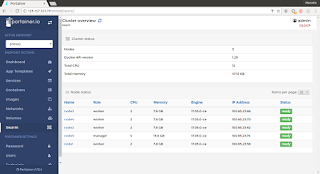 Swarm nodes
 Swarm Services Scale up/down op.
For this presentation I showed how to implement your Container Cloud Services (CCS) directly on top of IaaS compute.
Let's compare OCCS and my own CCS, here how they look like:
 OCCS welcome page
 My CCS welcome pagethey look similar :), my own CCS is implemented using Portainer.io project.
Going deeper with both implementations I can resume the pros/cons as:
OCCS:
- Pros
- Easy manage
- Pre-configured templates
- Fast jump-start, 1-click deploy
- Support for using official repository of Oracle images
- Cons:
- Host OS not configurable, ej. disk, semaphores, etc
- Old Docker version 1.12
- Not Swarm support
- Basic orchestration features
My CCS:
- Pros
- Latest Docker/Swarm version 17.04.0-ce
- Full Swarm support, scaling, upgrade, load-balancing
- One-click deploy
- Public templates (Portainer.io and LinuxServer.io)
- Graphical scaling Swarm services
- Console Log/Stats for services
- Full custom software/hardware selection
- Cons
- Oracle official repositories only available from command line
- Registry with login not supported in graphical interface, only command line
- A little complex deployment (scripts)
On the other side my CCS best feature is that supports Swarm and command line operation if you connect to the host OS using ssh, with Swarm support you have a serious implementation for Docker data center solution, specially compared with other orchestration solutions like Kubernetes, see this great post about Docker Swarm exceeds Kubernetes performance at scale.
If you want to test by your self my CCS I extended the scripts of my previous post Managing Oracle Cloud IaaS - The API way to include a Portainer console up and running after deployment of the ES cluster and Swarm Visualizer.
The scripts are available at my GitHub repository, basically it deploys Portainer console at the end of the script deploy-cluster.sh using this command line:
docker run -d --name portainer -p 9000:9000 -v /var/run/docker.sock:/var/run/docker.sock portainer/portainer -H unix:///var/run/docker.sock
if you grant access to the Swarm master host (node5 at the examples) to the port 9000 you will get access to the Portainer console as is showed at above screenshot, note that Portainer have access to the Unix socket /var/run/docker.sock to perform Swarm commands graphically.
You can also directly manage other nodes of the cluster in a native Docker way adding endpoints using TLS certificates generated during the step deploy-machines.sh.
Finally to see Portainer in action I recorded this simple walk through and below OCCS presentation.
 Swarm nodes
 Swarm Services Scale up/down op.
Doing RDBMS hot full backup using RMan when running on Docker
I think many databases are going in production now using Docker environment, specially with the official support provides by Oracle when allows pulling Docker images from official Docker store.
If you are using a custom build image using Oracle's official scripts you can do a hot full backup using RMAN as is described in this post.
We will test using a container started as:
[mochoa@localhost ols-official]$ docker run -d --privileged=true --name test --hostname test --shm-size=1g -p 1521:1521 -p 5500:5500 -e ORACLE_SID=TEST -e ORACLE_PDB=PDB1 -v /etc/timezone:/etc/timezone:ro -e TZ="America/Argentina/Buenos_Aires" -v /home/data/db/test:/opt/oracle/oradata oracle/database:12.1.0.2-ee
SQL> SELECT LOG_MODE FROM SYS.V$DATABASE;
LOG_MODE------------ NOARCHIVELOG
If you are using a custom build image using Oracle's official scripts you can do a hot full backup using RMAN as is described in this post.
We will test using a container started as:
[mochoa@localhost ols-official]$ docker run -d --privileged=true --name test --hostname test --shm-size=1g -p 1521:1521 -p 5500:5500 -e ORACLE_SID=TEST -e ORACLE_PDB=PDB1 -v /etc/timezone:/etc/timezone:ro -e TZ="America/Argentina/Buenos_Aires" -v /home/data/db/test:/opt/oracle/oradata oracle/database:12.1.0.2-ee
Note that datafiles and other RDBMS persistent data are stored at /home/data/db/test host directory.
To connect as SYSDBA to above running container do:
[mochoa@localhost ols-official]$ docker exec -ti test bash [oracle@test ~]$ sqlplus "/ as sysdba"First checks if your database is running in archive log mode:SQL> SELECT LOG_MODE FROM SYS.V$DATABASE;
LOG_MODE------------ NOARCHIVELOG
If no, enable using the steps described in this page, login using bash and performs following steps connected as SYSDBA:
SQL> SHUTDOWN IMMEDIATE SQL> STARTUP MOUNT SQL> ALTER DATABASE ARCHIVELOG; SQL> ALTER DATABASE OPEN; SQL> SELECT LOG_MODE FROM SYS.V$DATABASE;
LOG_MODE------------ ARCHIVELOG
LOG_MODE------------ ARCHIVELOG
you can force RDBMS to generate a log file to see which directory is defined for redo log backups, for example:
SQL> ALTER SYSTEM SWITCH LOGFILE;
usually is defined by the parameter log_archive_dest, but if it empty the Docker image is doing backup at the container directory:
/opt/oracle/oradata/fast_recovery_area/${ORACLE_SID}/archivelog/yyyy_mm_dd/Once you have your database up and running in archive log mode using RMAN utility a full daily backup can be configured in your /etc/cron.daily/ host directory as:
[mochoa@localhos ols-official]$ cat /etc/cron.daily/backup-db.sh #!/bin/bash docker exec test /opt/oracle/product/12.1.0.2/dbhome_1/bin/rman target=/ cmdfile='/opt/oracle/oradata/backup_full_compressed.sh' log='/opt/oracle/oradata/backup_archive.log'where backup_full_compressed.sh is an RMAN's script as:
delete force noprompt obsolete; run { configure controlfile autobackup on; configure default device type to disk; configure device type disk parallelism 1; configure controlfile autobackup format for device type disk clear; allocate channel c1 device type disk; backup format '/opt/oracle/oradata/backup/prod/%d_%D_%M_%Y_%U' as compressed backupset database; } delete force noprompt obsolete;
during the full backup you can see RMAN's output at the host file:
/home/data/db/test/backup_archive.logor container file:
/opt/oracle/oradata/backup_archive.logit looks like:
Recovery Manager: Release 12.1.0.2.0 - Production on Sat May 27 09:18:54 2017
Copyright (c) 1982, 2014, Oracle and/or its affiliates. All rights reserved.
connected to target database: TEST (DBID=2242310144)
RMAN> delete force noprompt obsolete;2> run3> {4> configure controlfile autobackup on;5> configure default device type to disk;6> configure device type disk parallelism 1;7> configure controlfile autobackup format for device type disk clear;8> allocate channel c1 device type disk;9> backup format '/opt/oracle/oradata/backup/prod/%d_%D_%M_%Y_%U' as compressed backupset database;10> }11> delete force noprompt obsolete;12> using target database control file instead of recovery catalogRMAN retention policy will be applied to the commandRMAN retention policy is set to redundancy 1allocated channel: ORA_DISK_1channel ORA_DISK_1: SID=365 device type=DISK....Deleting the following obsolete backups and copies:Type Key Completion Time Filename/Handle-------------------- ------ ------------------ --------------------Backup Set 5 26-MAY-17 Backup Piece 5 26-MAY-17 /opt/oracle/oradata/backup/prod/TEST_26_05_2017_05s57dn5_1_1Backup Set 6 26-MAY-17 Backup Piece 6 26-MAY-17 /opt/oracle/oradata/backup/prod/TEST_26_05_2017_06s57dti_1_1Backup Set 7 26-MAY-17 Backup Piece 7 26-MAY-17 /opt/oracle/oradata/backup/prod/TEST_26_05_2017_07s57e1g_1_1Archive Log 3 27-MAY-17 /opt/oracle/oradata/fast_recovery_area/TEST/archivelog/2017_05_27/o1_mf_1_48_dllv53d2_.arcBackup Set 8 26-MAY-17 Backup Piece 8 26-MAY-17 /opt/oracle/oradata/fast_recovery_area/TEST/autobackup/2017_05_26/o1_mf_s_945010852_dljvbpfq_.bkpdeleted backup piecebackup piece handle=/opt/oracle/oradata/backup/prod/TEST_26_05_2017_05s57dn5_1_1 RECID=5 STAMP=945010405deleted backup piecebackup piece handle=/opt/oracle/oradata/backup/prod/TEST_26_05_2017_06s57dti_1_1 RECID=6 STAMP=945010610deleted backup piecebackup piece handle=/opt/oracle/oradata/backup/prod/TEST_26_05_2017_07s57e1g_1_1 RECID=7 STAMP=945010736deleted archived logarchived log file name=/opt/oracle/oradata/fast_recovery_area/TEST/archivelog/2017_05_27/o1_mf_1_48_dllv53d2_.arc RECID=3 STAMP=945076211deleted backup piecebackup piece handle=/opt/oracle/oradata/fast_recovery_area/TEST/autobackup/2017_05_26/o1_mf_s_945010852_dljvbpfq_.bkp RECID=8 STAMP=945010854Deleted 5 objects
Recovery Manager complete.
and that's all when your host cron.daily script finish your full backup is at /home/data/db/test/backup/prod, note that a 3.7Gb datafiles only produce 695Mb size files and took a few minutes to do that.
Managing Oracle Cloud IaaS - The API way
My last post shows how to deploy, for example, a Docker Swarm cluster at Oracle Cloud IaaS services.
This time I'll show you how to do the same without using the Web interface, I am an old fashioned sysadmin and I loves scripting and console tools ;)
The idea is to create a set of 5 nodes of Docker swarm cluster in five steps:
Oracle provides a complete set of URL end points to manage all the infrastructure of your needs, here an example of the functionalities:
as you can see it virtually cover all your needs for managing the cloud infrastructure.
Before start you need some basic information to manage the cloud through the API.
above information usually is included at the welcome mail when you register a cloud account, here an screenshot:
here a full explanation on how to deal with above information.
Also using the compute UI I uploaded a public ssh key named ubnt.pub, imports an Ubuntu 16.10 compute image from the Cloud Market place:
and allowing ssh access to my compute instances.
Once you have user/password/identity/API endpoint information you are able to log using CURl Linux command line required to test my shell examples, you can see on-line at my GitHub account.
Step one - Deploy storage create disk VMsdeploy-storage.sh script basically creates a boot disk for your VM and data disk to store Docker repository (aufs backed storage on top of ext4 file-system)
Here an example calling the scripts with proper arguments:
[mochoa@localhost es]$ export API_URL="https://api-z999.compute.us0.oraclecloud.com/"
[mochoa@localhost es]$ export COMPUTE_COOKIE="Set-Cookie: nimbula=eyJpZGVudGl0eSI6ICJ7XCJyZWFsbVwiOiBcImNvbXB1dGUtdXM2LXoyOFwiLCBcInZhbHVlXCI6IFwie1xcXCJjdXN0b21lclxcXCI6IFxcXCJDb21wdXRlLWFjbWVjY3NcXFwiLCBcXFwicmVhbG1cXFwiOiBcXFwiY29tcHV0ZS11czYtejI4XFxcIiwgXFxcImVudGl0eV90eXBlXFxcIjogXFxcInVzZXJcXFwiLCBcXFwic2Vzc2lvbl9leHBpcmVzXFxcIjogMTQ2MDQ4NjA5Mi44MDM1NiwgXFxcImV4cGlyZXNcXFwiOiAxNDYwNDc3MDkyLjgwMzU5MiwgXFxcInVzZXJcXFwiOiBcXFwiL0NvbXB1dGUtYWNtZWNjcy9zeWxhamEua2FubmFuQG9yYWNsZS5jb21cXFwiLCBcXFwiZ3JvdXBzXFxcIjogW1xcXCIvQ29tcHV0ZS1hY21lY2NzL0NvbXB1dGUuQ29tcHV0ZV9PcGVyYXRpb25zXFxcIiwgXFxcIi9Db21wdXRlLWFjbWVjY3MvQ29tcHV0ZS5Db21wdXRlX01vbml0b3JcXFwiXX1cIiwgXCJzaWduYXR1cmVcIjogXCJRT0xaeUZZdU54SmdjL3FuSk16MDRnNmRWVng2blY5S0JpYm5zeFNCWXJXcVVJVGZmMkZtdjhoTytaVnZwQVdURGpwczRNMHZTc2RocWw3QmM0VGJpSmhFTWVyNFBjVVgvb05qd2VpaUcyaStBeDBPWmc3SDJFSjRITWQ0S1V3eTl6NlYzRHd4eUhwTjdqM0w0eEFUTDUyeVpVQWVQK1diMkdzU1pjMmpTaHZyNi9ibU1CZ1Nyd2M4MUdxdURBMFN6d044V2VneUF1YVk5QTUxZmxaanJBMGVvVUJudmZ6NGxCUVVIZXloYyt0SXZVaDdUcGU2RGwxd3RSeFNGVVlQR0FEQk9xMExGaVd1QlpaU0FTZVcwOHBZcEZ2a2lOZXdPdU9LaU93dFc3VkFtZ3VHT0E1Yk1ibzYvMm5oZEhTWHJhYmtsY000UVE1LzZUMDJlZUpTYVE9PVwifSJ9; Path=/; Max-Age=1800"
[mochoa@localhost es]$ ./deploy-storage.sh "$COMPUTE_COOKIE" "$API_URL"
-----------------
Creating Nodes...
-----------------
creating oc1 node...
This time I'll show you how to do the same without using the Web interface, I am an old fashioned sysadmin and I loves scripting and console tools ;)
The idea is to create a set of 5 nodes of Docker swarm cluster in five steps:
- Deploy storage (Disks)
- Deploy instances (VMs)
- Deploy Docker
- Deploy Docker Machine
- Deploy Swarm
Oracle provides a complete set of URL end points to manage all the infrastructure of your needs, here an example of the functionalities:
- Accounts
- ACLs
- Images
- IP Address
- Orchestrations
- Security
- Snapshots
- Storage
- Virtual NICs
- VPN
as you can see it virtually cover all your needs for managing the cloud infrastructure.
Before start you need some basic information to manage the cloud through the API.
- Username/Password cloud access
- Indentity domain
above information usually is included at the welcome mail when you register a cloud account, here an screenshot:
here a full explanation on how to deal with above information.
Also using the compute UI I uploaded a public ssh key named ubnt.pub, imports an Ubuntu 16.10 compute image from the Cloud Market place:
and allowing ssh access to my compute instances.
Once you have user/password/identity/API endpoint information you are able to log using CURl Linux command line required to test my shell examples, you can see on-line at my GitHub account.
Step one - Deploy storage create disk VMsdeploy-storage.sh script basically creates a boot disk for your VM and data disk to store Docker repository (aufs backed storage on top of ext4 file-system)
Here an example calling the scripts with proper arguments:
[mochoa@localhost es]$ export API_URL="https://api-z999.compute.us0.oraclecloud.com/"
[mochoa@localhost es]$ export COMPUTE_COOKIE="Set-Cookie: nimbula=eyJpZGVudGl0eSI6ICJ7XCJyZWFsbVwiOiBcImNvbXB1dGUtdXM2LXoyOFwiLCBcInZhbHVlXCI6IFwie1xcXCJjdXN0b21lclxcXCI6IFxcXCJDb21wdXRlLWFjbWVjY3NcXFwiLCBcXFwicmVhbG1cXFwiOiBcXFwiY29tcHV0ZS11czYtejI4XFxcIiwgXFxcImVudGl0eV90eXBlXFxcIjogXFxcInVzZXJcXFwiLCBcXFwic2Vzc2lvbl9leHBpcmVzXFxcIjogMTQ2MDQ4NjA5Mi44MDM1NiwgXFxcImV4cGlyZXNcXFwiOiAxNDYwNDc3MDkyLjgwMzU5MiwgXFxcInVzZXJcXFwiOiBcXFwiL0NvbXB1dGUtYWNtZWNjcy9zeWxhamEua2FubmFuQG9yYWNsZS5jb21cXFwiLCBcXFwiZ3JvdXBzXFxcIjogW1xcXCIvQ29tcHV0ZS1hY21lY2NzL0NvbXB1dGUuQ29tcHV0ZV9PcGVyYXRpb25zXFxcIiwgXFxcIi9Db21wdXRlLWFjbWVjY3MvQ29tcHV0ZS5Db21wdXRlX01vbml0b3JcXFwiXX1cIiwgXCJzaWduYXR1cmVcIjogXCJRT0xaeUZZdU54SmdjL3FuSk16MDRnNmRWVng2blY5S0JpYm5zeFNCWXJXcVVJVGZmMkZtdjhoTytaVnZwQVdURGpwczRNMHZTc2RocWw3QmM0VGJpSmhFTWVyNFBjVVgvb05qd2VpaUcyaStBeDBPWmc3SDJFSjRITWQ0S1V3eTl6NlYzRHd4eUhwTjdqM0w0eEFUTDUyeVpVQWVQK1diMkdzU1pjMmpTaHZyNi9ibU1CZ1Nyd2M4MUdxdURBMFN6d044V2VneUF1YVk5QTUxZmxaanJBMGVvVUJudmZ6NGxCUVVIZXloYyt0SXZVaDdUcGU2RGwxd3RSeFNGVVlQR0FEQk9xMExGaVd1QlpaU0FTZVcwOHBZcEZ2a2lOZXdPdU9LaU93dFc3VkFtZ3VHT0E1Yk1ibzYvMm5oZEhTWHJhYmtsY000UVE1LzZUMDJlZUpTYVE9PVwifSJ9; Path=/; Max-Age=1800"
[mochoa@localhost es]$ ./deploy-storage.sh "$COMPUTE_COOKIE" "$API_URL"
COMPUTE_COOKIE value is generated as is described into the section Step 5: Get an Authentication Cookie. API_URL is the information showed at the Compute console UI Dashboard.
The shell script basically parse a file with cloud hosts with this syntax:
oc1 129.144.12.125 es_ingest
oc2 129.144.12.234 es_data
oc3 129.144.12.229 es_data
oc4 129.144.12.74 es_master
oc5 129.144.12.140 es_master
oc2 129.144.12.234 es_data
oc3 129.144.12.229 es_data
oc4 129.144.12.74 es_master
oc5 129.144.12.140 es_master
during storage operations only first column is used to create a 10Gb boot disk named boot_[instance_name] of type storage/default and boot enabled, and a repository disk named repo_[instance_name] with 45Gb size and type storage/latency designed for fast data access.
After a few seconds you can see the storage created as is shown below:
Step two - Create instances (VMs)Once your storages are all on-line the script deploy-machines.sh will create your VMs, here a command line example, note that the COMPUTE_COOKIE should be valid, this cookie expire after 1800 seconds, once expired you have to call again to the login call.
deploy-machines also use cloud.hosts file first column to named your instances and to locate the properly storage.
[mochoa@localhost es]$ ./deploy-nodes.sh "$COMPUTE_COOKIE" "$API_URL"-----------------
Creating Nodes...
-----------------
creating oc1 node...
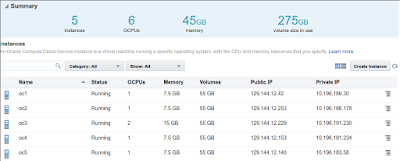
after a few minutes all your instances will be ready as is show below:
at this time you see actual public IPs assigned to the instances, you have to edit cloud.hosts file using above information.
Step three - Deploy Docker softwaredeploy-docker.sh will use first two columns of cloud.hosts file, instance name and public IP for accessing using SSH.
Unlike previous scripts it requires your private ssh key (associated to the public one uploaded using Compute UI web pages), here a sample call:
[mochoa@localhost es]$ ./deploy-docker.sh /home/mochoa/Documents/Scotas/ubnt
----------------------------
Deploying Docker to nodes...
----------------------------
Deploying oc1 node with docker software ...
# Host 129.144.12.125 found: line 285
/home/mochoa/.ssh/known_hosts updated.
Original contents retained as /home/mochoa/.ssh/known_hosts.old
----------------------------
Deploying Docker to nodes...
----------------------------
Deploying oc1 node with docker software ...
# Host 129.144.12.125 found: line 285
/home/mochoa/.ssh/known_hosts updated.
Original contents retained as /home/mochoa/.ssh/known_hosts.old
the shell mainly pulla an script named oracle-cloud-node-conf.sh which do all the post installation steps to get and Ubuntu 16.10 OS updated and with Docker software installed, also prepares and ext4 partition using /dev/xvdc the disk named repo_[instance_name] during instance creation time, finally reboot the instance to get the new kernel updated.
Step four - Deploy Docker Machine software (cloud side and local side)Docker Machine software is designed to manage from command line your Docker Cloud instances, it is designed to use custom drivers such as VirtualBox or AWS, for Oracle Cloud there isn't a driver but you can register your Cloud instances as generic instances managed using SSH.
deploy-machines.sh also uses first two columns of cloud.hosts file and needs your SSH private key file, here a sample call:
[mochoa@localhost es]$ ./deploy-machines.sh /home/mochoa/Documents/Scotas/ubnt
-------------------------------------
Deploying docker-machine for nodes...
-------------------------------------
Creating oc1 docker-machine ...
Running pre-create checks...
Creating machine...
(oc1) Importing SSH key...
Waiting for machine to be running, this may take a few minutes...
Step five - Init Docker Swarm-------------------------------------
Deploying docker-machine for nodes...
-------------------------------------
Creating oc1 docker-machine ...
Running pre-create checks...
Creating machine...
(oc1) Importing SSH key...
Waiting for machine to be running, this may take a few minutes...
Last step also uses first two columns of your cloud.hosts file, and receives only one argument which defines which instance is defined as Swarm master node.
deploy-swarm.sh uses your docker-machine(s) created in previous step, here an example call:
[mochoa@localhost es]$ ./deploy-swarm.sh oc5
----------------------------
Deploying swarm for nodes...
----------------------------
----------------------------
Deploying swarm for nodes...
----------------------------
at this point you your Docker Swarm cluster is ready to use.
Testing with Elastic Search imagesAs in my previous post Deploying an ElasticSearch cluster at Oracle Cloud, a Swarm Cluster could be easily tested using Elastic Search cluster, I modified the script deploy-cluster.sh, to use cloud.hosts information and label the Swarm cluster using third column of cloud.hosts file and finally build my custom Docker images and start the cluster, here a sample usage:
[mochoa@localhost es]$ ./deploy-cluster.sh oc5
----------------------------
Deploying swarm for nodes...
----------------------------
-----------------------------------------
Building private ES image on all nodes...
-----------------------------------------
Building ES at oc1 node ...
----------------------------
Deploying swarm for nodes...
----------------------------
-----------------------------------------
Building private ES image on all nodes...
-----------------------------------------
Building ES at oc1 node ...
oc5 argument is the instance defined into previous step as Swarm master node, the script also leaves running a Swarm Visualizer using 8080 port of oc5 instance and Cerebro ES monitoring tool at port 9000.
As you can see after you have your scripts ready to use the Cloud infrastructure will be ready in minutes if use Cloud API.
Scaling up/down Oracle Cloud Swarm services
Following with last post about how to deploy an Elastic Search (ES) cluster at Oracle Cloud facilities this post will play with scaling up and down a Swarm service.
We have an ES cluster deployed including a master node, four data nodes and one ingest node:
$ eval $(docker-machine env oc5)
[oc5]$ docker service ls
ID NAME MODE REPLICAS IMAGE
a32wxoob53hv es_ingest replicated 1/1 elasticsearch/swarm:5.0.0
crjhzsunyj12 es_master replicated 1/1 elasticsearch/swarm:5.0.0
w7abwyokpp6d es_data replicated 4/4 elasticsearch/swarm:5.0.0
Then using en example provides by the book Elastic Search 5.x Cookbook by Packt Publishing chapter 8 I uploaded at ingest node 1000 documents:
$ eval (docker-machine env oc1)
[oc1] docker ps
CONTAINER ID IMAGE COMMAND CREATED STATUS PORTS NAMES
98dd1e6882f4 elasticsearch/swarm:5.0.0 "/docker-entrypoin..." About an hour ago Up About an hour 9200/tcp, 9300/tcp es_ingest.1.svszgk01qrupuk9o7uloakprp
[oc1] docker exec -ti es_ingest.1.svszgk01qrupuk9o7uloakprp bash
root@98dd1e6882f4:/usr/share/elasticsearch# curl -XHEAD 'http://192.168.0.8:9200/test-index?pretty=true'
root@98dd1e6882f4:/usr/share/elasticsearch# curl -XDELETE 'http://192.168.0.8:9200/test-index?pretty=true'
root@98dd1e6882f4:/usr/share/elasticsearch# curl -XHEAD 'http://192.168.0.8:9200/test-index?pretty=true'
root@98dd1e6882f4:/usr/share/elasticsearch# curl -H "Expect:" -XPUT 'http://192.168.0.8:9200/test-index?pretty=true' -d '{"mappings": {"test-type": {"properties": {"name": {"term_vector": "with_positions_offsets", "boost": 1.0, "store": "yes", "type": "text"}, "title": {"term_vector": "with_positions_offsets", "boost": 1.0, "store": "yes", "type": "text"}, "parsedtext": {"index": "analyzed", "term_vector": "with_positions_offsets", "boost": 1.0, "store": "yes", "type": "text"}, "tag": {"type": "keyword", "store": "yes"}, "date": {"type": "date", "store": "yes"}, "position": {"type": "geo_point", "store": "yes"}, "uuid": {"store": "yes", "type": "keyword"}}}}, "settings": {"index.number_of_replicas": 1, "index.number_of_shards": 5}}'
root@98dd1e6882f4:/usr/share/elasticsearch# curl -XPOST 'http://192.168.0.8:9200/test-index/_refresh?pretty=true'
root@98dd1e6882f4:/usr/share/elasticsearch# curl -XGET 'http://192.168.0.8:9200/_cluster/health?wait_for_status=green&timeout=0s&pretty=true'
root@98dd1e6882f4:/usr/share/elasticsearch# curl -H "Expect:" -XPUT 'http://192.168.0.8:9200/test-index/test-type/1?pretty=true' -d '{"in_stock": false, "tag": ["perspiciatis", "ullam", "excepturi", "ex"], "name": "Valkyrie", "date": "2014-07-28T16:46:01.668683", "position": {"lat": -17.9940459163244, "lon": -15.110538312702941}, "age": 49, "metadata": [{"num": 5, "name": "Korrek", "value": "3"}, {"num": 5, "name": "Namora", "value": "5"}, {"num": 26, "name": "Nighthawk", "value": "3"}], "price": 19.62106010941592, "description": "ducimus nobis harum doloribus voluptatibus libero nisi omnis officiis exercitationem amet odio odit dolor perspiciatis minima quae voluptas dignissimos facere ullam tempore temporibus laboriosam ad doloremque blanditiis numquam placeat accusantium at maxime consectetur esse earum velit officia dolorum corporis nemo consequatur perferendis cupiditate eum illum facilis sunt saepe"}'
....
es_data scaled to 6
We have an ES cluster deployed including a master node, four data nodes and one ingest node:
$ eval $(docker-machine env oc5)
[oc5]$ docker service ls
ID NAME MODE REPLICAS IMAGE
a32wxoob53hv es_ingest replicated 1/1 elasticsearch/swarm:5.0.0
crjhzsunyj12 es_master replicated 1/1 elasticsearch/swarm:5.0.0
w7abwyokpp6d es_data replicated 4/4 elasticsearch/swarm:5.0.0
$ eval (docker-machine env oc1)
[oc1] docker ps
CONTAINER ID IMAGE COMMAND CREATED STATUS PORTS NAMES
98dd1e6882f4 elasticsearch/swarm:5.0.0 "/docker-entrypoin..." About an hour ago Up About an hour 9200/tcp, 9300/tcp es_ingest.1.svszgk01qrupuk9o7uloakprp
[oc1] docker exec -ti es_ingest.1.svszgk01qrupuk9o7uloakprp bash
root@98dd1e6882f4:/usr/share/elasticsearch# curl -XHEAD 'http://192.168.0.8:9200/test-index?pretty=true'
root@98dd1e6882f4:/usr/share/elasticsearch# curl -XDELETE 'http://192.168.0.8:9200/test-index?pretty=true'
root@98dd1e6882f4:/usr/share/elasticsearch# curl -XHEAD 'http://192.168.0.8:9200/test-index?pretty=true'
root@98dd1e6882f4:/usr/share/elasticsearch# curl -H "Expect:" -XPUT 'http://192.168.0.8:9200/test-index?pretty=true' -d '{"mappings": {"test-type": {"properties": {"name": {"term_vector": "with_positions_offsets", "boost": 1.0, "store": "yes", "type": "text"}, "title": {"term_vector": "with_positions_offsets", "boost": 1.0, "store": "yes", "type": "text"}, "parsedtext": {"index": "analyzed", "term_vector": "with_positions_offsets", "boost": 1.0, "store": "yes", "type": "text"}, "tag": {"type": "keyword", "store": "yes"}, "date": {"type": "date", "store": "yes"}, "position": {"type": "geo_point", "store": "yes"}, "uuid": {"store": "yes", "type": "keyword"}}}}, "settings": {"index.number_of_replicas": 1, "index.number_of_shards": 5}}'
root@98dd1e6882f4:/usr/share/elasticsearch# curl -XPOST 'http://192.168.0.8:9200/test-index/_refresh?pretty=true'
root@98dd1e6882f4:/usr/share/elasticsearch# curl -XGET 'http://192.168.0.8:9200/_cluster/health?wait_for_status=green&timeout=0s&pretty=true'
root@98dd1e6882f4:/usr/share/elasticsearch# curl -H "Expect:" -XPUT 'http://192.168.0.8:9200/test-index/test-type/1?pretty=true' -d '{"in_stock": false, "tag": ["perspiciatis", "ullam", "excepturi", "ex"], "name": "Valkyrie", "date": "2014-07-28T16:46:01.668683", "position": {"lat": -17.9940459163244, "lon": -15.110538312702941}, "age": 49, "metadata": [{"num": 5, "name": "Korrek", "value": "3"}, {"num": 5, "name": "Namora", "value": "5"}, {"num": 26, "name": "Nighthawk", "value": "3"}], "price": 19.62106010941592, "description": "ducimus nobis harum doloribus voluptatibus libero nisi omnis officiis exercitationem amet odio odit dolor perspiciatis minima quae voluptas dignissimos facere ullam tempore temporibus laboriosam ad doloremque blanditiis numquam placeat accusantium at maxime consectetur esse earum velit officia dolorum corporis nemo consequatur perferendis cupiditate eum illum facilis sunt saepe"}'
....
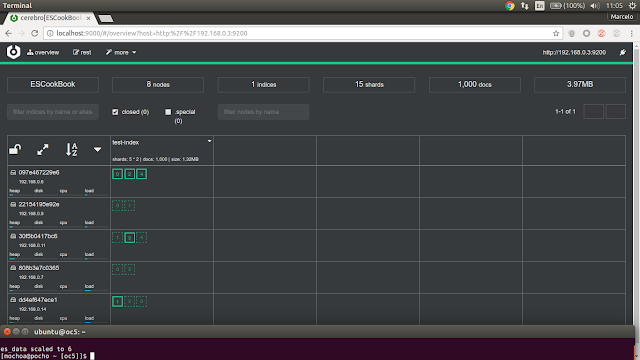
after the index is populated with documents Cerebro show this state:
the cluster is in green state with four data nodes and test-index included 5 shards and 2 replicas, now I'll scale up our cluster with two data nodes more:
[oc5]$ docker service scale es_data=6es_data scaled to 6
after a few seconds ES detects two new nodes at the cluster
and shards and replicas start being relocated to the new facilites, this end with:
now We scale down our cluster removing one node, this simulate for example a hardware failure:
ES cluster detect a missing node and change to yellow state, after a few second a recovery process starts and re-balance all shard/replica to a new topology:
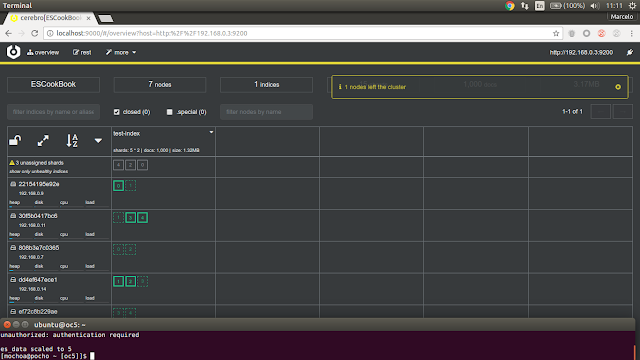
but what happen if scale down to only two nodes:
our ES cluster is re-balanced and working but still in red state which means that is not compliant with a fault tolerance preference for the index (there are 7 unassigned shard), and We missed 201 documents :(.
Well my personal conclusions about scale up/down facilities with Docker Swarm and ES are:
- if you have a large cluster you could perfectly work with ephemeral storage in docker instances/services, remember that We never mention that our ES storage is defined externally so when scale up/down services Docker instances are created/removed discarding the index storage
- if the ES cluster have a lot nodes you could think that is Torrent storage which means that independently if nodes are added or deleted you always have your index data persistent and the cluster is moving from green to yellow and back to green again
- when nodes are added or deleted there will be a portion of time where your interconnect network have more traffic and the CPU usage of the nodes are up
- you can pickup an NFS storage and mount in all swarm nodes using similar path, then using ES snapshot you can do a secure backup of the data, also there are drivers for doing snapshot using HDFS or S3.
next try will be with Oracle NoSQL cluster.
Deploying an ElasticSearch cluster at Oracle Cloud
Continuing with my previous post about how to deploy a Docker Swarm Cluster at Oracle Cloud the idea now is how to deploy as example an Elastic Search cluster with these characteristics:
a complete set of scripts used in this post is at GitHub, click here for more details.
Swarm nodes preparationFirst We will tag our cluster of five nodes with some tags to control our ES cluster allocation.
To do that using docker-machine to submit commands to the Swarm cluster do, remember oc4 and oc5 are Swarm master capable nodes:
$ eval $(docker-machine env oc5)
[oc5] $ docker node update --label-add type=es_master oc5
[oc5] $ docker node update --label-add type=es_master oc4
[oc5] $ docker node update --label-add type=es_data oc3
[oc5] $ docker node update --label-add type=es_data oc2
[oc5] $ docker node update --label-add type=es_ingest oc1in my test official Elastic Search 5.0.0 image do not work well to recognize the primary host name on Swarm nodes, so I decided to use a custom ES image, We can build this image on each node with:
$ eval $(docker-machine env oc5)
[oc5]$ git clone https://github.com/marcelo-ochoa/docker.git
[oc5]$ cd docker/es
[oc5]$ docker build -t "elasticsearch/swarm:5.0.0" .
Step 1/6 : FROM elasticsearch:5.0.0
5.0.0: Pulling from library/elasticsearch
386a066cd84a: Pull complete
.....
Step 6/6 : CMD elasticsearch
---> Running in a6dd5fb17cf8
---> 2f1c7bfe6c67
Removing intermediate container a6dd5fb17cf8
Successfully built 2f1c7bfe6c67
[oc5]$ eval $(docker-machine env oc4)
[oc4]$ docker build -t "elasticsearch/swarm:5.0.0" .
.....
[oc1]$ docker build -t "elasticsearch/swarm:5.0.0" .[oc1]$ eval $(docker-machine env oc5)
[oc5]$ docker network create -d overlay --attachable --subnet=192.168.0.0/24 es_cluster
[oc4]$ docker run -d \
--name viz \
-p 8080:8080 \
--net es_cluster \
-v /var/run/docker.sock:/var/run/docker.sock manomarks/visualizer:latest
because es_master was starting at OC5 node we can see the log output with:
[oc4]$ docker run -d \
-p 9000:9000 \
--net es_cluster \
--env JAVA_OPTS="-Djava.net.preferIPv4Stack=true" \
--name cerebro yannart/cerebro:latest
[oc5]$ docker service scale es_data=4
es_data scaled to 4
[oc5]$ docker service scale es_ingest=2
es_ingest scaled to 2
[oc5]$ docker service ls
ID NAME MODE REPLICAS IMAGE
o4x15kklu520 es_master replicated 1/1 elasticsearch/swarm:5.0.0
ue10tw8c64be es_ingest replicated 2/2 elasticsearch/swarm:5.0.0
w9cpobrxvay1 es_data replicated 4/4 elasticsearch/swarm:5.0.0
- One node working as master
- Two node working as data nodes
- One node working as ingest node
a complete set of scripts used in this post is at GitHub, click here for more details.
Swarm nodes preparationFirst We will tag our cluster of five nodes with some tags to control our ES cluster allocation.
To do that using docker-machine to submit commands to the Swarm cluster do, remember oc4 and oc5 are Swarm master capable nodes:
$ eval $(docker-machine env oc5)
[oc5] $ docker node update --label-add type=es_master oc5
[oc5] $ docker node update --label-add type=es_master oc4
[oc5] $ docker node update --label-add type=es_data oc3
[oc5] $ docker node update --label-add type=es_data oc2
[oc5] $ docker node update --label-add type=es_ingest oc1in my test official Elastic Search 5.0.0 image do not work well to recognize the primary host name on Swarm nodes, so I decided to use a custom ES image, We can build this image on each node with:
$ eval $(docker-machine env oc5)
[oc5]$ git clone https://github.com/marcelo-ochoa/docker.git
[oc5]$ cd docker/es
[oc5]$ docker build -t "elasticsearch/swarm:5.0.0" .
Step 1/6 : FROM elasticsearch:5.0.0
5.0.0: Pulling from library/elasticsearch
386a066cd84a: Pull complete
.....
Step 6/6 : CMD elasticsearch
---> Running in a6dd5fb17cf8
---> 2f1c7bfe6c67
Removing intermediate container a6dd5fb17cf8
Successfully built 2f1c7bfe6c67
[oc5]$ eval $(docker-machine env oc4)
[oc4]$ docker build -t "elasticsearch/swarm:5.0.0" .
.....
[oc1]$ docker build -t "elasticsearch/swarm:5.0.0" .
once we have a modified image built on each node of the Swarm cluster, we can start deploying Swarm services, before that We built an specific private interconnect network for our ES cluster with the posibilty of attaching other containers, specifically I'll attach:
- Swarm visualizer to see our cluster allocation
- Cerebro ES monitoring tool
[oc5]$ docker network create -d overlay --attachable --subnet=192.168.0.0/24 es_cluster
Once we have the network a Swarm visualizer could be started on oc5 or oc4 master nodes:
[oc5]$ eval $(docker-machine env oc4)[oc4]$ docker run -d \
--name viz \
-p 8080:8080 \
--net es_cluster \
-v /var/run/docker.sock:/var/run/docker.sock manomarks/visualizer:latest
to not open another port on oc4 node We can simple connect to swarm visualizer using an ssh tunnel, for example:
ssh -i /home/mochoa/Documents/Scotas/ubnt -L8080:localhost:8080 ubuntu@oc4then access to http://localhost:8080/ here a sample output
OK, get ready to start deploying our ES cluster, first jump ES master:
[oc4]$ eval $(docker-machine env oc5) [oc5]$ docker service create --network es_cluster --name es_master --constraint 'node.labels.type == es_master' --replicas=1 --publish 9200:9200/tcp --env ES_JAVA_OPTS="-Xms1g -Xmx1g" elasticsearch/swarm:5.0.0 -E cluster.name="ESCookBook" -E node.master=true -E node.data=false -E discovery.zen.ping.unicast.hosts=es_master [oc5]$ docker service ls ID NAME MODE REPLICAS IMAGEo4x15kklu520 es_master replicated 1/1 elasticsearch/swarm:5.0.0[oc5]$ docker service ps es_masterID NAME IMAGE NODE DESIRED STATE CURRENT STATE ERROR PORTSn4a8tibaqxpw es_master.1 elasticsearch/swarm:5.0.0 oc5 Running Running 17 seconds ago [oc5]$ docker ps CONTAINER ID IMAGE COMMAND CREATED STATUS PORTS NAMESad8a2ce40f68 elasticsearch/swarm:5.0.0 "/docker-entrypoin..." 2 minutes ago Up 2 minutes 9200/tcp, 9300/tcp es_master.1.n4a8tibaqxpwwlcrjt33ywqry [oc5]4 docker logs ad8a2ce40f68 [2017-03-09T19:23:15,427][INFO ][o.e.n.Node ] [ad8a2ce40f68] initializing ........[2017-03-09T19:23:21,812][INFO ][o.e.n.Node ] [ad8a2ce40f68] started[2017-03-09T19:23:21,900][INFO ][o.e.g.GatewayService ] [ad8a2ce40f68] recovered [0] indices into cluster_state
now adding two data nodes and one ingest node:
[oc5]$ docker service create --network es_cluster --name es_data --constraint 'node.labels.type == es_data' --replicas=2 --env ES_JAVA_OPTS="-Xms1g -Xmx1g" elasticsearch/swarm:5.0.0 -E cluster.name="ESCookBook" -E node.master=false -E node.data=true -E discovery.zen.ping.unicast.hosts=es_master [oc5]$ docker service create --network es_cluster --name es_ingest --constraint 'node.labels.type == es_ingest' --replicas=1 --env ES_JAVA_OPTS="-Xms1g -Xmx1g" elasticsearch/swarm:5.0.0 -E cluster.name="ESCookBook" -E node.master=false -E node.data=false -E node.ingest=true -E discovery.zen.ping.unicast.hosts=es_master [oc5]$ docker service ls
ID NAME MODE REPLICAS IMAGE
o4x15kklu520 es_master replicated 1/1 elasticsearch/swarm:5.0.0
ue10tw8c64be es_ingest replicated 1/1 elasticsearch/swarm:5.0.0
w9cpobrxvay1 es_data replicated 2/2 elasticsearch/swarm:5.0.0 [oc5]]$ docker service ps es_data
ID NAME IMAGE NODE DESIRED STATE CURRENT STATE ERROR PORTS
q18eq708g692 es_data.1 elasticsearch/swarm:5.0.0 oc2 Running Running 25 seconds ago
x1ijojty4nrp es_data.2 elasticsearch/swarm:5.0.0 oc3 Running Running 25 seconds ago [oc5]]$ docker service ps es_ingest
ID NAME IMAGE NODE DESIRED STATE CURRENT STATE ERROR PORTS
vcskf9lkd4xr es_ingest.1 elasticsearch/swarm:5.0.0 oc1 Running Running 19 seconds ago
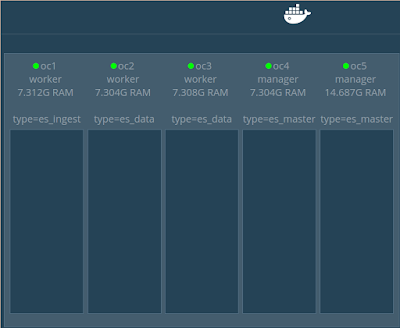
visually it look like:
connecting Cerebro to ES cluster using:
[oc5]$ eval $(docker-machine env oc4)[oc4]$ docker run -d \
-p 9000:9000 \
--net es_cluster \
--env JAVA_OPTS="-Djava.net.preferIPv4Stack=true" \
--name cerebro yannart/cerebro:latest
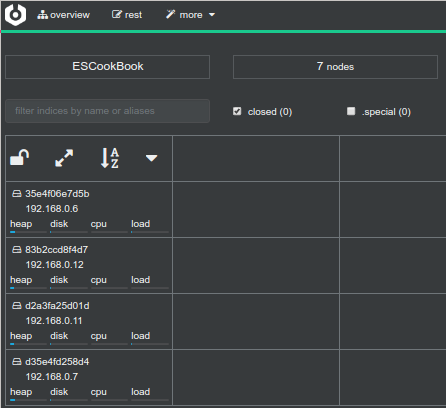
again to access to Cerebro console http://localhost:9000/ is through an SSH tunnel, here the output:
if you take a look above We are connecting to ES on host 192.168.0.3 even the master node have the IP 192.168.0.4, this is because the routing mesh of Swarm cluster publish our port on an specific address and then route transparent to the target IP.
So let's play with scale up and down our cluster:
[oc4]$ eval $(docker-machine env oc5)[oc5]$ docker service scale es_data=4
es_data scaled to 4
[oc5]$ docker service scale es_ingest=2
es_ingest scaled to 2
[oc5]$ docker service ls
ID NAME MODE REPLICAS IMAGE
o4x15kklu520 es_master replicated 1/1 elasticsearch/swarm:5.0.0
ue10tw8c64be es_ingest replicated 2/2 elasticsearch/swarm:5.0.0
w9cpobrxvay1 es_data replicated 4/4 elasticsearch/swarm:5.0.0
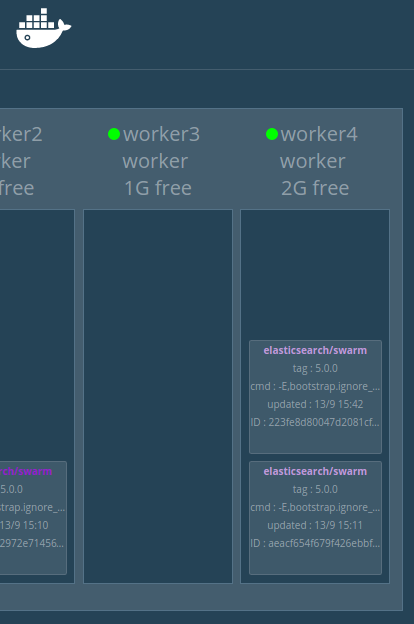
visualize it:
that's great our ES cluster now have 7 nodes :)
Final conclusion, the purpose of this post is to show that Docker Swarm works perfect at Oracle Cloud, you can easily manage the cluster remotely using docker-machine and you can massively deploy a big Elastic Search cluster using a bunch of Compute services, don't worry about hardware crash or scale up/down your cluster, if you have enough nodes your ES indices will change to yellow state first and once your ES recovery process start the cluster will move your shards to existent capacity and that's all.
I'll show scale up/down on another post, stay tuned.
Docker swarm at Oracle Cloud
As I mentioned in a previous post the Oracle Container Service seem to be little for my cloud expectativa.
But the Cloud Compute service is enough to implement my Docker Swarm implementation.
Why Docker Swarm?
When I tested Oracle Cloud Services I found three major problems:
All these things can be avoided if you deploy your own Swarm cluster using Oracle Compute Cloud Services, here detailed instructions about how to do that, ADVICE: is a long post :)
Configuring the networkBefore starting creating a compute node (swarm node) is necessary to create a network definition to access using ssh and docker commands, here the step by step instructions using compute console:
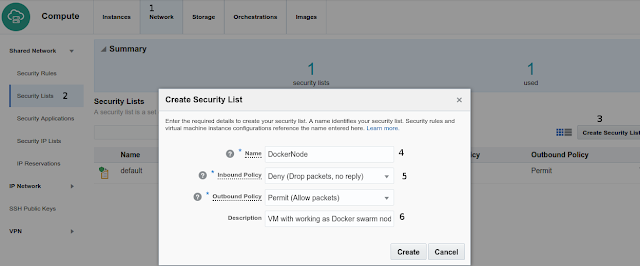
create a security list by clicking:
next defines a Security Application for Docker remote operations
next create a Security Rule allowing SSH and Docker ports
Launching five Swarm nodes
--2017-03-08 14:53:11-- https://raw.githubusercontent.com/marcelo-ochoa/docker/master/es/oracle-cloud-node-conf.sh
Resolving raw.githubusercontent.com (raw.githubusercontent.com)... 151.101.48.133
Connecting to raw.githubusercontent.com (raw.githubusercontent.com)|151.101.48.133|:443... connected.
HTTP request sent, awaiting response... 200 OK
Length: 757 [text/plain]
Saving to: 'oracle-cloud-node-conf.sh'
oracle-cloud-node-conf.sh 100%[===============================================================>] 757 --.-KB/s in 0s
2017-03-08 14:53:12 (201 MB/s) - 'oracle-cloud-node-conf.sh' saved [757/757]
ubuntu@oc1:~$ chmod +x oracle-cloud-node-conf.sh
ubuntu@oc1:~$ ./oracle-cloud-node-conf.sh
Filesystem Size Used Avail Use% Mounted on
udev 3.7G 0 3.7G 0% /dev
tmpfs 749M 17M 732M 3% /run
/dev/xvdb1 9.6G 2.6G 7.0G 27% /
tmpfs 3.7G 128K 3.7G 1% /dev/shm
tmpfs 5.0M 0 5.0M 0% /run/lock
tmpfs 3.7G 0 3.7G 0% /sys/fs/cgroup
/dev/xvdc 30G 408M 28G 2% /var/lib/docker
/dev/xvdb15 105M 3.6M 101M 4% /boot/efi
tmpfs 749M 0 749M 0% /run/user/1000
ubuntu@oc1:~$ docker version
Client:
Version: 1.13.1
API version: 1.26
Go version: go1.7.5
Git commit: 092cba3
Built: Wed Feb 8 06:57:21 2017
OS/Arch: linux/amd64
Server:
Version: 1.13.1
API version: 1.26 (minimum version 1.12)
Go version: go1.7.5
Git commit: 092cba3
Built: Wed Feb 8 06:57:21 2017
OS/Arch: linux/amd64
Experimental: true
--driver generic \
--generic-ip-address=129.144.12.62 \
--generic-ssh-key /home/mochoa/Documents/Scotas/ubnt \
--generic-ssh-user ubuntu \
oc1after adding our five node docker-machine repository is:
$ docker-machine ls
NAME ACTIVE DRIVER STATE URL SWARM DOCKER ERRORS
oc1 - generic Running tcp://129.144.12.62:2376 v1.13.1
oc2 - generic Running tcp://129.144.12.36:2376 v1.13.1
oc3 - generic Running tcp://129.144.12.145:2376 v1.13.1
oc4 - generic Running tcp://129.144.12.14:2376 v1.13.1
oc5 - generic Running tcp://129.144.12.235:2376 v1.13.1 Note that remote operations are secure managed using ssh encryption and TLS certificates
Latest step is to prepare Swarm cluster:
Define OC5 as Swarm master:$ docker-machine ssh oc5
ubuntu@oc5:~$ docker swarm init --advertise-addr 10.0.0.6
Swarm initialized: current node (j54j1bricmhl3buten3qletxy) is now a manager.
To add a worker to this swarm, run the following command:
docker swarm join \
--token SWMTKN-1-1897yn8y1d931tnzfq99vek5fjebznsdp8po03zy15gk7kh9vc-9j50mbq7nkzrwcuvr6zn50svy \
10.0.0.6:2377
To add a manager to this swarm, run 'docker swarm join-token manager' and follow the instructions.Define OC4 as Swarm second master ubuntu@oc5:~$ docker swarm join-token manager
To add a manager to this swarm, run the following command:
docker swarm join \
--token SWMTKN-1-1897yn8y1d931tnzfq99vek5fjebznsdp8po03zy15gk7kh9vc-0hk823fjc3mdqz5cvl88etxm8 \
10.0.0.6:2377
ubuntu@oc5:~$ exit
$ eval $(docker-machine oc4)
[oc4]]$ docker swarm join \
> --token SWMTKN-1-1897yn8y1d931tnzfq99vek5fjebznsdp8po03zy15gk7kh9vc-0hk823fjc3mdqz5cvl88etxm8 \
> 10.0.0.6:2377
This node joined a swarm as a manager.
But the Cloud Compute service is enough to implement my Docker Swarm implementation.
Why Docker Swarm?
- Is standard and supported by other cloud providers
- Is operated through command line using standard docker and docker-machine operations
When I tested Oracle Cloud Services I found three major problems:
- You can't modify base OS parameters
- Access to persistent storage didn't work for me
- The Docker version supported is a bit outdated
All these things can be avoided if you deploy your own Swarm cluster using Oracle Compute Cloud Services, here detailed instructions about how to do that, ADVICE: is a long post :)
Configuring the networkBefore starting creating a compute node (swarm node) is necessary to create a network definition to access using ssh and docker commands, here the step by step instructions using compute console:
- Network menu up
- Security list left menu
- Create Security list right up side
- Choose a name (DockerNode in this example)
- Choose Inbound Policy as Drop Packet/Outbound Policy Allow
- Set a meaningful text description
next defines a Security Application for Docker remote operations
- Click on left menu Security Applications
- Create Security Application
- Name it as docker
- Choose port type as TCP
- Define a port staring range 2376 (docker node daemon)
- Define a port end range 2377 (docker swarm cluster management communications)
- Set a meaningful text description
next create a Security Rule allowing SSH and Docker ports
- Click on Security Rules left menu
- Click on Create Security Rule right up button
- Name it (DockerAdminPort/SSHAdminPort in our case)
- Choose a Security Application (ssh built in defined, docker defined previously)
- Source will be Public Internet
- Destination will be our previously defined Security List named DockerNode
- Set a meaningful text description
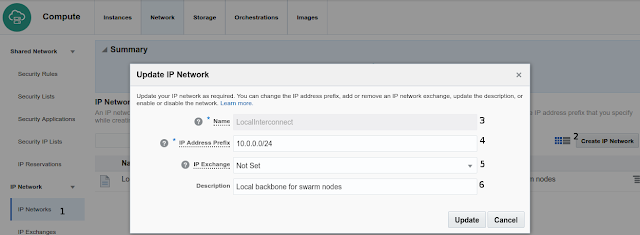
defines a private network for swarm inter connect operations
- Click on left side menu IP Network -> IP Neworks
- Click on right up Create IP Network button
- Name it in that case LocalInterconnect
- Define a private IP range We choose 10.0.0.0/24
- IP Exchange Not Set
- Set a meaningful text description
create Public IP Reservation, this will simplify remote operations using docker-machine tool from outside the Oracle Cloud, repeat this step five times.
- On Network top menu
- Click left side menu IP Reservations
- Click on right up button Create IP Reservations
- Named it, in our test case SwarmNode1..to..SwarmNode5
- By now For Instance None
Launching five Swarm nodes
There is no Docker Swarm instances ready at the Oracle Cloud Market Place, but we can easily get one using Ubuntu 16.10 base image, here the step by definition, repeat them five times
- At the Compute Console choose Instance upper main menu
- At the beginning there isn't instance running, click right button Create Instance
- The wizard start showing pre-build Oracle Image, Choose Private images if you already use Ubuntu 16.10 image or Marketplace to find Ubuntu.16.10
- Click on Selected button
- Next choose go to Shape definition
- Because we want a large cluster of cheap hardware (horizontal scaling) Shape is
- General Purpose oc3 (1 OCPU/7.5 Gb memory)
- Go to the Instance options
- Clicking on Instance tab
- Define a name for your instance
- Define some meaningful tags
- Choose a private SSH key (ubnt) or upload a new one using Add SSH Public Key button
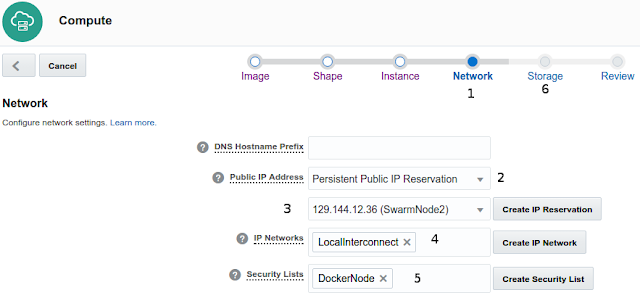
- Go to next step Network definition
- On network preferences
- Select Persistente Public IP Reservation option
- Chose one of five public IP reservations defined previously
- Chose our LocalInterconnect network previously defined (10.0.0.0/24)
- Select our DockerNode Security List (ssh and docker enabled ports from outside)
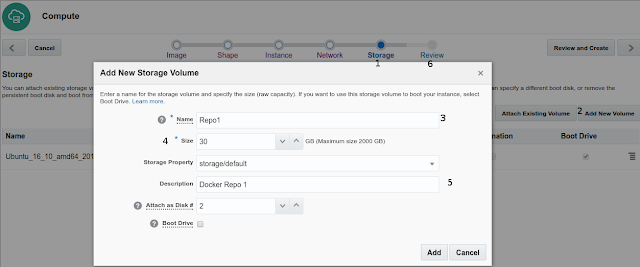
- Next go to Storage tab
- On the Storage tab by default Ubuntu instance have pre-defined 10Gb boot disk
- Click on button Add New Volume
- Named it as Repo1 (other instance choose Repo2, Repo3 and so on)
- Select 30 GB storage, this storage is for Docker local repository instance, some instance could be large, for example 12cR2 instance is 14 GB size
- Set a meaningful text description
Finally review and click create, after a few minutes the instance will be ready to use, you could access using SSH as:
$ ssh -i /home/mochoa/Documents/Scotas/ubnt ubuntu@oc1ubnt es my private ssh key associated with the public one upload to the cloud instance, ubuntu is de default user on this image instance with sudo rights and oc1 is an alias in my /etc/hostname to public IP reservation defined to this instance.
The Ubuntu 16.10 instance do not have installed Docker by default, but with this simple script you could do the post-installation steps, here sample output:
ubuntu@oc1:~$ wget https://raw.githubusercontent.com/marcelo-ochoa/docker/master/es/oracle-cloud-node-conf.sh--2017-03-08 14:53:11-- https://raw.githubusercontent.com/marcelo-ochoa/docker/master/es/oracle-cloud-node-conf.sh
Resolving raw.githubusercontent.com (raw.githubusercontent.com)... 151.101.48.133
Connecting to raw.githubusercontent.com (raw.githubusercontent.com)|151.101.48.133|:443... connected.
HTTP request sent, awaiting response... 200 OK
Length: 757 [text/plain]
Saving to: 'oracle-cloud-node-conf.sh'
oracle-cloud-node-conf.sh 100%[===============================================================>] 757 --.-KB/s in 0s
2017-03-08 14:53:12 (201 MB/s) - 'oracle-cloud-node-conf.sh' saved [757/757]
ubuntu@oc1:~$ chmod +x oracle-cloud-node-conf.sh
ubuntu@oc1:~$ ./oracle-cloud-node-conf.sh
the script do:
- change OS parameter to vm.max_map_count=262144, required by ElasticSearch
- define eth1 network interface with DHCP options, Oracle Cloud will provide you an IP on LocalInterconnect subnet
- Mount /var/lib/docker directory with our 30 GB extra disk /dev/xvdc
- Update Ubuntu OS with latest patches
- Install latest Docker version 1.13.1
you could check the steps by using, remember to reboot to apply kernel updates:
ubuntu@oc1:~$ df -hFilesystem Size Used Avail Use% Mounted on
udev 3.7G 0 3.7G 0% /dev
tmpfs 749M 17M 732M 3% /run
/dev/xvdb1 9.6G 2.6G 7.0G 27% /
tmpfs 3.7G 128K 3.7G 1% /dev/shm
tmpfs 5.0M 0 5.0M 0% /run/lock
tmpfs 3.7G 0 3.7G 0% /sys/fs/cgroup
/dev/xvdc 30G 408M 28G 2% /var/lib/docker
/dev/xvdb15 105M 3.6M 101M 4% /boot/efi
tmpfs 749M 0 749M 0% /run/user/1000
ubuntu@oc1:~$ docker version
Client:
Version: 1.13.1
API version: 1.26
Go version: go1.7.5
Git commit: 092cba3
Built: Wed Feb 8 06:57:21 2017
OS/Arch: linux/amd64
Server:
Version: 1.13.1
API version: 1.26 (minimum version 1.12)
Go version: go1.7.5
Git commit: 092cba3
Built: Wed Feb 8 06:57:21 2017
OS/Arch: linux/amd64
Experimental: true
finally We can define docker-machine definitions in remote machine (my notebook) to administer this five node instance, to add a remote managed machine is necessary to execute locally:
$ docker-machine create \--driver generic \
--generic-ip-address=129.144.12.62 \
--generic-ssh-key /home/mochoa/Documents/Scotas/ubnt \
--generic-ssh-user ubuntu \
oc1after adding our five node docker-machine repository is:
$ docker-machine ls
NAME ACTIVE DRIVER STATE URL SWARM DOCKER ERRORS
oc1 - generic Running tcp://129.144.12.62:2376 v1.13.1
oc2 - generic Running tcp://129.144.12.36:2376 v1.13.1
oc3 - generic Running tcp://129.144.12.145:2376 v1.13.1
oc4 - generic Running tcp://129.144.12.14:2376 v1.13.1
oc5 - generic Running tcp://129.144.12.235:2376 v1.13.1 Note that remote operations are secure managed using ssh encryption and TLS certificates
Latest step is to prepare Swarm cluster:
Define OC5 as Swarm master:$ docker-machine ssh oc5
ubuntu@oc5:~$ docker swarm init --advertise-addr 10.0.0.6
Swarm initialized: current node (j54j1bricmhl3buten3qletxy) is now a manager.
To add a worker to this swarm, run the following command:
docker swarm join \
--token SWMTKN-1-1897yn8y1d931tnzfq99vek5fjebznsdp8po03zy15gk7kh9vc-9j50mbq7nkzrwcuvr6zn50svy \
10.0.0.6:2377
To add a manager to this swarm, run 'docker swarm join-token manager' and follow the instructions.Define OC4 as Swarm second master ubuntu@oc5:~$ docker swarm join-token manager
To add a manager to this swarm, run the following command:
docker swarm join \
--token SWMTKN-1-1897yn8y1d931tnzfq99vek5fjebznsdp8po03zy15gk7kh9vc-0hk823fjc3mdqz5cvl88etxm8 \
10.0.0.6:2377
ubuntu@oc5:~$ exit
$ eval $(docker-machine oc4)
[oc4]]$ docker swarm join \
> --token SWMTKN-1-1897yn8y1d931tnzfq99vek5fjebznsdp8po03zy15gk7kh9vc-0hk823fjc3mdqz5cvl88etxm8 \
> 10.0.0.6:2377
This node joined a swarm as a manager.
Note that after logout from OC5 instance We shows how to operate remote (without ssh login) on our Swarm nodes only changing the Docker environments variables with docker-machine env command.
Finally add latest three nodes as workers[oc4]]$ eval $(docker-machine env oc3)
[oc3]]$ docker swarm join \
> --token SWMTKN-1-1897yn8y1d931tnzfq99vek5fjebznsdp8po03zy15gk7kh9vc-9j50mbq7nkzrwcuvr6zn50svy \
> 10.0.0.6:2377
This node joined a swarm as a worker.
[oc3]]$ eval $(docker-machine env oc2)
[oc2]]$ docker swarm join \
> --token SWMTKN-1-1897yn8y1d931tnzfq99vek5fjebznsdp8po03zy15gk7kh9vc-9j50mbq7nkzrwcuvr6zn50svy \
> 10.0.0.6:2377
This node joined a swarm as a worker.
[oc2]]$ eval $(docker-machine env oc1)
[oc1]]$ docker swarm join \
> --token SWMTKN-1-1897yn8y1d931tnzfq99vek5fjebznsdp8po03zy15gk7kh9vc-9j50mbq7nkzrwcuvr6zn50svy \
> 10.0.0.6:2377
This node joined a swarm as a worker.
Our Swarm cluster is ready to use with this set of nodes:
$ eval $(docker-machine env oc5)
[oc5]]$ docker node ls
ID HOSTNAME STATUS AVAILABILITY MANAGER STATUS
6na93y52xu20gqg4gc0epi51l oc1 Ready Active
cmspvwokukxaq3v6gwxxuz4w2 oc3 Ready Active
j54j1bricmhl3buten3qletxy * oc5 Ready Active Leader
l69skrce4zb69bjhofhkp9ggq oc2 Ready Active
vu9l0xip479qlwz83hzisbd2f oc4 Ready Active Reachable
Next post will be about deploying an Elastic Search cluster using Docker Swarm at Oracle Cloud. Stay tuned.
Elasticsearch 5.x Cookbook - Third Edition
Elasticsearch 5.x Cookbook - Third Edition is just published, here the link at Amazon.
Again Packt Publishing trust in me as technical reviewer, is great for me be part of technical reviewer staff because it push me to read careful all the content, test the example and stay in touch with new technologies.
For a long time I been in contact with Apache Solr and ElasticSearch as a consequence of Scotas Products but its not the only contact with ElasticSearch.
Now ElasticSearch is part of the functionality for free text searching at Oracle NoSQL solution and is one of the solution stacks available at Oracle Cloud.
If you are starting a BigData project with or without Oracle NoSQL may be you will be in touch with ElasticSearch, in that case this cookbook will be a great starting point to start using ElasticSearch guided through a complete list of recipes covering all the functionality from installing on Windows/Linux or latest Docker distributions to BigData integrations.
Guides not only are designed for beginners users there are a lot of examples for power users/installations.
Happy reading and searching...
First touch with Oracle Container Cloud Service
Some weeks ago Oracle releases Oracle Container Cloud Service, Oracle's support for Docker containers.
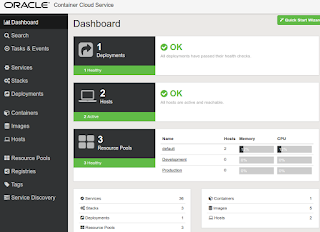
It basically provides several Linux machines to run Docker containers, one of them is designated as controller of the cluster services, here a simple screen shot of the service view:
by clicking on link Container Console you will access to the manager instance
the admin password for this console was defined during the service creation, here the look & feel the container console:
Basically the steps for using your containers are:
Define a service is basically a web representation of docker run command, supported version is Docker 1.10, several services are defined as examples, it includes Apache/PHP web server, Jenkins, Maria DB among others.
I tested this functionality adding a service for running Oracle 12cR1, the image for running an Oracle 12c is not in at a public repository, so you have to define a private registry for Docker images, remember that you must not push Oracle binary in public repository because you violate the license term.
So if you follow this guide you can build your own registry server, but this is not enough because the registry server should be enabled using https for security reason, so follow this guide you could put NGinx reverse proxy and SSL certificate signed by LetsEncrypt, but to get a free SSL certificate this registry server should be register in a public DNS server.
If you get a registry server up, running and accesible through Internet over https this server could be added at the section Registries->New Registry, mandatory entries are:
Email: user@domain
URL: server.domain.com
UserName: user_name
Password: your_password
Description: A description textPort 443 of the SSL traffic is not required, the URL will be translated for example to https://server.domain.com:443/v2/, registry server will ask for HTTP authenticated user and the Cloud Service will provide the UserName and Password values.
Once you have a registry server up, running and registered at the Cloud Service you can define your Docker test, the Service builder page look like:
the Builder pane is a graphical representation of the docker run command, the image name (in black) must includes 443 port, for example server.domain.com:443/oracle/database:12.1.0.2-ee.
The process to build above image in your local machine is:
$ cd dockerfiles
$ ./buildDockerImage.sh -v 12.1.0.2 -e
$ docker login -u user_name -p user_pwd server.domain.com:443
$ docker tag oracle/database:12.1.0.2-ee server.domain.com:443/oracle/database:12.1.0.2-ee
$ docker push server.domain.com:443/oracle/database:12.1.0.2-eethen when you Deploy your service the Cloud Service will pull above image from your private registry.
The idea of building an Oracle 12cR1 EE image and test it using the Oracle Container Cloud Service is for comparing the performance against the DBAAS and IAAS testing. The result is:
OCCS
Max IOPS = 1387654
Max MBPS = 21313
Latency = 0not so bad, under the hood this Oracle RDBMS is running on Oracle Linux Server release 6.6.89/Docker 1.10, 4 x Intel(R) Xeon(R) CPU - 16Gb RAM. the file system seem to be XFS.
Drawbacks:- By not proving a private registry where you can build/pull/push your custom images the usage of the service could be complicated for most of non experimented Docker users.
- I can't find a way to define a shared filesystem for a given volume, for example, above deployment puts Oracle Datafiles into an internal container volume, if you stop your deployment all the data is lost, the only possibility is pause/unpause the service if you want not to loose your data. Note: at the Service Editor (Tips & Trick button) there is an example defining an external volume as /NFS/{{.EnvironmentID}}/{{.DeploymentID}}/{{.ServiceID}}/{{.ServiceSlot}}:/mnt/data, but it didn't work for me.
- You can't modify Hosts OS parameters, so for example if you want to deploy an ElasticSearch cluster is necessary to change at /etc/sysctl.conf file vm.max_map_count=262144, so is limited environment also for a simple test case.
- Docker version is 1.10.3, which means, if you want to deploy Oracle XE it doesn't work because --shm-size=1g is not supported
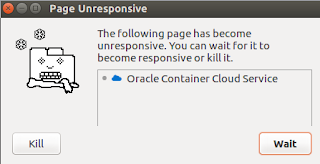
- Some time the Container Cloud Console kill my Chrome browser, Linux or Windows version, here the screenshot, seem to be a JavaScript problem:
Final thoughtsThe Containers Cloud Service console is a good abstraction (graphical interface) of typical Docker command line services, for example:
Services -> docker run command
Stacks -> docker-compose command, docker-compose.yml (graphical interface)
Hosts -> Bare metal/VM servers
In my personal opinion if I have to deploy a docker complex installation I'll deploy a set Oracle Compute Cloud Service running Oracle Linux/Ubuntu installations with latest Docker release and docker swarm native service, why?
It basically provides several Linux machines to run Docker containers, one of them is designated as controller of the cluster services, here a simple screen shot of the service view:
by clicking on link Container Console you will access to the manager instance
the admin password for this console was defined during the service creation, here the look & feel the container console:
Basically the steps for using your containers are:
- Define a service
- Deploy a service
- Monitor your running containers
Define a service is basically a web representation of docker run command, supported version is Docker 1.10, several services are defined as examples, it includes Apache/PHP web server, Jenkins, Maria DB among others.
I tested this functionality adding a service for running Oracle 12cR1, the image for running an Oracle 12c is not in at a public repository, so you have to define a private registry for Docker images, remember that you must not push Oracle binary in public repository because you violate the license term.
So if you follow this guide you can build your own registry server, but this is not enough because the registry server should be enabled using https for security reason, so follow this guide you could put NGinx reverse proxy and SSL certificate signed by LetsEncrypt, but to get a free SSL certificate this registry server should be register in a public DNS server.
If you get a registry server up, running and accesible through Internet over https this server could be added at the section Registries->New Registry, mandatory entries are:
Email: user@domain
URL: server.domain.com
UserName: user_name
Password: your_password
Description: A description textPort 443 of the SSL traffic is not required, the URL will be translated for example to https://server.domain.com:443/v2/, registry server will ask for HTTP authenticated user and the Cloud Service will provide the UserName and Password values.
Once you have a registry server up, running and registered at the Cloud Service you can define your Docker test, the Service builder page look like:
the Builder pane is a graphical representation of the docker run command, the image name (in black) must includes 443 port, for example server.domain.com:443/oracle/database:12.1.0.2-ee.
The process to build above image in your local machine is:
$ cd dockerfiles
$ ./buildDockerImage.sh -v 12.1.0.2 -e
$ docker login -u user_name -p user_pwd server.domain.com:443
$ docker tag oracle/database:12.1.0.2-ee server.domain.com:443/oracle/database:12.1.0.2-ee
$ docker push server.domain.com:443/oracle/database:12.1.0.2-eethen when you Deploy your service the Cloud Service will pull above image from your private registry.
The idea of building an Oracle 12cR1 EE image and test it using the Oracle Container Cloud Service is for comparing the performance against the DBAAS and IAAS testing. The result is:
OCCS
Max IOPS = 1387654
Max MBPS = 21313
Latency = 0not so bad, under the hood this Oracle RDBMS is running on Oracle Linux Server release 6.6.89/Docker 1.10, 4 x Intel(R) Xeon(R) CPU - 16Gb RAM. the file system seem to be XFS.
Drawbacks:- By not proving a private registry where you can build/pull/push your custom images the usage of the service could be complicated for most of non experimented Docker users.
- I can't find a way to define a shared filesystem for a given volume, for example, above deployment puts Oracle Datafiles into an internal container volume, if you stop your deployment all the data is lost, the only possibility is pause/unpause the service if you want not to loose your data. Note: at the Service Editor (Tips & Trick button) there is an example defining an external volume as /NFS/{{.EnvironmentID}}/{{.DeploymentID}}/{{.ServiceID}}/{{.ServiceSlot}}:/mnt/data, but it didn't work for me.
- You can't modify Hosts OS parameters, so for example if you want to deploy an ElasticSearch cluster is necessary to change at /etc/sysctl.conf file vm.max_map_count=262144, so is limited environment also for a simple test case.
- Docker version is 1.10.3, which means, if you want to deploy Oracle XE it doesn't work because --shm-size=1g is not supported
- Some time the Container Cloud Console kill my Chrome browser, Linux or Windows version, here the screenshot, seem to be a JavaScript problem:
Final thoughtsThe Containers Cloud Service console is a good abstraction (graphical interface) of typical Docker command line services, for example:
Services -> docker run command
Stacks -> docker-compose command, docker-compose.yml (graphical interface)
Hosts -> Bare metal/VM servers
In my personal opinion if I have to deploy a docker complex installation I'll deploy a set Oracle Compute Cloud Service running Oracle Linux/Ubuntu installations with latest Docker release and docker swarm native service, why?
- It run faster, see my previous post.
- I have control of the host parameter (sysctl among others, see host setup section)
- I can define shared filesystem in ext4 or NFS partitions
- I can build my own images by using Dockerfile commands
- I can deploy/manage the infrastructure (nodes/network) using docker swarm command.
Apex 5.1 on Docker
Two day after publish my post on Building a Docker image with Oracle 11gXE and latest Apex distribution Oracle releases latest production version 5.1.
So I just committed on GitHub a project update with the instruction to build a new Docker image using Oracle 11g official Docker image script and Apex 5.1 installation.
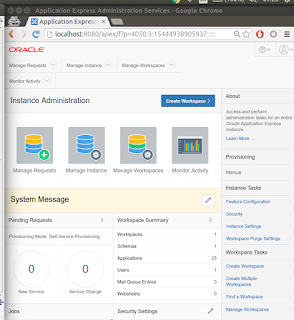
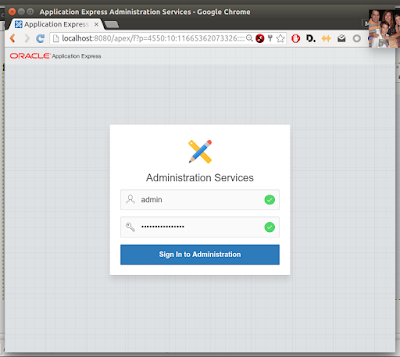
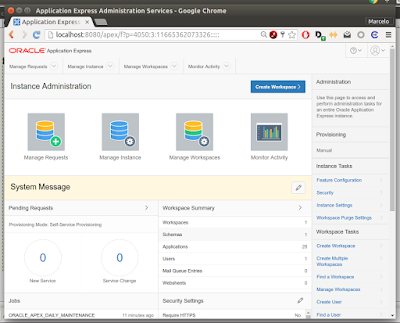
Here an screen shot of the first run when open the URL with http://localhost:8080/apex/apex_admin:
admin password is by default sys/system password output during first boot of the Docker image, see Docker logs for more details, for example:
ORACLE AUTO GENERATED PASSWORD FOR SYS AND SYSTEM: 80c55053b63dc749
immediately Oracle Apex will prompt you to change this default password, due security reason obviously admin/admin is not allowed, we choose for example OraPwd$16:
next the welcome page is returned:
at the bottom of the welcome page you could check this new version:
and that's all, this is how easy you can provision a new Apex environment with Docker
Building a Docker image with Oracle 11gXE and latest Apex distribution
This year during the Oracle Development Tour at Argentina I saw that the labs have the problem that the default installation of Oracle 11g XE doesn't include an updated version of Oracle Apex.
So I decide to build a new Oracle 11g XE Docker image including latest Apex version available for download at OTN with two mainly purposes:
Everybody knows that Docker simplify the development/testing/production lines by providing a clean/simple image distribution to run basically any Linux/Windows program on any platform, so the steps below could be replicated on any Linux flavors (Ubuntu/RedHat/Debian), Windows environment or Mac, with the only requirement of having Docker 1.10+ installed and running.
So here the simple steps:
- Check if docker is running:
[mochoa@localhost github-public]$ docker version Client: Version: 1.12.4 API version: 1.24 Go version: go1.6.4 Git commit: 1564f02 Built: Mon Dec 12 23:50:16 2016 OS/Arch: linux/amd64
Server: Version: 1.12.4 API version: 1.24 Go version: go1.6.4 Git commit: 1564f02 Built: Mon Dec 12 23:50:16 2016 OS/Arch: linux/amd64
So I decide to build a new Oracle 11g XE Docker image including latest Apex version available for download at OTN with two mainly purposes:
- A clean installation for demos and courses
- A simple distribution of latest Oracle Apex based Docker
Everybody knows that Docker simplify the development/testing/production lines by providing a clean/simple image distribution to run basically any Linux/Windows program on any platform, so the steps below could be replicated on any Linux flavors (Ubuntu/RedHat/Debian), Windows environment or Mac, with the only requirement of having Docker 1.10+ installed and running.
So here the simple steps:
- Check if docker is running:
[mochoa@localhost github-public]$ docker version Client: Version: 1.12.4 API version: 1.24 Go version: go1.6.4 Git commit: 1564f02 Built: Mon Dec 12 23:50:16 2016 OS/Arch: linux/amd64
Server: Version: 1.12.4 API version: 1.24 Go version: go1.6.4 Git commit: 1564f02 Built: Mon Dec 12 23:50:16 2016 OS/Arch: linux/amd64
- Build the Oracle official 11gXE image following the instruction here:
[mochoa@localhost dockerfiles]$ ./buildDockerImage.sh -v -x.. lot of outputs here ..[mochoa@localhost dockerfiles]$ docker images|grep oracle oracle/database 11.2.0.2-xe ba74688a297e 39 hours ago 1.206 GBoracle/database 12.1.0.2-ee af209128066e 6 days ago 11.72 GB- Download the xe-apex-test scripts from GitHub.com, at the directory where you download the Docker scripts put latest Oracle Apex distribution, now 5.0.4, if you found a newest version please edit your Dockerfile according to the new file by modifying the environment variable APEX_FILE.
- Build your new Docker image running buildDockerImage.sh script.
[mochoa@localhost xe-apex-latest]$ ./buildDockerImage.sh .. lot of outputs here ..[mochoa@localhost xe-apex-latest]$ docker images|grep apex oracle/apex-5.0.4_en 11.2.0.2-xe 89ef9b5e1ced 18 hours ago 1.531 GBNow you have two possibilities to run above image:
- using Docker internal volume manager
- using an external mount point for the Oracle Datafiles.
For the first use case your Docker database will start, create a new clean installation and upgrade default 11gXE Apex installation (4.0.0) to a new version 5.0.4, this database will have a random sys/system/admin password generated a boot time (see logs), Apex will be available at http://server:8080/apex/apex_admin URL. If you do stop/start Docker container the RDBMS changes persist using internal Docker volumes, if you call docker rm {container_name} command all RDBMS datafiles and Apex changes will be discarded.
Here a command example using Docker ephemeral storage:
[mochoa@localhost xe-apex-latest]$ docker run --shm-size=1g --name apex --hostname apex \ > -p 1521:1521 -p 8080:8080 \ > oracle/apex-5.0.4_en:11.2.0.2-xe ORACLE AUTO GENERATED PASSWORD FOR SYS AND SYSTEM: 0c27f3d91af388c1
Oracle Database 11g Express Edition Configuration.. lots of output here ..Configuring database.... Loading images directory: /install/apex/images
Directory created.
Oracle Database 11g Express Edition Configuration.. lots of output here ..Configuring database.... Loading images directory: /install/apex/images
Directory created.
A second use case is show in run-apex.sh script, before run this script create an empty directory on your local machine and change permissions to 1000:1000, for example:
[mochoa@localhost xe-apex-latest]$ sudo mkdir -p /home/data/db/apex [mochoa@localhost xe-apex-latest]$ sudo chown -R 1000:1000 /home/data/db/apex
finally call run-apex.sh script, your Oracle XE/Apex 5.0.4 will be available at http://localhost:8080/apex/apex_admin URL, remember that by default Apex user is admin and the password defined during boot time, see this screenshot on how your new Apex installation look like
first login will ask you to change default admin password and if everything is fine Apex Welcome page will be displayed:
Happy coding with Apex hosted by Docker :) next post will be about how to deploy this using Oracle Container Cloud Service.
12cR2 versus 12cR1 scan time using Java inside the RDBMS - a DBAAS Cloud test
As usual my first test with every Oracle RDBMS release is by Java inside the database, for this test I am using a heavy/intensive Java application inside the RDBMS named Scotas OLS.
Basically it provides full text search functionality by using an embedded Solr version running inside the DB.
By now Oracle 12cR2 is available at the Oracle Cloud DBAAS, the screen below is the services started to do the test
As I mentioned above Scotas OLS provides searching functionality through new domain index, during a creation or rebuild of the index and full table scan is done in batch of 5000 rows, this full scan is executed using a query like:
SELECT /*+ DYNAMIC_SAMPLING(L$MT 0) */ L$MT.rowid,..others_columns..
FROM TABLE_NAME L$MT where rowid in (select /*+ cardinality(L$PT, 10) */ * from table(?) L$PT) for update nowaittable pipeline function receives as arguments a batch of 5000 rowids wrapped using ODCIRidList PLSQL Type.
The Java code running inside the DB look like:
while (rs.next()) {
addCmd.clear();
addCmd.solrDoc = new SolrInputDocument();
String rowid = rs.getString(1);
addCmd.solrDoc.addField("rowid", rowid);
if (includeMasterColumn) {
Object o = rs.getObject(2);
readColumn(addCmd.solrDoc,this.colName,o);
}
for (int i = 0; i < numExtraCols; i++) {
Object o = rs.getObject(i + offset);
readColumn(addCmd.solrDoc,extraCols[i],o);
}
if (log.isTraceEnabled())
log.trace("Adding: " + addCmd.solrDoc.toString());
try {
processor.processAdd(addCmd);
} catch (Exception e) {
....
}
}
the scan time observed between the two DBAAS instances is summarized in this graph
Average scan time is 890 ms per batch in 12cR2 versus 1648 ms in 12cR1, GOOD JOB Oracle OJVM dev team for this improvement!!!!
First touch with Oracle Cloud Services
The idea of this post is to show my simple test (first touch) of Oracle Cloud services:
the idea is to create an Oracle instance and run a heavy IO testing using Oracle Resource manager.
Both DBs are running in similar hardware shapes as show in these screen shots:
If you connect using ssh the underlying hardware are:
Database release in both cases is:
Oracle Database 12c Enterprise Edition Release 12.1.0.2.0 - 64bit Production
the idea is to create an Oracle instance and run a heavy IO testing using Oracle Resource manager.
Both DBs are running in similar hardware shapes as show in these screen shots:
If you connect using ssh the underlying hardware are:
- 4 x Intel(R) Xeon(R) CPU E5-2690 v2 @ 3.00GHz - 16Gb RAM for IAAService
- 4 x Intel(R) Xeon(R) CPU E5-2699 v3 @ 2.30GHz - 16Gb RAM for DBAAService
Database release in both cases is:
Oracle Database 12c Enterprise Edition Release 12.1.0.2.0 - 64bit Production
Operating system are:
- DBAAS Red Hat Enterprise Linux Server release 6.6 (Santiago)
- IAAS Red Hat Enterprise Linux Server release 7.2 (Maipo)
but as you can see early the IAAS service is running Ubuntu 16.04 LTS image, on top of that I am using Docker 1.12.2 to create an image using Oracle official scripts.
To test the IO performance of both instance I am using this simple PLSQL script:
DECLARE
l_latency PLS_INTEGER;
l_iops PLS_INTEGER;
l_mbps PLS_INTEGER;
BEGIN
DBMS_RESOURCE_MANAGER.calibrate_io (num_physical_disks => 1,
max_latency => 20,
max_iops => l_iops,
max_mbps => l_mbps,
actual_latency => l_latency);
DBMS_OUTPUT.put_line('Max IOPS = ' || l_iops);
DBMS_OUTPUT.put_ 2 line('Max MBPS = ' || l_mbps);
DBMS_OUTPUT.put_line('Latency = ' || l_latency);
END;
the result are:
DBAAS
Max IOPS = 115038
Max MBPS = 1138
Latency = 0
Max MBPS = 1138
Latency = 0
IAAS
Max IOPS = 1761346
Max MBPS = 23324
Latency = 0
Max MBPS = 23324
Latency = 0
strange, IAAService outperform better IO than DBAAService from the DB point of view!!!
PD: Datafiles resides in ext4 partions:
/dev/mapper/dataVolGroup-lvol0 on /u02 type ext4 (rw,nodev)
/dev/xvdd on /opt/oracle/oradata type ext4 (rw,relatime,data=ordered)
ElasticSearch cluster using Docker Swarm mode 1.12
Latest release of Docker project integrate a Swarm mode to manage your cluster environment.
The idea of this post is to show how to use Docker Swarm to deploy an ElasticSearch 5.0 cluster, to be similar to a production DataCenter I am using docker-machine to deploy six nodes of my Swarm cluster, similar deployment could be replicated in a public cloud such as AWS or DigitalOcean by simple change a parameter in docker-machine create command.
My six nodes where created using:
docker-machine create --driver virtualbox manager1
docker-machine create --driver virtualbox manager2
...
es_ingest scaled to 2
mochoa@localhost:~/es$ docker logs -f es_master.1.8fuhvyy9scidk9fzmmme9k14l
[2016-09-13 18:42:37,811][INFO ][cluster.service ] [c251c9e143c1] added {{223fe8d80047}{f7GkmloETKe4UZsJy0nOsg}{fO6738D4T-ORB6GFFSSbsw}{10.0.1.9}{10.0.1.9:9300},}, reason: zen-disco-node-join[{223fe8d80047}{f7GkmloETKe4UZsJy0nOsg}{fO6738D4T-ORB6GFFSSbsw}{10.0.1.9}{10.0.1.9:9300}]
es_ingest
es_data
es_master
The idea of this post is to show how to use Docker Swarm to deploy an ElasticSearch 5.0 cluster, to be similar to a production DataCenter I am using docker-machine to deploy six nodes of my Swarm cluster, similar deployment could be replicated in a public cloud such as AWS or DigitalOcean by simple change a parameter in docker-machine create command.
My six nodes where created using:
docker-machine create --driver virtualbox manager1
docker-machine create --driver virtualbox manager2
...
Then I changed some physical considerations about the cluster such DNS resolver and memory allocation:
VBoxManage modifyvm "manager1" --natdnshostresolver1 on --memory 1024
VBoxManage modifyvm "manager2" --natdnshostresolver1 on --memory 1024
...
VBoxManage modifyvm "worker4" --natdnshostresolver1 on --memory 2048
VBoxManage modifyvm "manager2" --natdnshostresolver1 on --memory 1024
...
VBoxManage modifyvm "worker4" --natdnshostresolver1 on --memory 2048
To start a cluster and init swarm the step are:
docker-machine start manager1
export MANAGER1_IP=$(docker-machine ip manager1)
docker-machine ssh manager1 docker swarm init --advertise-addr eth1
export MGR_TOKEN=$(docker-machine ssh manager1 docker swarm join-token manager -q)
export WRK_TOKEN=$(docker-machine ssh manager1 docker swarm join-token worker -q)
docker-machine start manager2
docker-machine ssh manager2 \
docker swarm join \
--token $MGR_TOKEN \
$MANAGER1_IP:2377
docker-machine start worker1
docker-machine ssh worker1 \
docker swarm join \
--token $WRK_TOKEN \
$MANAGER1_IP:2377
...
docker-machine start worker4
docker-machine ssh worker4 \
docker swarm join \
--token $WRK_TOKEN \
$MANAGER1_IP:2377
Back to manager1 console we can check the cluster status by using:
mochoa@localhost:~$ eval $(docker-machine env manager1)
mochoa@localhost:~$ docker node ls
ID HOSTNAME STATUS AVAILABILITY MANAGER STATUS
157fk6bsgck766kbmui2723b1 * manager1 Ready Active Leader
588917vcd8eqlx2i26qr45wdl manager2 Ready Active Reachable
bpeivuf6zmubjuhwczifo0o1u worker1 Ready Active
btqhwp5ju82ydaj35tuwwmz7f worker4 Ready Active
ct7lyum45a4cm4rtzftqtnrxp worker3 Ready Active
duo3oykjte0hd0wr3nm8oj7c9 worker2 Ready Active
More information about how to create a docker swarm cluster is available here.
Once the cluster is ready We have to deploy an ElasticSearch image locally modified from official one, here the steps:
mochoa@localhost:~/es$ cat Dockerfile
#name of container: elasticsearch/swarm
#versison of container: 5.0.0
FROM elasticsearch:5.0.0
MAINTAINER Marcelo Ochoa "marcelo.ochoa@gmail.com"
COPY config/elasticsearch.yml /usr/share/elasticsearch/config
EXPOSE 9200 9300
ENTRYPOINT ["/docker-entrypoint.sh"]
CMD ["elasticsearch"]
mochoa@localhost:~/es$ cat config/elasticsearch.yml
network.host: ${HOSTNAME}
node.name: ${HOSTNAME}
# this value is required because we set "network.host"
# be sure to modify it appropriately for a production cluster deployment
discovery.zen.minimum_master_nodes: 1
mochoa@localhost:~/es$ eval $(docker-machine env manager1) mochoa@localhost:~/es$ docker build -t "elasticsearch/swarm:5.0.0" ..... mochoa@localhost:~/es$ eval $(docker-machine env worker4) mochoa@localhost:~/es$ docker build -t "elasticsearch/swarm:5.0.0" .
The idea of using a modified version of ElasticSearch image is to change the default config file to use ${HOSTAME} variable instead of the auto-discovery IP provided by ElasticSearch, this is important because Swarm deployment mode make a lot of stuff with the mappings address, see this page to find out more information of which IPs will be mapped when Docker service start.
If We see previous link each service deployed in a network will have an internal IP and a Virtual IP, hostname within the service resolve to the internal IP and not to the VIP associated to the service.
OK, we have the cluster started and the Docker image deployed on each node of the cluster, lets create an overlay network first to bound my ElasticSearch nodes.
mochoa@localhost:~/es$ docker network create -d overlay es_cluster
and finally deploy my services (master node, slave nodes and ingest nodes)
mochoa@localhost:~/es$ docker service create --network es_cluster --name es_master --constraint 'node.labels.type == es_master' --replicas=1 -p 9200:9200 -p 9300:9300 --env ES_JAVA_OPTS="-Xms1g -Xmx1g" elasticsearch/swarm:5.0.0 -E bootstrap.ignore_system_bootstrap_checks=true -E cluster.name="ESCookBook" -E node.master=true -E node.data=false -E discovery.zen.ping.unicast.hosts=es_master mochoa@localhost:~/es$ docker service create --network es_cluster --name es_data --constraint 'node.labels.type == es_data' --replicas=2 --env ES_JAVA_OPTS="-Xms1g -Xmx1g" elasticsearch/swarm:5.0.0 -E bootstrap.ignore_system_bootstrap_checks=true -E cluster.name="ESCookBook" -E node.master=false -E node.data=true -E discovery.zen.ping.unicast.hosts=es_master mochoa@localhost:~/es$ docker service create --network es_cluster --name es_ingest --constraint 'node.labels.type == es_ingest' --replicas=1 --env ES_JAVA_OPTS="-Xms1g -Xmx1g" elasticsearch/swarm:5.0.0 -E bootstrap.ignore_system_bootstrap_checks=true -E cluster.name="ESCookBook" -E node.master=false -E node.data=false -E node.ingest=true -E discovery.zen.ping.unicast.hosts=es_master
Some point marked in italic/bold:
- all services are attached to the overlay network es_cluster (--network es_cluster)
- only service named es_master (1 replica) have mapped ElasticSearch ports (-p 9200:9200 -p 9300:9300)
- es_master service are attached to nodes with label es_master, these nodes are marked specially to run ElasticSearch master nodes, in our deployment only nodes manager1 and manager2 are marked as node.labels.type == es_master
- es_data (2 replicas) service have the parameters node.master-false, node.data=true and will run in nodes marked as es_data (worker1, worker2 and worker3)
- es_ingest (1 replica) service have parameters node.master=false,node.data=false,node.ingest=true, these kind of ElasticSearch nodes are specially targeted to have a lot of CPU processing
A nice picture using manomarks/visualizer Docker image shows four ElasticSearch nodes up and running:
Docker services could be checked from command line using:
mochoa@localhost:~/es$ docker service ls
ID NAME REPLICAS IMAGE COMMAND
1bofyw8lrcai es_master 1/1 elasticsearch/swarm:5.0.0 -E bootstrap.ignore_system_bootstrap_checks=true -E cluster.name=ESCookBook -E node.master=true -E node.data=false -E discovery.zen.ping.unicast.hosts=es_master
8qh9why7q8zn es_data 2/2 elasticsearch/swarm:5.0.0 -E bootstrap.ignore_system_bootstrap_checks=true -E cluster.name=ESCookBook -E node.master=false -E node.data=true -E discovery.zen.ping.unicast.hosts=es_master
97lc13vebfoz es_ingest 1/1 elasticsearch/swarm:5.0.0 -E bootstrap.ignore_system_bootstrap_checks=true -E cluster.name=ESCookBook -E node.master=false -E node.data=false -E node.ingest=true -E discovery.zen.ping.unicast.hosts=es_master
If you want to see logs from ElasticSearch master node the command is:
mochoa@localhost:~/es$ docker logs -f es_master.1.8fuhvyy9scidk9fzmmme9k14l
[2016-09-13 18:09:57,680][INFO ][node ] [c251c9e143c1] initializing ...
......
[2016-09-13 18:11:07,974][INFO ][cluster.service ] [c251c9e143c1] added {{9b4551cd2972}{Jt29mm9cQje18EEeP4pW_w}{LhBu2B9ETs6DB_uemvlKQQ}{10.0.1.6}{10.0.1.6:9300},}, reason: zen-disco-node-join[{9b4551cd2972}{Jt29mm9cQje18EEeP4pW_w}{LhBu2B9ETs6DB_uemvlKQQ}{10.0.1.6}{10.0.1.6:9300}]
[2016-09-13 18:11:08,626][INFO ][cluster.service ] [c251c9e143c1] added {{a83d5e3a107d}{tpG4RN9dQ0OOiC7rOzmPiA}{r4aCN4S0Rk-Akqdfu1WEQg}{10.0.1.5}{10.0.1.5:9300},}, reason: zen-disco-node-join[{a83d5e3a107d}{tpG4RN9dQ0OOiC7rOzmPiA}{r4aCN4S0Rk-Akqdfu1WEQg}{10.0.1.5}{10.0.1.5:9300}]
[2016-09-13 18:11:58,287][INFO ][cluster.service ] [c251c9e143c1] added {{aeacf654f679}{M7ymfkquRqmzHXa61zQbjQ}{pzJgqQHLSE6r9g1Ueh6rgQ}{10.0.1.8}{10.0.1.8:9300},}, reason: zen-disco-node-join[{aeacf654f679}{M7ymfkquRqmzHXa61zQbjQ}{pzJgqQHLSE6r9g1Ueh6rgQ}{10.0.1.8}{10.0.1.8:9300}]
Master node is running and three slave nodes where attached to the cluster, as We marked above two ports where published outside the cluster mapped to the master node, with these ports we can operate with our ElasticSearch deployment, for example:
mochoa@localhost:~/es$ curl http://192.168.99.100:9200/_nodes/process?pretty
{
"_nodes" : {
"total" : 4,
"successful" : 4,
"failed" : 0
},
"cluster_name" : "ESCookBook",
....
}
}
{
"_nodes" : {
"total" : 4,
"successful" : 4,
"failed" : 0
},
"cluster_name" : "ESCookBook",
....
}
}
Note the We are using 192.168.99.100 (manager1 IP) instead of the ElasticSearch master node internal IP (10.0.1.2).
Finally We can scale up and down our services according to our needs, for example if We need to upload a lot data to our ElasticSearch cluster we can scale ingest nodes to two:
mochoa@localhost:~/es$ docker service scale es_ingest=2es_ingest scaled to 2
mochoa@localhost:~/es$ docker logs -f es_master.1.8fuhvyy9scidk9fzmmme9k14l
[2016-09-13 18:42:37,811][INFO ][cluster.service ] [c251c9e143c1] added {{223fe8d80047}{f7GkmloETKe4UZsJy0nOsg}{fO6738D4T-ORB6GFFSSbsw}{10.0.1.9}{10.0.1.9:9300},}, reason: zen-disco-node-join[{223fe8d80047}{f7GkmloETKe4UZsJy0nOsg}{fO6738D4T-ORB6GFFSSbsw}{10.0.1.9}{10.0.1.9:9300}]
graphically
Remember that es_ingest service where tagged to node with type es_ingest, so it was started on node worker4.
Here an example of scaling data node to three:
mochoa@localhost:~/es$ docker service scale es_data=3
es_data scaled to 3
mochoa@localhost:~/es$ docker logs -f es_master.1.8fuhvyy9scidk9fzmmme9k14l
[2016-09-13 18:48:57,919][INFO ][cluster.service ] [c251c9e143c1] added {{624b3fdc746f}{fOJW3Ms1RdiYeTuS4jtdnQ}{208lYQhoRj2LIDspst2Njg}{10.0.1.10}{10.0.1.10:9300},}, reason: zen-disco-node-join[{624b3fdc746f}{fOJW3Ms1RdiYeTuS4jtdnQ}{208lYQhoRj2LIDspst2Njg}{10.0.1.10}{10.0.1.10:9300}]
graphically:
latest es_data ElasticSearch data node was deployed into the empty cluster node worker3.
Finally we can stop our ElasticSearch cluster node using:
mochoa@localhost:~/es$ docker service rm es_ingest es_data es_masteres_ingest
es_data
es_master
Final toughs, remember that Docker Swarm services are ephemeral do not store persistent data on it so what happen with my data? Well if your DataCenter infra-structure is large you could up and down nodes using scale command and ElasticSearch will move your data using replicas and the cluster algorithms or by using Docker storage drivers but is not clearly for me how to map each storage node to a particular persistent directory.
All script about this post is available at my GitHub repo.
Reducing Oracle Docker images size by using a central repo
Oracle provides a way to build several Docker images at their GitHub Official Repo. But IMO they have two big problems:
To mitigate these two factors I tested the local repo idea, a new Docker image which exposes using HTTP protocol all Oracle binary files in your DataCenter without broke the license term.
You could build a local repository image adding or removing Oracle binary packages, for example:
FROM gliderlabs/alpine:3.4
# Maintainer
# ----------
MAINTAINER Marcelo Ochoa
RUN apk --no-cache add nginx && mkdir /run/nginx
# Oracle Linux 64Bits 12.1.0.2
COPY linuxamd64_12102_database_1of2.zip /var/lib/nginx/html
COPY linuxamd64_12102_database_2of2.zip /var/lib/nginx/html
# Oracle Linux XE 11.2.0
COPY oracle-xe-11.2.0-1.0.x86_64.rpm.zip /var/lib/nginx/html
# Oracle JDK 8b101
COPY server-jre-8u101-linux-x64.tar.gz /var/lib/nginx/html
# Oracle WebLogic 12.2.1.1.0
COPY fmw_12.2.1.1.0_wls_Disk1_1of1.zip /var/lib/nginx/html
EXPOSE 80
CMD ["nginx", "-g", "daemon off;"]files marked in italic/bold should be downloaded first (manually from OTN) and located in same directory as your local repo Dockerfile, for example:
mochoa@localhost:~/jdeveloper/mywork/docker/localrepo$ ls -l
total 3805068
-rwxr-xr-x 1 mochoa mochoa 48 ago 12 10:23 buildDockerImage.sh
-rw-rw-r-- 1 mochoa mochoa 493 ago 15 18:19 Dockerfile
-rw-rw-r-- 1 mochoa mochoa 832500826 ago 15 18:01 fmw_12.2.1.1.0_wls_Disk1_1of1.zip
-rw-r--r-- 1 mochoa mochoa 1673544724 jul 16 19:19 linuxamd64_12102_database_1of2.zip
-rw-r--r-- 1 mochoa mochoa 1014530602 jul 16 19:20 linuxamd64_12102_database_2of2.zip
-rw-rw-r-- 1 mochoa mochoa 315891481 jul 18 12:20 oracle-xe-11.2.0-1.0.x86_64.rpm.zip
-rwxr-xr-x 1 mochoa mochoa 97 ago 12 10:25 run-repo.sh
-rw-rw-r-- 1 mochoa mochoa 59874321 ago 15 17:32 server-jre-8u101-linux-x64.tar.gzto build and run your local repo use buildDockerImage.sh and run-repo.sh:
# docker build -t "localrepo:1.0.0" .# docker run --name localrepo --hostname localrepo --detach=true --publish=8000:80 localrepo:1.0.0
echo "Local repo is at: http://$(docker inspect --format='{{ .NetworkSettings.IPAddress }}' localrepo):80/"finally if We use a modified version of Oracle Official Dockerfile:
mochoa@localhost:~/jdeveloper/mywork/docker/docker-images/OracleDatabase/dockerfiles$ git diff 11.2.0.2/Dockerfile.xe
diff --git a/OracleDatabase/dockerfiles/11.2.0.2/Dockerfile.xe b/OracleDatabase/dockerfiles/11.2.0.2/Dockerfile.xe
index 00ed28a..cade77c 100644
--- a/OracleDatabase/dockerfiles/11.2.0.2/Dockerfile.xe
+++ b/OracleDatabase/dockerfiles/11.2.0.2/Dockerfile.xe
@@ -50,7 +50,7 @@ ARG ORACLE_PWD
# Copy binaries
# -------------
-COPY $INSTALL_FILE_1 $CONFIG_RSP $INSTALL_DIR/
+COPY $CONFIG_RSP $INSTALL_DIR/
# Update yum
# ----------
@@ -61,8 +61,9 @@ WORKDIR $INSTALL_DIR
# Install Oracle Express Edition
# ------------------------------
-RUN unzip $INSTALL_FILE_1 && \
- rm $INSTALL_FILE_1 && \
+RUN curl -sSL http://192.168.200.55:8000/$INSTALL_FILE_1 -o $INSTALL_FILE_1 && \
+ unzip $INSTALL_FILE_1 && \
+ rm -f $INSTALL_FILE_1 && \
rpm -i Disk1/*.rpm && \
sed -i -e "s|###ORACLE_PWD###|$ORACLE_PWD|g" $INSTALL_DIR/$CONFIG_RSP && \
/etc/init.d/oracle-xe configure responseFile=$CONFIG_RSP
@@ -91,5 +92,6 @@ RUN echo "DEDICATED_THROUGH_BROKER_LISTENER=ON" >> $ORACLE_HOME/network/admin/l
echo "DIAG_ADR_ENABLED = off" >> $ORACLE_HOME/network/admin/listener.ora;
EXPOSE 1521 8080
+VOLUME ["/u01/app/oracle/oradata","/u01/app/oracle/fast_recovery_area"]
CMD $ORACLE_BASE/runOracle.sh
PD: I don't know why official Oracle RDBMS images includes the Oracle Data-files (data), containers are immutable, Do not store data in containers!!! I prefer a build Docker image which creates outside the Database data-files.
- unlike the Docker way, you have to download manually binary installation files
- size of the images is big due the use of Docker COPY command (ADD or COPY section)
To mitigate these two factors I tested the local repo idea, a new Docker image which exposes using HTTP protocol all Oracle binary files in your DataCenter without broke the license term.
You could build a local repository image adding or removing Oracle binary packages, for example:
FROM gliderlabs/alpine:3.4
# Maintainer
# ----------
MAINTAINER Marcelo Ochoa
RUN apk --no-cache add nginx && mkdir /run/nginx
# Oracle Linux 64Bits 12.1.0.2
COPY linuxamd64_12102_database_1of2.zip /var/lib/nginx/html
COPY linuxamd64_12102_database_2of2.zip /var/lib/nginx/html
# Oracle Linux XE 11.2.0
COPY oracle-xe-11.2.0-1.0.x86_64.rpm.zip /var/lib/nginx/html
# Oracle JDK 8b101
COPY server-jre-8u101-linux-x64.tar.gz /var/lib/nginx/html
# Oracle WebLogic 12.2.1.1.0
COPY fmw_12.2.1.1.0_wls_Disk1_1of1.zip /var/lib/nginx/html
EXPOSE 80
CMD ["nginx", "-g", "daemon off;"]files marked in italic/bold should be downloaded first (manually from OTN) and located in same directory as your local repo Dockerfile, for example:
mochoa@localhost:~/jdeveloper/mywork/docker/localrepo$ ls -l
total 3805068
-rwxr-xr-x 1 mochoa mochoa 48 ago 12 10:23 buildDockerImage.sh
-rw-rw-r-- 1 mochoa mochoa 493 ago 15 18:19 Dockerfile
-rw-rw-r-- 1 mochoa mochoa 832500826 ago 15 18:01 fmw_12.2.1.1.0_wls_Disk1_1of1.zip
-rw-r--r-- 1 mochoa mochoa 1673544724 jul 16 19:19 linuxamd64_12102_database_1of2.zip
-rw-r--r-- 1 mochoa mochoa 1014530602 jul 16 19:20 linuxamd64_12102_database_2of2.zip
-rw-rw-r-- 1 mochoa mochoa 315891481 jul 18 12:20 oracle-xe-11.2.0-1.0.x86_64.rpm.zip
-rwxr-xr-x 1 mochoa mochoa 97 ago 12 10:25 run-repo.sh
-rw-rw-r-- 1 mochoa mochoa 59874321 ago 15 17:32 server-jre-8u101-linux-x64.tar.gzto build and run your local repo use buildDockerImage.sh and run-repo.sh:
# docker build -t "localrepo:1.0.0" .# docker run --name localrepo --hostname localrepo --detach=true --publish=8000:80 localrepo:1.0.0
echo "Local repo is at: http://$(docker inspect --format='{{ .NetworkSettings.IPAddress }}' localrepo):80/"finally if We use a modified version of Oracle Official Dockerfile:
mochoa@localhost:~/jdeveloper/mywork/docker/docker-images/OracleDatabase/dockerfiles$ git diff 11.2.0.2/Dockerfile.xe
diff --git a/OracleDatabase/dockerfiles/11.2.0.2/Dockerfile.xe b/OracleDatabase/dockerfiles/11.2.0.2/Dockerfile.xe
index 00ed28a..cade77c 100644
--- a/OracleDatabase/dockerfiles/11.2.0.2/Dockerfile.xe
+++ b/OracleDatabase/dockerfiles/11.2.0.2/Dockerfile.xe
@@ -50,7 +50,7 @@ ARG ORACLE_PWD
# Copy binaries
# -------------
-COPY $INSTALL_FILE_1 $CONFIG_RSP $INSTALL_DIR/
+COPY $CONFIG_RSP $INSTALL_DIR/
# Update yum
# ----------
@@ -61,8 +61,9 @@ WORKDIR $INSTALL_DIR
# Install Oracle Express Edition
# ------------------------------
-RUN unzip $INSTALL_FILE_1 && \
- rm $INSTALL_FILE_1 && \
+RUN curl -sSL http://192.168.200.55:8000/$INSTALL_FILE_1 -o $INSTALL_FILE_1 && \
+ unzip $INSTALL_FILE_1 && \
+ rm -f $INSTALL_FILE_1 && \
rpm -i Disk1/*.rpm && \
sed -i -e "s|###ORACLE_PWD###|$ORACLE_PWD|g" $INSTALL_DIR/$CONFIG_RSP && \
/etc/init.d/oracle-xe configure responseFile=$CONFIG_RSP
@@ -91,5 +92,6 @@ RUN echo "DEDICATED_THROUGH_BROKER_LISTENER=ON" >> $ORACLE_HOME/network/admin/l
echo "DIAG_ADR_ENABLED = off" >> $ORACLE_HOME/network/admin/listener.ora;
EXPOSE 1521 8080
+VOLUME ["/u01/app/oracle/oradata","/u01/app/oracle/fast_recovery_area"]
CMD $ORACLE_BASE/runOracle.sh
if We build the Oracle XE Docker image using the original script the size of the image is 2.84 GB, using a local repo and the modified Dockerfile result in 2.524 GB, basically is the size of the rpm.zip binary file, obviously if you sum the size of the local repo plus the size of the Oracle image is similar, but remember that the image of the resulting Oracle XE images is spread in all of your DataCenter nodes.
More on this the difference in the Oracle EE image using a modified version of this Dockerfile:
mochoa@localhost:~/jdeveloper/mywork/docker/docker-images/OracleDatabase/dockerfiles$ git diff 12.1.0.2/Dockerfile.ee
diff --git a/OracleDatabase/dockerfiles/12.1.0.2/Dockerfile.ee b/OracleDatabase/dockerfiles/12.1.0.2/Dockerfile.ee
index fccc3c4..8b38153 100644
--- a/OracleDatabase/dockerfiles/12.1.0.2/Dockerfile.ee
+++ b/OracleDatabase/dockerfiles/12.1.0.2/Dockerfile.ee
@@ -48,7 +48,7 @@ ENV INSTALL_DIR=$ORACLE_BASE/install \
# Copy binaries
# -------------
-COPY $INSTALL_FILE_1 $INSTALL_FILE_2 $INSTALL_RSP $CONFIG_RSP $INSTALL_DIR/
+COPY $INSTALL_RSP $CONFIG_RSP $INSTALL_DIR/
COPY $RUN_FILE $ORACLE_BASE/
# Setup filesystem and oracle user
@@ -78,10 +78,12 @@ RUN sed -i -e "s|###ORACLE_EDITION###|EE|g" $INSTALL_DIR/$INSTALL_RSP &&
# -------------------
USER oracle
-RUN unzip $INSTALL_FILE_1 && \
- rm $INSTALL_FILE_1 && \
- unzip $INSTALL_FILE_2 && \
- rm $INSTALL_FILE_2 && \
+RUN curl -sSL http://192.168.200.55:8000/$INSTALL_FILE_1 -o $INSTALL_FILE_1 && \
+ unzip $INSTALL_FILE_1 -d $INSTALL_DIR/ && \
+ rm -f $INSTALL_FILE_1 && \
+ curl -sSL http://192.168.200.55:8000/$INSTALL_FILE_2 -o $INSTALL_FILE_2 && \
+ unzip $INSTALL_FILE_2 -d $INSTALL_DIR/ && \
+ rm -f $INSTALL_FILE_2 && \
$INSTALL_DIR/database/runInstaller -silent -force -waitforcompletion -responsefile $INSTALL_DIR/$INSTALL_RSP -ignoresysprereqs -ignoreprereq && \
rm -rf $INSTALL_DIR/database
@@ -142,6 +144,7 @@ RUN echo "startup;" | sqlplus / as sysdba && \
RUN rm -rf $INSTALL_DIR
EXPOSE 1521 5500
-
+VOLUME ["/opt/oracle/oradata","/opt/oracle/fast_recovery_area"]
+
# Define default command to start Oracle Database.
CMD $ORACLE_BASE/runOracle.sh
result in 18.45 GB over 13.08 GB, 5Gb less!!
Hope these tips!!!
PD: I don't know why official Oracle RDBMS images includes the Oracle Data-files (data), containers are immutable, Do not store data in containers!!! I prefer a build Docker image which creates outside the Database data-files.
Is time for Oracle XE on Docker
Sometime Oracle XE is used in development environment because at the early stage of the project an Oracle RDBMS EE is not necessary.
There are many Docker images at the public repo but many of them do not include the possibility to customize some parameters and I am not sure if the legal condition of Oracle XE redistribution license is meet.
So, using similar ideas as in Oracle RDBMS 12c Docker image script I made this simple Dockerfile script:
FROM oraclelinux:5
MAINTAINER marcelo.ochoa@gmail.com
RUN groupadd -g 54321 oinstall
RUN groupadd -g 54322 dba
RUN useradd -m -g oinstall -G oinstall,dba -u 54321 oracle
RUN yum -y install bc glibc make binutils gcc libaio perl wget unzip && yum clean all
RUN chown -R oracle:oinstall /home/oracle
RUN chmod g+rx /home/oracle
RUN chmod o+rx /home/oracle
ADD xe.rsp /home/oracle/
ADD oracle-xe-11.2.0-1.0.x86_64.rpm /home/oracle/
RUN rpm2cpio /home/oracle/oracle-xe-11.2.0-1.0.x86_64.rpm | cpio -idmv
RUN rm -f /home/oracle/oracle-xe-11.2.0-1.0.x86_64.rpm
RUN mkdir /u01/app/oracle/oradata
RUN mkdir /u01/app/oracle/product/11.2.0/xe/config/log
RUN mkdir -p /u01/app/oracle/diag/rdbms/xe/XE/trace/
RUN umask 0027
RUN mkdir -p /u01/app/oracle/admin/XE/adump
RUN mkdir -p /u01/app/oracle/admin/XE/dpdump
RUN mkdir -p /u01/app/oracle/admin/XE/pfile
RUN mkdir -p /u01/app/oracle/admin/cfgtoollogs/dbca/XE
RUN mkdir -p /u01/app/oracle/admin/XE/dbs
RUN mkdir -p /u01/app/oracle/fast_recovery_area
RUN umask 0022
RUN touch /u01/app/oracle/diag/rdbms/xe/XE/trace/alert_XE.log
RUN chown -R oracle:oinstall /u01/app/oracle
RUN chmod u+x /etc/init.d/oracle-xe
RUN sed -i -e 's/%memory_target%/1G/g' /u01/app/oracle/product/11.2.0/xe/config/scripts/init.ora
RUN sed -i -e 's/%memory_target%/1G/g' /u01/app/oracle/product/11.2.0/xe/config/scripts/initXETemp.ora
RUN find /u01/app/oracle/product/11.2.0/xe -name "*.sh" -exec chmod u+x {} \;
RUN echo ". /u01/app/oracle/product/11.2.0/xe/bin/oracle_env.sh" >>/home/oracle/.bashrc
COPY manage-oracle.sh /home/oracle/
EXPOSE 1521 8080
VOLUME ["/u01/app/oracle/oradata","/u01/app/oracle/fast_recovery_area"]
CMD [ "sh" , "-c" , "/home/oracle/manage-oracle.sh" ]
This Docker image is using Official Oracle Linux 5 layer, and to build the image is necessary to dowload oracle-xe-11.2.0-1.0.x86_64.rpm.zip from OTN Download Section, unzip above file and put oracle-xe-11.2.0-1.0.x86_64.rpm at the same directory where Dockerfile is placed.
To build the image I made this simple buildDockerImage.sh:
#!/bin/bash
docker build -t "oracle-xe:11.2.0-1.0" .
docker build -t "oracle-xe:11.2.0-1.0" .
I am 100% sure that the the installation will be successful, this is the magic on Docker world, here the output of docker image listing:
$ docker images REPOSITORY TAG IMAGE ID CREATED SIZE oracle-xe 11.2.0-1.0 946a685de09f About an hour ago 1.885 GB
as in the Oracle RDBMS 12c Docker image the installation of the seed database and initial configuration is made by manage-oracle.sh script.
Note that also that in above Dockerfile script instead of using rpm tool to install Oracle XE rpm file I am using rpm2cpio, this is because the original rpm file provided by Oracle do some actions that are not valid on Docker environment, I am doing all necessary actions inside the Dockerfile then.Once you have the image ready to run I created an initial database a run.sh file which could by used as:
docker run --privileged=true --name xe --hostname xe --detach=true --publish=1521:1521 --publish=8080:8080 oracle-xe:11.2.0-1.0SQLNet 1521 port and Oracle Express web admin tool is published outside the container.
If you run the container with above script the Database will be created using Docker volumnes which means that all data stored into the RDBMS will persists across multiple run/stop executions, but if you execute docker rm command all datafiles will be removed from the layered file system.
Here an screenshot of the Admin tool:
To get data surviving across containers destruction a run-persistent.sh script look like:
docker run --privileged=true --volume=/home/data/db/xe/fast_recovery_area:/u01/app/oracle/fast_recovery_area --volume=/home/data/db/xe/oradata:/u01/app/oracle/oradata --name xe --hostname xe --detach=true --publish=1521:1521 --publish=8080:8080 oracle-xe:11.2.0-1.0before running above Docker command create externals directories as:
$ sudo mkdir -p /home/data/db/xe/oradata
$ sudo mkdir -p /home/data/db/xe/fast_recovery_area
$ sudo mkdir -p chown -R 54321:54321 /home/data/db/xe
$ sudo mkdir -p /home/data/db/xe/fast_recovery_area
$ sudo mkdir -p chown -R 54321:54321 /home/data/db/xe
And thats all, enjoy your Oracle XE Database on Docker, a complete list files showed above could be download as oracle-xe.zip from Google Drive obviously without the Oracle XE rpm file.
Using Official Oracle NoSQL Docker images
At the time of writing this post Building an Oracle NoSQL cluster using Docker there was no official Oracle NoSQL images to use as base image, also Docker has no native networking functionality.
So with these two new additions making a NoSQL cluster is too easy :)
First step, creating my NoSQL image with an automatic startup script, here a Docker file:
FROM oracle/nosql
MAINTAINER marcelo.ochoa@gmail.com
ADD start-nosql.sh /start-nosql.sh
RUN chmod +x /start-nosql.sh
CMD /start-nosql.sh
So with these two new additions making a NoSQL cluster is too easy :)
First step, creating my NoSQL image with an automatic startup script, here a Docker file:
FROM oracle/nosql
MAINTAINER marcelo.ochoa@gmail.com
ADD start-nosql.sh /start-nosql.sh
RUN chmod +x /start-nosql.sh
CMD /start-nosql.sh
start-nosql.sh script look like:
#!/bin/bash
mkdir -p $KVROOT
stop_database() {
java -Xmx256m -Xms256m -jar $KVHOME/lib/kvstore.jar stop -root $KVROOT
exit
}
start_database() {
nohup java -Xmx256m -Xms256m -jar $KVHOME/lib/kvstore.jar start -root $KVROOT &
}
create_bootconfig() {
[[ -n $NODE_TYPE ]] && [[ $NODE_TYPE = "m" ]] && java -jar $KVHOME/lib/kvstore.jar makebootconfig -root $KVROOT -port 5000 -admin 5001 -host "$(hostname -f)" -harange 5010,5020 -store-security none -capacity 1 -num_cpus 0 -memory_mb 0
[[ -n $NODE_TYPE ]] && [[ $NODE_TYPE = "s" ]] && java -jar $KVHOME/lib/kvstore.jar makebootconfig -root $KVROOT -port 5000 -host "$(hostname -f)" -harange 5010,5020 -store-security none -capacity 1 -num_cpus 0 -memory_mb 0
}
trap stop_database SIGTERM
if [ ! -f $KVROOT/config.xml ]; then
create_bootconfig
fi
start_database
touch $KVROOT/snaboot_0.log
tail -f $KVROOT/snaboot_0.log
Note that above script is using an environment variable to know if we are launching a master node (with the admin tool enabled) and a regular node, in both cases if $KVROOT/config.xml is not present we assume that the makebootconfig operation should be execute first.
To build an image using above Docker file is necessary to run:
docker build -t "oracle-nosql/net" .after that a new Docker image will be ready to use at the local repository:
REPOSITORY TAG IMAGE ID CREATED VIRTUAL SIZE
oracle-nosql/net latest 2bccb187cbbe 4 days ago 476.9 MB
oracle-nosql/net latest 2bccb187cbbe 4 days ago 476.9 MB
now as in the other blog post we can launch a NoSQL cluster using a volatile repository or a persistent one, here both examples, volatile repository (changes on NoSQL storage will be lost when Docker image is removed):
#!/bin/bash
export KVHOME `docker inspect --format='{{index .Config.Env 3}}' oracle-nosql/net`
export KVROOT `docker inspect --format='{{index .Config.Env 7}}' oracle-nosql/net`
echo starting cluster using $KVHOME and $KVROOT
docker network create -d bridge mycorp.com
docker run -d -t --net=mycorp.com --publish=5000:5000 --publish=5001:5001 -e NODE_TYPE=m -P --name master -h master.mycorp.com oracle-nosql/net
docker run -d -t --net=mycorp.com -e NODE_TYPE=s -P --name slave1 -h slave1.mycorp.com oracle-nosql/net
docker run -d -t --net=mycorp.com -e NODE_TYPE=s -P --name slave2 -h slave2.mycorp.com oracle-nosql/net
persistent repository (NoSQL storage will persist over multiple cluster executions):
#!/bin/bash
export KVHOME `docker inspect --format='{{index .Config.Env 3}}' oracle-nosql/net`
export KVROOT `docker inspect --format='{{index .Config.Env 7}}' oracle-nosql/net`
echo starting cluster using $KVHOME and $KVROOT
mkdir -p /tmp/kvroot1
mkdir -p /tmp/kvroot2
mkdir -p /tmp/kvroot3
docker network create -d bridge mycorp.com
docker run -d -t --volume=/tmp/kvroot1:$KVROOT --net=mycorp.com --publish=5000:5000 --publish=5001:5001 -e NODE_TYPE=m -P \
--name master -h master.mycorp.com oracle-nosql/net
docker run -d -t --volume=/tmp/kvroot2:$KVROOT --net=mycorp.com -e NODE_TYPE=s -P --name slave1 -h slave1.mycorp.com oracle-nosql/net
docker run -d -t --volume=/tmp/kvroot3:$KVROOT --net=mycorp.com -e NODE_TYPE=s -P --name slave2 -h slave2.mycorp.com oracle-nosql/net
starting a NoSQL cluster by using a persistent or a volatile way is easy using above scripts, for example:
./start-cluster-persistent.sh
starting cluster using /kv-3.5.2 and /var/kvroot
81ff17648736e366f5a30e74abb2168c6b784e17986576a9971974f1e4f8589e
b0ca038ee366fa1f4f2f645f46b9df32c9d2461365ab4f03a8caab94b4474027
53518935f250d43d04388e5e76372c088a7a933a110b6e11d6b31db60399d03d
05a7ba2908b77c1f5fa3d0594ab2600e8cb4f9bbfc00931cb634fa0be2aaeb56
to deploy a NoSQL storage we use a simple script as:
#!/bin/bash
export KVHOME `docker inspect --format='{{index .Config.Env 3}}' oracle-nosql/net`
export KVROOT `docker inspect --format='{{index .Config.Env 7}}' oracle-nosql/net`
echo deploying cluster using $KVHOME and $KVROOT
grep -v "^#" script.txt | while read line ;do
docker exec -t master java -jar $KVHOME/lib/kvstore.jar runadmin -host master -port 5000 $line;
done
and script.txt as:
### build script start
configure -name mystore
plan deploy-zone -name "Boston" -rf 3 -wait
plan deploy-sn -zn zn1 -host master.mycorp.com -port 5000 -wait
plan deploy-admin -sn sn1 -port 5001 -wait
pool create -name BostonPool
pool join -name BostonPool -sn sn1
plan deploy-sn -zn zn1 -host slave1.mycorp.com -port 5000 -wait
pool join -name BostonPool -sn sn2
plan deploy-sn -zn zn1 -host slave2.mycorp.com -port 5000 -wait
pool join -name BostonPool -sn sn3
topology create -name topo -pool BostonPool -partitions 300
plan deploy-topology -name topo -wait
show topology
### build script end
a ping script returns:
Pinging components of store mystore based upon topology sequence #308
300 partitions and 3 storage nodes
Time: 2016-03-01 14:51:36 UTC Version: 12.1.3.5.2
Shard Status: healthy:1 writable-degraded:0 read-only:0 offline:0
Admin Status: healthy
Zone [name="Boston" id=zn1 type=PRIMARY] RN Status: online:3 offline:0 maxDelayMillis:0 maxCatchupTimeSecs:0
Storage Node [sn1] on master.mycorp.com:5000 Zone: [name="Boston" id=zn1 type=PRIMARY] Status: RUNNING Ver: 12cR1.3.5.2 2015-12-03 08:34:31 UTC Build id: 0c693aa1a5a0
Admin [admin1] Status: RUNNING,MASTER
Rep Node [rg1-rn1] Status: RUNNING,REPLICA sequenceNumber:100,693 haPort:5011 delayMillis:0 catchupTimeSecs:0
Storage Node [sn2] on slave1.mycorp.com:5000 Zone: [name="Boston" id=zn1 type=PRIMARY] Status: RUNNING Ver: 12cR1.3.5.2 2015-12-03 08:34:31 UTC Build id: 0c693aa1a5a0
Rep Node [rg1-rn2] Status: RUNNING,REPLICA sequenceNumber:100,693 haPort:5010 delayMillis:0 catchupTimeSecs:0
Storage Node [sn3] on slave2.mycorp.com:5000 Zone: [name="Boston" id=zn1 type=PRIMARY] Status: RUNNING Ver: 12cR1.3.5.2 2015-12-03 08:34:31 UTC Build id: 0c693aa1a5a0
Rep Node [rg1-rn3] Status: RUNNING,MASTER sequenceNumber:100,693 haPort:5010
finally we can test the cluster using some Oracle NoSQL examples, here two, external-table.sh:
#!/bin/bash
export KVHOME `docker inspect --format='{{index .Config.Env 3}}' oracle-nosql/net`
export KVROOT `docker inspect --format='{{index .Config.Env 7}}' oracle-nosql/net`
echo hello world cluster using $KVHOME and $KVROOT
docker exec -t master javac -cp examples:lib/kvclient.jar examples/externaltables/UserInfo.java
docker exec -t master javac -cp examples:lib/kvclient.jar examples/externaltables/MyFormatter.java
docker exec -t master javac -cp examples:lib/kvclient.jar examples/externaltables/LoadCookbookData.java
docker exec -t master java -cp examples:lib/kvclient.jar externaltables.LoadCookbookData -store mystore -host master -port 5000 -delete
and parallel-scan.sh:
#!/bin/bash
export KVHOME `docker inspect --format='{{index .Config.Env 3}}' oracle-nosql/net`
export KVROOT `docker inspect --format='{{index .Config.Env 7}}' oracle-nosql/net`
echo parallel scan cluster using $KVHOME and $KVROOT
docker exec -t master javac -cp examples:lib/kvclient.jar examples/parallelscan/ParallelScanExample.java
docker exec -t master java -cp examples:lib/kvclient.jar parallelscan.ParallelScanExample -store mystore -host master -port 5000 -load 50000
docker exec -t master java -cp examples:lib/kvclient.jar parallelscan.ParallelScanExample -store mystore -host master -port 5000 -where 99
here some outputs:
# ./parallel-scan.sh
parallel scan cluster using /kv-3.5.2 and /var/kvroot
1400 records found in 3448 milliseconds.
Detailed Metrics: rg1 records: 50010 scanTime: 3035
# ./external-table.sh
hello world cluster using /kv-3.5.2 and /var/kvroot
50010 records deleted
parallel scan cluster using /kv-3.5.2 and /var/kvroot
1400 records found in 3448 milliseconds.
Detailed Metrics: rg1 records: 50010 scanTime: 3035
# ./external-table.sh
hello world cluster using /kv-3.5.2 and /var/kvroot
50010 records deleted
the NoSQL Web Admin tools shows:
and that's all IMO much easier. a complete list of file used in this post is available at GDrive.
Playing with graphOra and Graphite
Following Neto's blog post about graphOra (Docker Image) – Oracle Real Time Performance Statistics I did my personal test using a Docker image for 12c.
First, I started a 12c Docker DB using:
# docker run --privileged=true --volume=/var/lib/docker/db/ols:/u01/app/oracle/data --name ols --hostname ols --detach=true --publish=1521:1521 --publish=9099:9099 oracle-12102Next starting Graphite Docker image:
# docker run --name graphs-db -p 80 -p 2003 -p 2004 -p 7002 --rm -ti nickstenning/graphiteNext installing graphOra repository:
# docker run -ti --link ols:oracle-db netofrombrazil/graphora --host oracle-db --port 1521 --sid ols --create
Enter sys password: -------
Creating user graphora
Grant access for user graphora to create sessions
Grant select privilege on V$SESSION_EVENT, V$SYSSTAT, V$STATNAME for user graphora
---
GraphOra is ready to collect your performance data!
phyReads: 0 phyWrites: 0 dbfsr: 43.30 lfpw: 43.30
phyReads: 0 phyWrites: 0 dbfsr: 0.00 lfpw: 0.00
phyReads: 0 phyWrites: 0 dbfsr: 0.00 lfpw: 0.00
First, I started a 12c Docker DB using:
# docker run --privileged=true --volume=/var/lib/docker/db/ols:/u01/app/oracle/data --name ols --hostname ols --detach=true --publish=1521:1521 --publish=9099:9099 oracle-12102Next starting Graphite Docker image:
# docker run --name graphs-db -p 80 -p 2003 -p 2004 -p 7002 --rm -ti nickstenning/graphiteNext installing graphOra repository:
# docker run -ti --link ols:oracle-db netofrombrazil/graphora --host oracle-db --port 1521 --sid ols --create
Enter sys password: -------
Creating user graphora
Grant access for user graphora to create sessions
Grant select privilege on V$SESSION_EVENT, V$SYSSTAT, V$STATNAME for user graphora
---
GraphOra is ready to collect your performance data!
Finally starting the graphOra Docker image:
# docker run -ti --link ols:oracle-db --rm --link graphs-db netofrombrazil/graphora --host oracle-db --port 1521 --sid ols --interval 10 --graphite graphs-db --graph-port 2003phyReads: 0 phyWrites: 0 dbfsr: 43.30 lfpw: 43.30
phyReads: 0 phyWrites: 0 dbfsr: 0.00 lfpw: 0.00
phyReads: 0 phyWrites: 0 dbfsr: 0.00 lfpw: 0.00
and that's all, happy monitoring.
Here an screenshot from my monitored session:
Note on parameters usedFirst from the original post is mandatory to remove parameter graphOra, I think is due to changes on the image build of Docker image netofrombrazil/graphora.
Second I used --link Docker syntax to avoid IP usage on command line options, that is, my Oracle DB is running on a container named ols, Graphite server running on a container named graphs-db, so by passing parameters --link ols:oracle-db --link graphs-db graphOra container receives connectivity and /etc/host file updated with the IP address of both related containers.


