

Syed Jaffar
Whatever topic has been discussed on this blog is my own finding and views, not necessary match with others. I strongly recommend you to do a test before you implement the piece of advice given at my blog.The Human Flyhttp://www.blogger.com/profile/03489518270084955004noreply@blogger.comBlogger315125
Updated: 1 week 3 days ago
Oracle Cloud & Third party tools
There have been several buzz words and offerings since the invention of Cloud concepts. We have been hearing of Private Cloud, Public Cloud, Hybrid cloud and more recently multi-clouds concepts and offering from many leading cloud market players. All most all leading market players are offering several tools and solutions to support seamless administration, maintenance and operations tasks.
Despite many OCI offerings, still we sometimes might need third-party tools or solutions to achieve some of the goals to move or manage the cloud platforms. So, I gonna walk through some of the third-party tools/solutions that are certified and supported OCI operations.
- According to Commvault, over 80% of companies are using the multi-cloud today. Commvault Cloud Backup solution provides support backup and recovery for over 40% clouds. This can ease backup and recovery operations between clouds.
- Vertitas's Netbackup 7.7.x supports backup and recovery operations on Oracle Cloud as well as supports multi-cloud data protection solutions. With NetBackup multi-cloud data protection, you can achieve seamless deduplication between data centers and multi-clouds.
- Using Cyberduck version 6.4.0 or higher, you can connect to OCI object storage
- With dbm cloud systems, you can easy move data and VMs from Classic to OCI, migrate & replicate data from on-premise to OCI and move data stored from any cloud vendor into OCI.
- VictorOps with OCI integration can greatly assist in cloud infrastructure and application monitoring, as well as real-time incident response will improve significantly.
- ZeroDown software provides HA option for Oracle cloud infrastructure.
- Coriolis is the simplest way to migrate your windows or Linux VMs alongside their underlying storage and networking configuration across cloud platforms.
There are many other third-party useful solutions available in the market. This is a just tiny list of useful third-party solutions on OCI.
Oracle database migration to cloud with Zero Downtime Migration (ZDM)
I wrote this article on my LN page, visit the link below to read it.
Migration methods to Autonomous Database (ADB) - Part IV (DBMS_CLOUD.COPY_DATA)
In this part of Migration methods to Autonomous Database (ADB) article series, we will see how to load data into ADB database using the DBMS_CLOUD package.
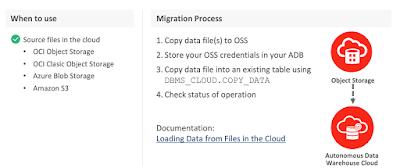
Assuming you have an ADB database up & running and you wanna load data from the file stored in any of the supported object storage. The image below from Oracle presentation depicts explains what type of object storage is supported to store the files, and settings required part of DBMS_CLOUD package to load the data.
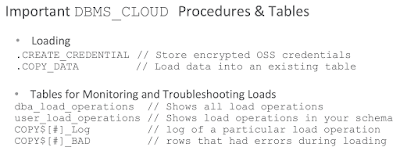
Below image depicts the important procedures and table details to monitor the loading jobs:
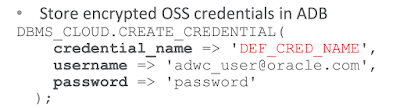
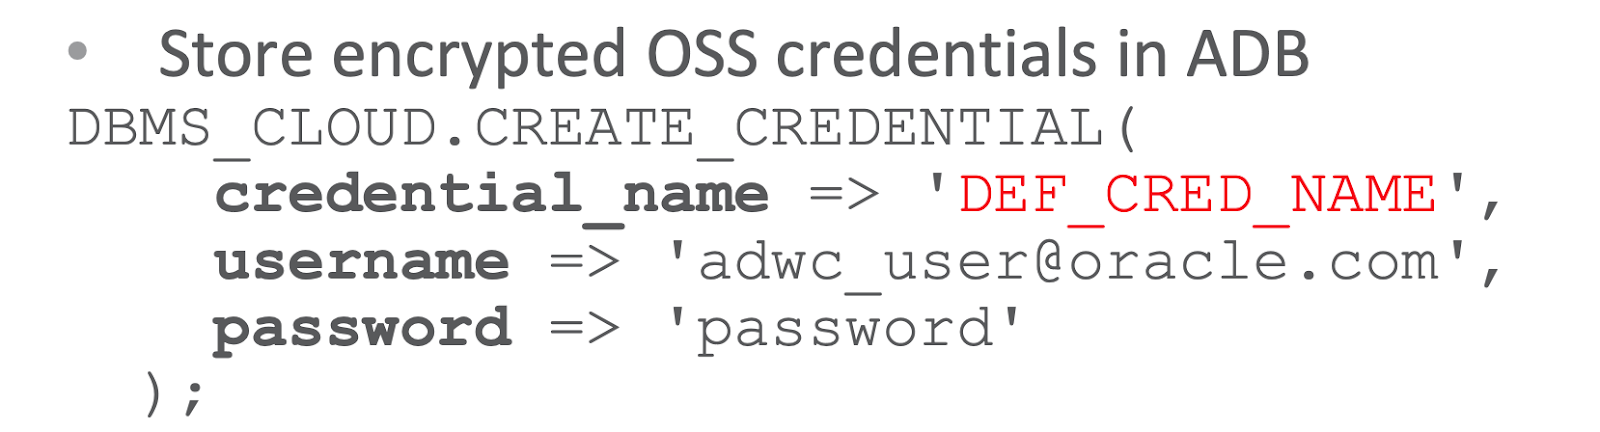
You may review my earlier articles to understand how to load files into an Oracle object storage. Once you have the files put in a bucket, you then need to store the OSS credentials in the ADB database using the example below:
And finally use the example below to load the data into the table:
If you are loading bulk data, you can query table below to know data loading operation progress:
So, we have learned how to load data into ADB using the DBMS_CLOUD package.
Assuming you have an ADB database up & running and you wanna load data from the file stored in any of the supported object storage. The image below from Oracle presentation depicts explains what type of object storage is supported to store the files, and settings required part of DBMS_CLOUD package to load the data.
Below image depicts the important procedures and table details to monitor the loading jobs:

You may review my earlier articles to understand how to load files into an Oracle object storage. Once you have the files put in a bucket, you then need to store the OSS credentials in the ADB database using the example below:
And finally use the example below to load the data into the table:
BEGIN
DBMS_CLOUD.COPY_DATA(
table_name =>'CHANNELS',
credential_name =>DEF_CRED_NAME,
file_uri_list =>'https://swiftobjectstorage.<region>.oraclecloud.com/v1/<tenancy>/<bucketname>/<filename>',
format => json_object('delimiter' value ',')
);
END;
/
If you are loading bulk data, you can query table below to know data loading operation progress:
SELECT *
FROM  user_load_operations
WHERE type = 'COPY';
Tables below provide information about log file and bad file of data load operations:
SELECT table_name, owner_name, type, status, logfile_table,

  badfile_table

FROM user_load_operations WHERE type = 'COPY';
SELECT * FROM copy$1_log;
SELECT * FROM copy$1_bad;
So, we have learned how to load data into ADB using the DBMS_CLOUD package.
Migration methods to Autonomous Database (ADB) - Part III (SQL Developer)
In part III article series of Migration methods to Autonomous Database we will see how to migrate or load data into ADB using SQL Developer.
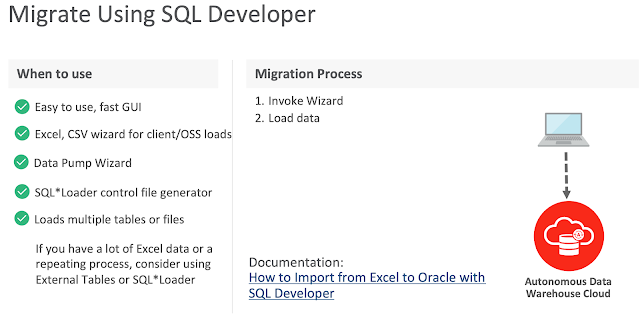
Below slide from Oracle presentation depicts SQL Developer different use cases to migrate or load data into ADB:
Following screenshots walk through data loading scenario from an excel sheet into an existing table using SQL Developer. To walk though this demonstration, ensure the following is in-place:
Downloading connection credentials
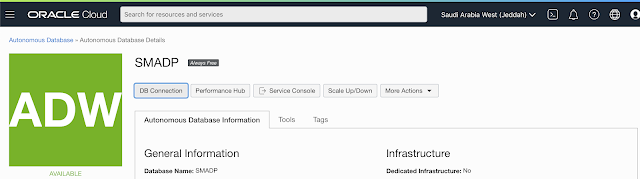
Presuming an ADB is created and it's up & running. From the OCI console, select the ADB, click the DB Connection tab to download the credentails.
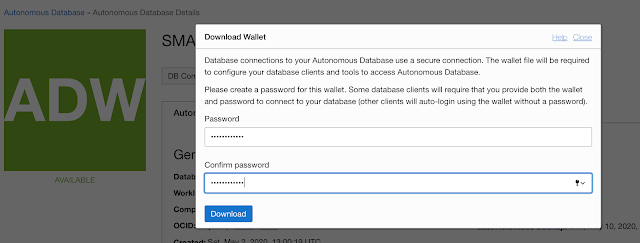
You have to input a password before you download the connection credentials.
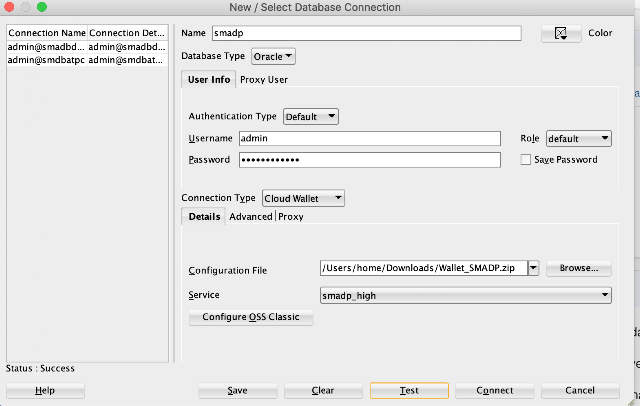
Start the SQL Developer tool and connect to the ADB using the credentials downloaded previously.
Specify the location of the .zip files (connection credentials) and choose the suitable TNS service, high, medium or low.
Once you connected to the database, select table and choose import data option by clicking the right mouse button on the table, as shown below:
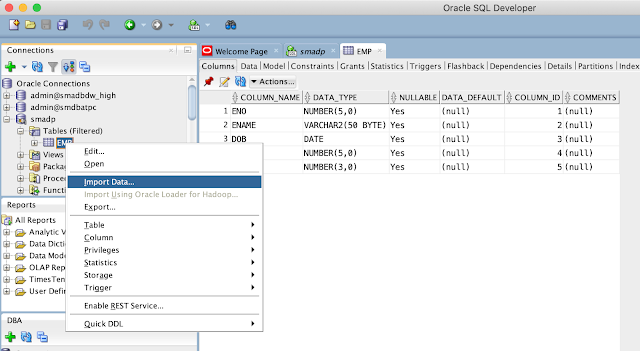
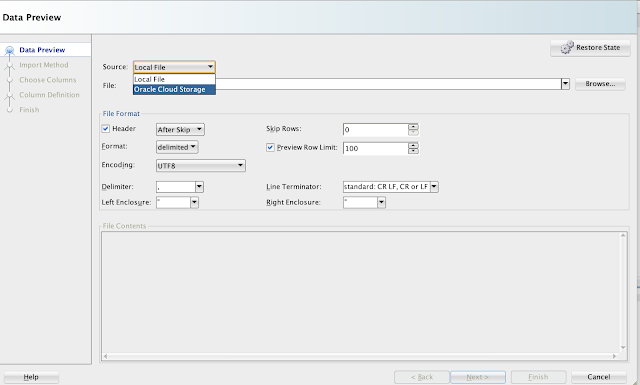
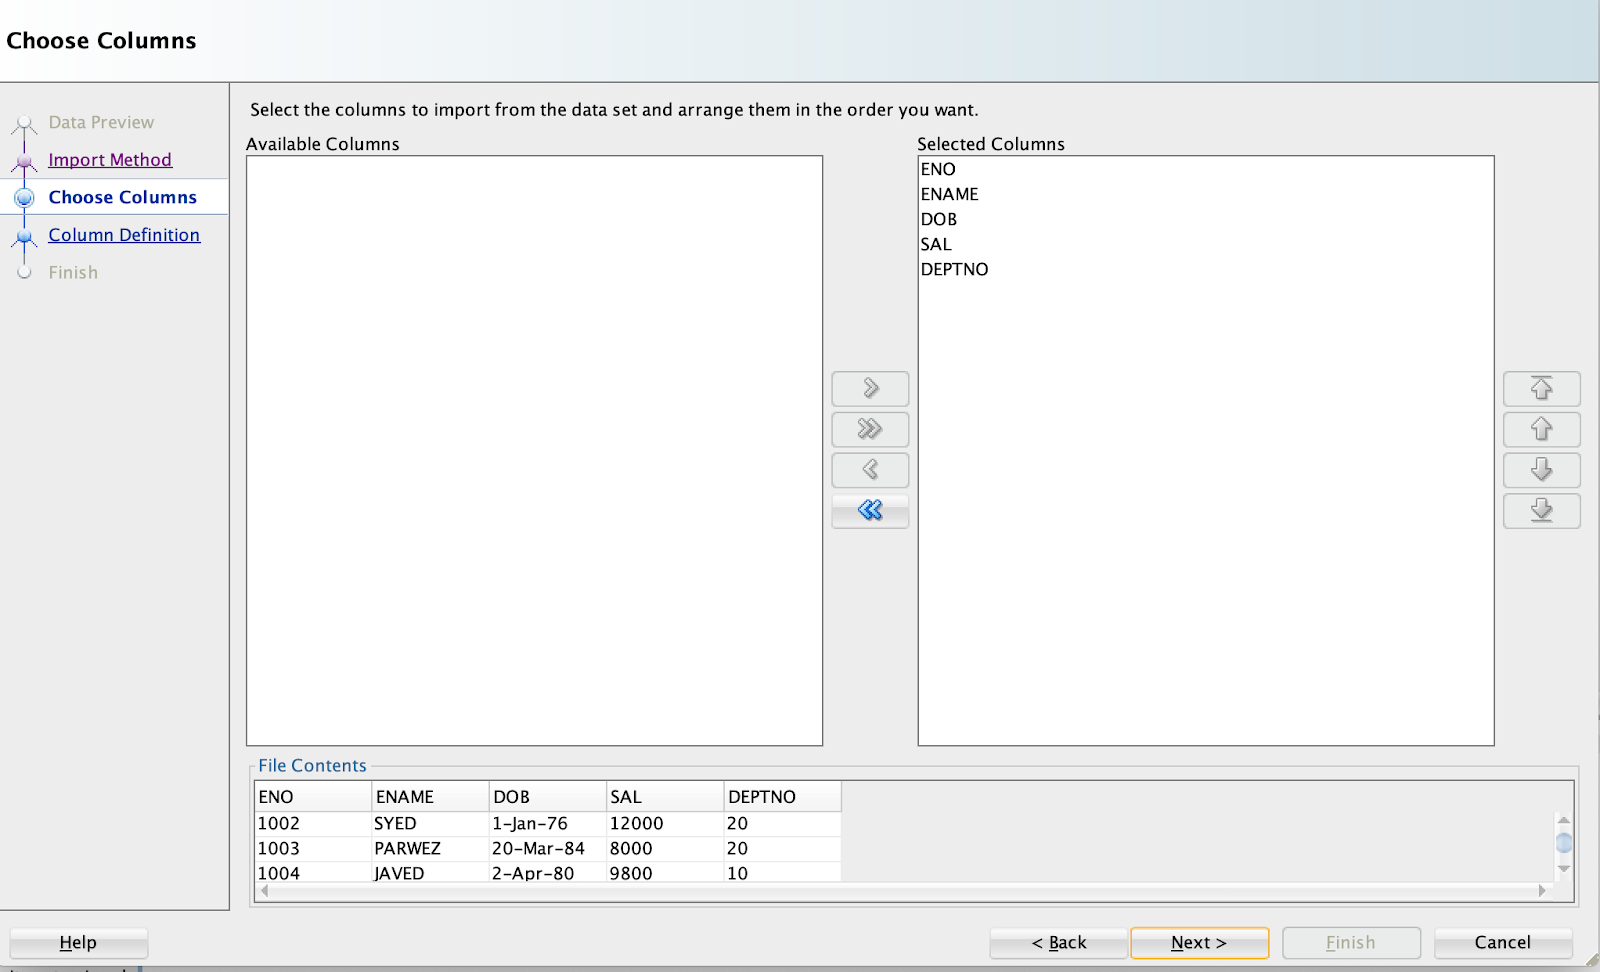
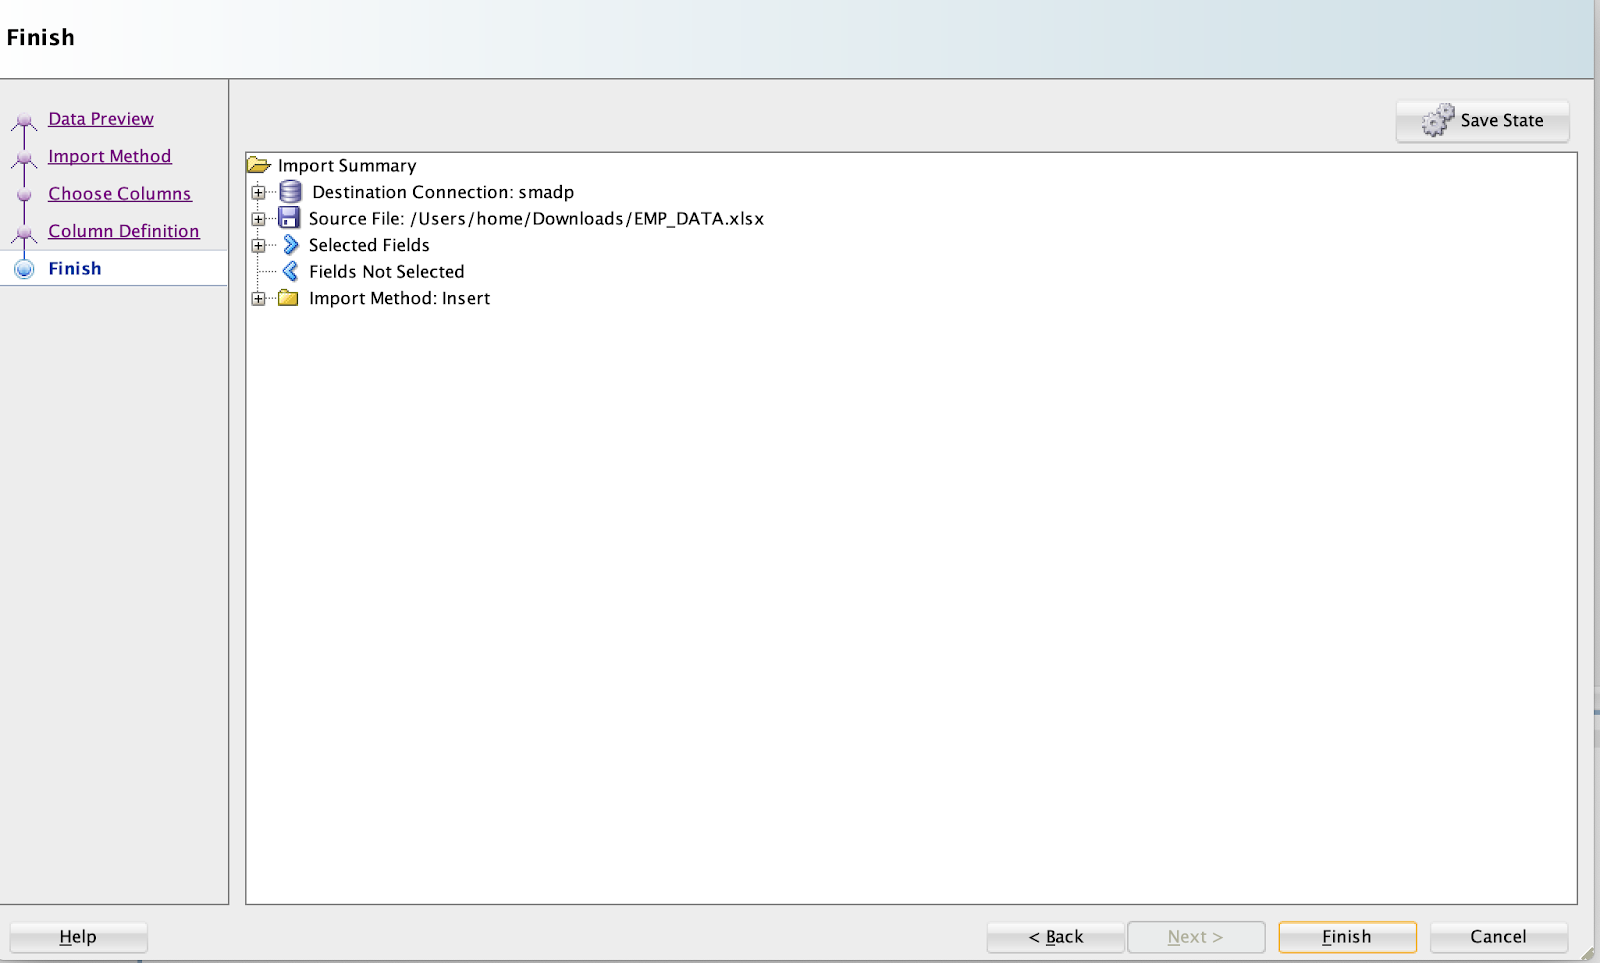
In this scenario, there is a table 'EMP, and we will load the data from an excel sheet. So, choose the file. Ensure you select Local File option from the Source.

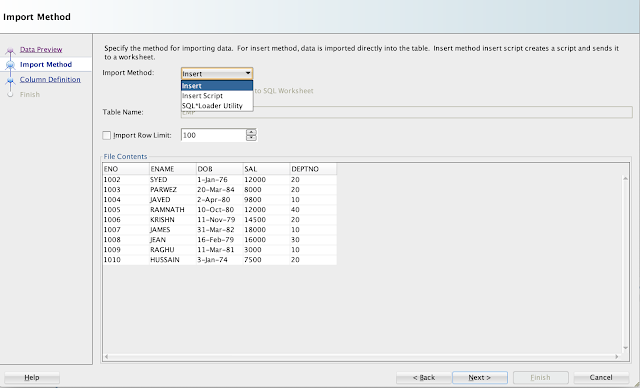
Choose Insert option from Import Method:
Map the columns, if not already selected.
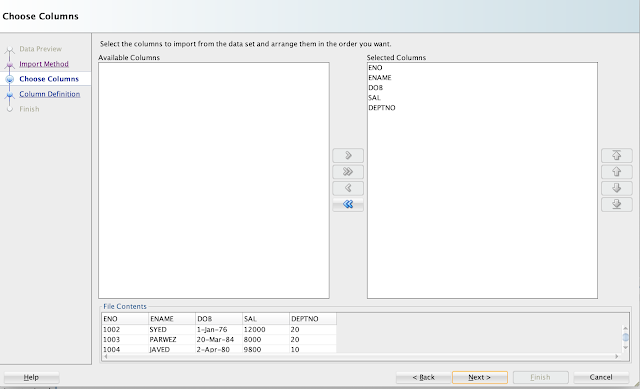
Choose the Match by option drop down list:

Finish gives the import details.

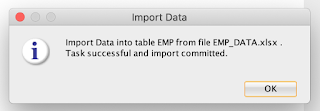
Once you click the Finish button, data will be loaded successfully and below message will appear:
And you can see the data is successfully loaded and can be viewed.
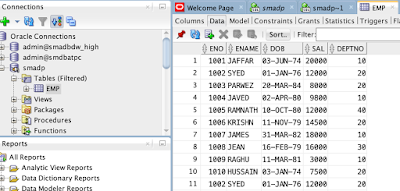
So using SQL Developer, you can easily load the data from files CSV, XLS, XLSX, TSV and TXT.
Hope you got the basic understanding of data loading using SQL Developer.
Below slide from Oracle presentation depicts SQL Developer different use cases to migrate or load data into ADB:

Following screenshots walk through data loading scenario from an excel sheet into an existing table using SQL Developer. To walk though this demonstration, ensure the following is in-place:
- an ADB is created and running
- You have downloaded the database connection credentials (as shown in the below screenshots)
- You have an excel sheet to load the data
Downloading connection credentials
Presuming an ADB is created and it's up & running. From the OCI console, select the ADB, click the DB Connection tab to download the credentails.

You have to input a password before you download the connection credentials.

Start the SQL Developer tool and connect to the ADB using the credentials downloaded previously.
Specify the location of the .zip files (connection credentials) and choose the suitable TNS service, high, medium or low.

Once you connected to the database, select table and choose import data option by clicking the right mouse button on the table, as shown below:

In this scenario, there is a table 'EMP, and we will load the data from an excel sheet. So, choose the file. Ensure you select Local File option from the Source.


Choose Insert option from Import Method:

Map the columns, if not already selected.
Choose the Match by option drop down list:

Finish gives the import details.
Once you click the Finish button, data will be loaded successfully and below message will appear:

And you can see the data is successfully loaded and can be viewed.

So using SQL Developer, you can easily load the data from files CSV, XLS, XLSX, TSV and TXT.
Hope you got the basic understanding of data loading using SQL Developer.
Migration methods to Autonomous Database (ADB) - Part II (MV2ADB)
In part II of migration methods to ADB blog series, we will look into MV2ADB tool details and usage. If you haven't read the Part I, I would encourage you to read it to get basic knowledge on various solutions offered by Oracle and some of the prerequisites for on-premise database migration to ADB.
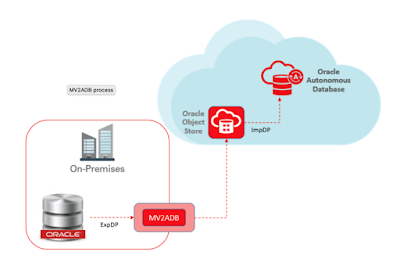
Move to Autonomous Database (aka MV2ADB) tool new tool introduced by Oracle to easily migrate on-premise Oracle database over Autonomous Database levering Oracle data pump capabilities. The tool automates data loading into Oracle Object storage and migrating the data into ADB by one-click option.
The picture below depicts the flow of data migration process using the MV2ADB tool:
Ensure following conditions are met before you launch the migration operation:
https://github.com/oracle/oci-cli

The MV2ADB tool can be installed on-premise using the RPM shown below:
# rpm -i mv2adb-2.0.1-X.noarch.rpm
Following is the directory structure of the tool:
# tree /opt/mv2adb/
/opt/mv2adb/
├── conf
| └── DBNAME.mv2atp.cfg
├── lib
| ├── MV2ADB_LoggingAndTracing.pm
| ├── MV2ADB_passwd.jar
| ├── MV2ADB_PFile.pm
| ├── MV2ADB_Queries.pm
| └── MV2ADB_Utils.pm
└── mv2adb
└── utils
├── install_adb_advisor.sql
└── premigration.jar
You can also download the tool zip file mv2adb-2.0.1-X.tar.gz from the MOS specified here and using below tar command to untar the file into a specific directory on the server.
tar xvfz mv2adb-2.0.1.X.tar.gz -C <target directory>
Before you use the tool, ensue the path is set correct, as shown below:
$ export MV2ADB_HOME=/home/oracle/mv2adb/mv2adb-2.0.1.x
Using command below, you can de-install the tool:
# rpm -e mv2adb-2.0.1-X.noarch
You can refer the log files for diagnose issues related to the tool:
"/opt/mv2adb/out/log"
MV2ADB supports following operational modes:
Courtesy MOS 2463574.1
Example with configuration file:
# ./mv2adb auto -conf conf/mv2atp.cfg
As mentioned the different operation modes, you can also use to export, copy, or import data using individual operation modes available with the tool. Refer the examples below:
# ./mv2adb expdp \
--dbcs //<host name/ip address>/DB122H1 \
--schemas SCHEMA_1,SCHEMA_2,SCHEMA_3,SCHEMA_4 \
--dumpname expdp.dmp --dumppath /tmp \
--ohome /u01/app/oracle/product/12.2.0.1/dbhome_1 \
--adbname RCATP \
--adbcfile /opt/mv2adb/source/Wallet_RCATP.zip \
# ./mv2adb impdp \
-ociregion us-phoenix \
-ocinamespace NAMESPACE_NAME \
-ocibucket BUCKET_NAME \
-ociid mail@corp.com \
-adbname RCATP \
-cfile /opt/mv2adb/source/Wallet_RCATP.zip \
-ichome /u01/app/oracle/product/instantclient_18_3 \
-dumpfile rcatp_exp_01.dmp,rcatp_exp_02.dmp \
-encryption \
-enctype AES256
For more usage Syntax and examples, refer MOS 2463574.1.
One of the advantages of MV2ADB is that the tool automatically install, configure and execute the Schema Advisor.
The tool can be used with configuration file or command line options.
References:
(ADB) MV2ADB: move data to Autonomous Database in "one-click" (Doc ID 2463574.1)
Move to Autonomous Database (aka MV2ADB) tool new tool introduced by Oracle to easily migrate on-premise Oracle database over Autonomous Database levering Oracle data pump capabilities. The tool automates data loading into Oracle Object storage and migrating the data into ADB by one-click option.
The picture below depicts the flow of data migration process using the MV2ADB tool:

Ensure following conditions are met before you launch the migration operation:
- HTTP connectivity between on-premise and Oracle object storage. Required to move dump files
- Download ADB credentials file
- Download and install latest Oracle client to have new version of expdp/impdp and other essential tools
- Perl >=5.10
- Perl-data-dumper
- Set java in execution path
- Also download and configure OCI CLI from the below link:
https://github.com/oracle/oci-cli
The MV2ADB tool can be installed on-premise using the RPM shown below:
# rpm -i mv2adb-2.0.1-X.noarch.rpm
Following is the directory structure of the tool:
# tree /opt/mv2adb/
/opt/mv2adb/
├── conf
| └── DBNAME.mv2atp.cfg
├── lib
| ├── MV2ADB_LoggingAndTracing.pm
| ├── MV2ADB_passwd.jar
| ├── MV2ADB_PFile.pm
| ├── MV2ADB_Queries.pm
| └── MV2ADB_Utils.pm
└── mv2adb
└── utils
├── install_adb_advisor.sql
└── premigration.jar
tar xvfz mv2adb-2.0.1.X.tar.gz -C <target directory>
Before you use the tool, ensue the path is set correct, as shown below:
$ export MV2ADB_HOME=/home/oracle/mv2adb/mv2adb-2.0.1.x
Using command below, you can de-install the tool:
# rpm -e mv2adb-2.0.1-X.noarch
You can refer the log files for diagnose issues related to the tool:
"/opt/mv2adb/out/log"
MV2ADB supports following operational modes:
- Auto Operations
- ExpDP Operations
- ImpDP Operation
- OCI Object Storage/Bucket Operations
- Database Schema Operations
- Encrypt Password Operations
The Auto operations (aka one command operation) automates the entire migration operation, performing the following individual operation:
- Schema based expdp from source database
- Upload the dump file over OCI object storage
- Loading data with impdp to ADB
Refer the below sytanx for parameters and usage:
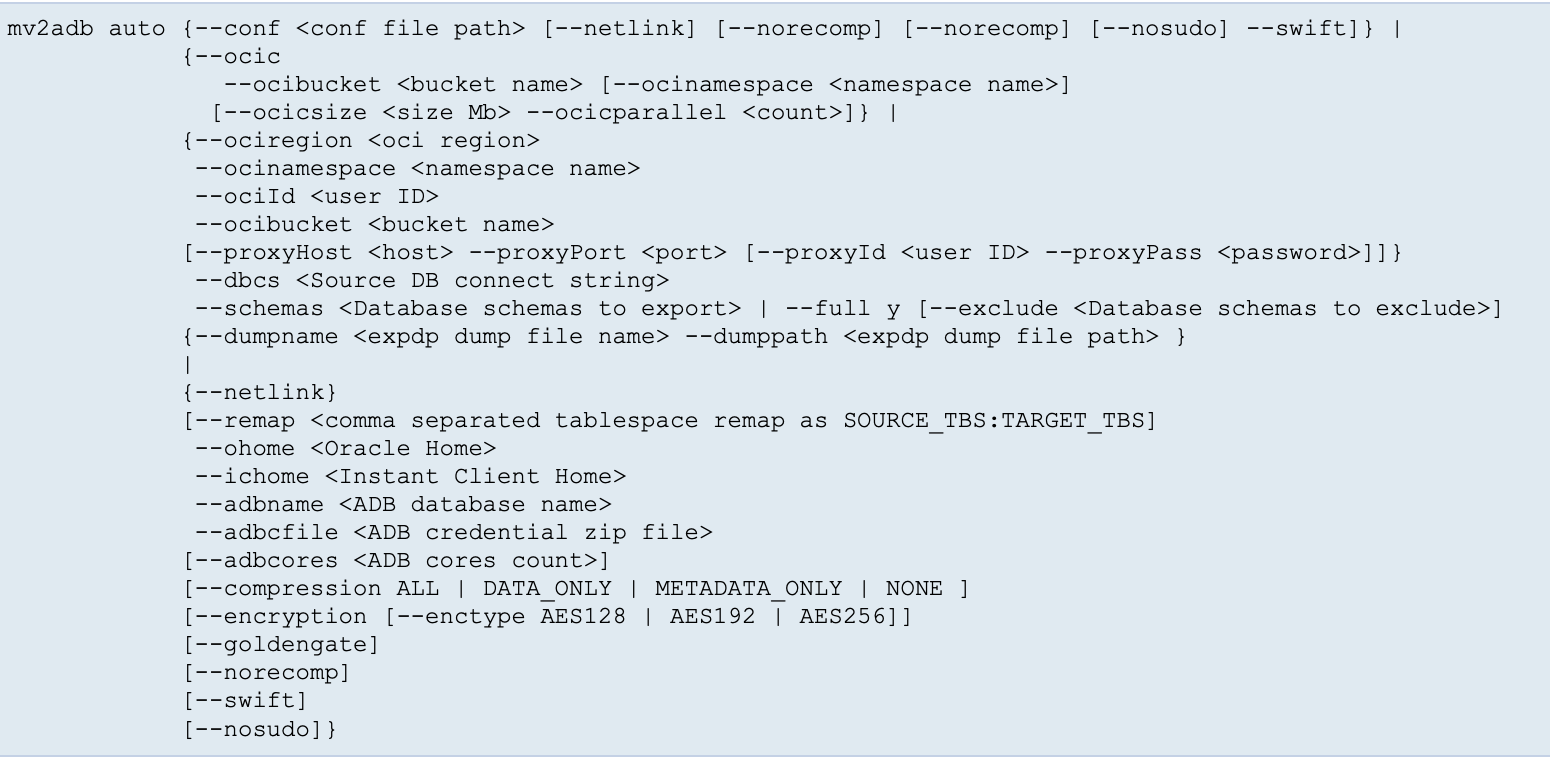
Courtesy MOS 2463574.1
Example with configuration file:
# ./mv2adb auto -conf conf/mv2atp.cfg
As mentioned the different operation modes, you can also use to export, copy, or import data using individual operation modes available with the tool. Refer the examples below:
# ./mv2adb expdp \
--dbcs //<host name/ip address>/DB122H1 \
--schemas SCHEMA_1,SCHEMA_2,SCHEMA_3,SCHEMA_4 \
--dumpname expdp.dmp --dumppath /tmp \
--ohome /u01/app/oracle/product/12.2.0.1/dbhome_1 \
--adbname RCATP \
--adbcfile /opt/mv2adb/source/Wallet_RCATP.zip \
# ./mv2adb impdp \
-ociregion us-phoenix \
-ocinamespace NAMESPACE_NAME \
-ocibucket BUCKET_NAME \
-ociid mail@corp.com \
-adbname RCATP \
-cfile /opt/mv2adb/source/Wallet_RCATP.zip \
-ichome /u01/app/oracle/product/instantclient_18_3 \
-dumpfile rcatp_exp_01.dmp,rcatp_exp_02.dmp \
-encryption \
-enctype AES256
For more usage Syntax and examples, refer MOS 2463574.1.
One of the advantages of MV2ADB is that the tool automatically install, configure and execute the Schema Advisor.
The tool can be used with configuration file or command line options.
References:
(ADB) MV2ADB: move data to Autonomous Database in "one-click" (Doc ID 2463574.1)
Migration methods to Autonomous Database (ADB) - Part I (Data Pump)
In this part of on-premise Oracle database migration to ADB series, we will focus on set of tools to migrate your on-prime database to Autonomies database (ADB). We will briefly discuss about various migration solutions offered by Oracle and walk through data pumps migration pre-requisites and procedure.
Database cloud migration requires a good amount of knowledge about various methods offered by Oracle and the best solution that suits your business need. The best place to start with understanding various database cloud migration solutions is to visit the below interactive Cloud Migration Advisor page designed by Oracle:
ADB Schema Advisor
Once adequate knowledge is gained, the very next step is to know the restrictions & limitations imposed by Oracle ADB. Oracle simplifies this task by introducing a advisor, ADB Schema Advisor. Configure Oracle Autonomous Database Schema Advisor to analyze existing on-premise database and get a report on any concerns that may arise during migration phase. ADB Schema Advisor a very light weight utility with capabilities to analyze existing on-premise database for migration suitability. You can also easily drop the schema. As there are certain limitations with some data types in ADB, the utility helps analyzing and reporting such objects with restricted data types in on-premise database as part of analysis. The utility runs on existing schemas and produces following report:
- Migration summary report with object count
- List objects that can't be migrated to ADB due to restrictions and limitations
- Also, objects list that can be migrated with modifications automatically during import process
- And Best practices and guidance are listed under Information section
You can download the ADB Schema Advisor utility from MOS 2462677.1, which also includes installation & executions steps and advisor output.
Migration methods
Below picture depicts various set of tools supported by Oracle to migrate your on-premise Oracle database to Autonomous Database:


Cloud migration path
To be able to migrate the data, dump files must be placed in cloud storage, either from Oracle, Microsoft Azure, AWS S3 or Oracle cloud object storage.
Migrating with Oracle Data Pump
Oracle Data Pump offers flexible and fast data movement between Oracle databases. Data pump lets you import from dump files residing on cloud storage. Refer the following example to export on-premise database:
expdp sh/welcome123@mydb \
exclude=index,cluster,indextype,materialized_view,materialized_view_log,materialized_zonemap,db_link \
data_options=group_partition_table_data  \
parallel=16 \
schemas=sh \
dumpfile=exp_MYDB_%u.dmp \
encryption_pwd_prompt=yes
Below are some guideline and recommend parameters to use with expdp:
- Schema level export for ADB migration
- Use parallelism to speed-up export job
- Exclude data types that are not supported in ADB with exclude parameter
- With data_options parameter, you can group portions into a non-partition table, recommended by ADB
Once the database is exported, move the dump files to Cloud Storage. In this blog, we will presume you have Oracle Cloud Object Storage option to put your dump files.
Download the latest Oracle client software on your desktop (if not exist) with also includes the latest Data Pump utilities. Before you start importing the database into ADB, ensure the following are in-place:
- An ADB database is configured, up and running
- You have downloaded the ADB connect credentials from OCI page for the ADB
- Export files are moved to Cloud storage
- Create cloud storage credentials in ADB
For more details about credentials download, refer my earlier blog post.
If you are using Oracle cloud object storage, you will have to create a bucket and place all your dump files.
Create cloud storage credentials in ADB referring below example:
BEGIN
  DBMS_CLOUD.CREATE_CREDENTIAL(
    credential_name => 'DEF_CRED_NAME',
    username => 'adwc_user@example.com',
    password => 'Welcome12$'
  );
END;
/
Once the credentials are created in ADB, run the imp command from your desktop referring the example below:
impdp admin/password@ADWC1_high \
     directory=data_pump_dir \
     credential=def_cred_name \
     dumpfile= https://objectstorage.us-ashburn-1.oraclecloud.com/n/namespace-string/b/bucketname/o/export%u.dmp \
     parallel=16 \
     encryption_pwd_prompt=yes \
     partition_options=merge \
     transform=segment_attributes:n \
     transform=dwcs_cvt_iots:y transform=constraint_use_default_index:y \
     exclude=index,cluster,indextype,materialized_view,materialized_view_log,materialized_zonemap,db_link
If you have worked with ADB, you know that admin is the default administrator user. If you wanna use different user to import, then, you will have to create that user in the ADB with required privileges for import. You can choose the TNS service name from the credentials file you have downloaded. You must specify the object URL in the dump file parameter, which is the location of your bucket with dump files.
You may notice we didn't mention the log file in the impdp. To review the log file, you may have to move the file to your object storage using the syntax below:
BEGIN
  DBMS_CLOUD.PUT_OBJECT(
    credential_name => 'DEF_CRED_NAME',
    object_uri => 'https://objectstorage.us-ashburn-1.oraclecloud.com/n/namespace-string/b/bucketname/o/import.log',
    directory_name  => 'DATA_PUMP_DIR',
    file_name => 'import.log');
END;
/
Conclusion
In nutshell, we have learned about various set of tools supported by Oracle to migrate on-prime database to ADB and a walk through a procedure of migrate an on-premise database to ADB using data pumps with best practices for fast migrations. In the subsequent blog posts, we will learn about MV2ADB and other tools and their procedure to migrate to ADB.
References:
Refer some of below notes and links for more understanding about on-premise database migration to Oracle ADB.
Oracle Autonomous Database Schema Advisor (Doc ID 2462677.1)
https://docs.oracle.com/en/cloud/paas/autonomous-data-warehouse-cloud/user/load-data-data-pump.html#GUID-30DB1EEA-DB45-49EA-9E97-DF49A9968E24
https://www.oracle.com/middleeast/database/technologies/cloud-migration.html
https://www.oracle.com/webfolder/s/assets/webtool/cloud-migration-advisor/index.html
Note : Pictures & Diagrams copied from various Oracle presentations for eduction and demo purpose only.
DB Links and ADB - Dos and Don'ts
DB Link simplifies data sharing across oracle databases. And DB link is created using the CREATE DATABASE LINK SQL command, a very simple and straight forward method. DB link creation has a different procedure on an Autonomous database in contract to typical Oracle databases. In this post, we will highlight the rules, limitations and the use of new DBMS_CLOUD_ADMIN package. Let's get into the action.
Rules and Limitations
Note some of below rules and limitations of creating DB link from ADB:
- The target databases (non-ADB) should be configured to use TCP/IP with SSL (TCPS) authentication
- The allowed DB port range is 1521-1525 to ensure the security. You can define the port while creating the DB link
- ADB DB link support databases that are only accessible through a public IP or public hostname
- One directory restricted to one wallet file. Create multiple directories to keep multiple wallet files of multiple databases
- Supported target database versions are 11.2.0.2, 12.1.0.2, 12.2.0.1, 18c and 19c.
Creating DB link from Autonomous Database
Now let's walk through DB link creation procedure from an Autonomous database. As mentioned, you should use DBMS_CLOUD_ADMIN.CREATE_ DATABASE_LINK procedure on ADB. Below steps describe the required procedure:
- Copy your target database wallet file (cwallet.sso) which contains target database certification to an object store
- Using DBMS_CLOUD.CREATE_CREDENTIAL procedure, create access credentials to the object store where the target wallet file is stored.
- Upload the target database wallet file from Object store to database directory using the DBMS_CLOUD.GET_OBJECT procedure. Refer example below:
BEGIN
     DBMS_CLOUD.GET_OBJECT(
        credential_name => 'DEFF_CRED_CRDB',
        object_uri => 'https://objectstorage.us-phoenix-1.oraclecloud.com/n/namespace-string/b/bucketname/o/cwallet.sso',
        directory_name => 'DATA_PUMP_DIR'); -- DATA_PUMP_DIR is the predefined/default directory. It can be another DB directory.
END;
/- Create credentials on ADB, refer below example:
BEGIN
  DBMS_CLOUD.CREATE_CREDENTIAL(
    credential_name => 'DBL_CRDB',
    username => 'SCOTT', -- username must be specified in CAPITAL
    password => 'welcome1'
  );
END;
/
Details are stored in the database in encrypted format.
You can use the query below to list the stored credentials:
SELECT credential_name, username, comments FROM all_credentials;- You can use below command to drop credentials from the database:
BEGIN
   DBMS_CLOUD.DROP_CREDENTIAL('DBL_CRDB');
END;- Now we are ready to create database link from Autonomous database. Use the example below to create:
BEGIN
     DBMS_CLOUD_ADMIN.CREATE_DATABASE_LINK(
          db_link_name => 'ADB_TO_CRDB',
          hostname => 'adb.eu-frankfurt-1.oraclecloud.com',
          port => '1525',
          service_name => 'example_medium.adwc.example.oraclecloud.com',
          ssl_server_cert_dn => 'CN=adwc.example.oraclecloud.com,OU=Oracle BMCS FRANKFURT,O=Oracle Corporation,L=Redwood City,ST=California,C=US',
          credential_name => 'DBL_CRDB',
          directory_name => 'DATA_PUMP_DIR');
END;
/
If you are not an admin privileged user, get the permission to run DBMS_CLOUD_ADMIN.CREATE_DATABASE_LINK procedure.
Now, you can use the DB link from ADB to the target database.
To drop DB link from ADB, you can use the example below:
BEGIN
     DBMS_CLOUD_ADMIN.DROP_DATABASE_LINK(
          db_link_name => 'ADB_TO_CRDB' );
END;
/
Creating DB link to ADB
We have learned so far how to create a DB link from ADB to target database. This section will zip through DB link creation to ADB.
As I have mentioned my previous blog entry that ADB only accepts secured client connections. To which, you will have to download client connect credentials. You can refer my previous blog post for the procedure.
Before creating database link, ensure the following is met:
- Download the client connect credentials
- Unzip the downloaded file to a secure location your computer
- Turn of GLOBAL_NAMES parameter using 'ALTER SYSTEM SET GLOBAL_NAMES=FALSE';
- Using below example, create a db LINK ADB:
CREATE DATABASE LINK DBL_TO_ADB
   CONNECT TO SYEDJ IDENTIFIED BY welcome1
   USING
'(description=(retry_count=20)(retry_delay=3)
     (address=(protocol=tcps)(port=1522)(host=example1.oraclecloud.com))
     (connect_data=(service_name=example2_high.adwc.oraclecloud.com))
     (security=(my_wallet_directory=/u01/targetwallet)
        (ssl_server_dn_match=true)
        (ssl_server_cert_dn="CN=example2.oraclecloud.com,OU=Oracle
          BMCS US,O=Oracle Corporation,L=Redwood City,ST=California,C=US")))';
At this point in time the DB link is ready.
In nutshell, this blog post explained the do's and don'ts of creating DB link from/to ADB.
Connecting to an Autonomous Database using JDBC Thin client
I have discussed in my earlier posts about establishing SQL * Plus and using the SQLcl tool details. Today's blog post will take you through JDBC Thin client configuration details to be able to successfully connect with an autonomous database service. Will primarily focus on mandatory JDK, JDBC versions and client connect credentials requirement details. Let's get started.
To begin with, any Java application that uses JDBC Thin driver requires an Oracle wallet or JavaKeyStore(JKS). Luckily, these files are readily available on OCI console for download. Refer my earlier blog post to learn about downloading client connect credentials files and JavakeyStore files.
Prerequisites for JDBC Thin Driver
Below is the list of perquisites for JDBC Thin client connection:
- Download Connect Credentials as explained in the previous post
- Validate JDK version for security, if you are on less than JDK8u162
- Check JDBC driver version
- JDBC driver 18.3 or higher simplifies security credentials wallet connection configuration.
- Specify the wallet directory in the JDBC connect string.
- Include the wallet directory location in the JDBC url if no TNS_ADMIN environmental variable is set.
Connection string url
Part of client connect credentials downloads, you will have tnsnames.ora files which contains tns service names and connection strings. Below is an example of high level connect string entry:
dbname_high= (description=
      (address=(protocol=tcps)(port=1522)(host=adw.example.oraclecloud.com))(connect_data=(service_name=adw_jdbctest_high.oraclecloud.com))(security=(ssl_server_cert_dn="CN=adw.oraclecloud.com,OU=Oracle
      US,O=Oracle Corporation,L=Redwood City,ST=California,C=US")))
JDBC 18.3 Thin Driver connection string example, for Linux platform:
DB_URL="jdbc:oracle:thin:@dbname_high?TNS_ADMIN=/Users/test/wallet_dbname"Using JavaKeyStore (JKS)
Below example shows the JDBC Thin driver connectivity using JKS to an ADB:
DB_URL="jdbc:oracle:thin:@dbname_high?TNS_ADMIN=/Users/test/wallet_dbname"Subsequently, add the JKS related connection properties to ojdbc.properties file. To use SSL connectivity over Oracle Wallet, below properties should be set to ojdbc.properties files:
# Properties for using Java KeyStore (JKS)
oracle.net.ssl_server_dn_match=true
javax.net.ssl.trustStore==${TNS_ADMIN}/truststore.jks
javax.net.ssl.trustStorePassword=password
javax.net.ssl.keyStore==${TNS_ADMIN}/keystore.jks
javax.net.ssl.keyStorePassword=password
Once the properties are set, compile and run using the below example:
java –classpath ./lib/ojdbc8.jar:./lib/ucp.jar UCPSampleTo go through your firewall with HTTP proxy requirement to connect to an internet, use JDBC Thin client 18.1 or higher. So, add the following to your tnsnames.ora file to go through HTTP proxy:
ADWC1_high =
       (description=
             (address=
                   (https_proxy=proxyhostname)(https_proxy_port=80)(protocol=tcps)(port=1522)(host=adw.example.oraclecloud.com)
             )
             (connect_data=(service_name=adwc1_high.adw.oraclecloud.com)
             )
             (security=(ssl_server_cert_dn="adw.example.oraclecloud.com,OU=Oracle BMCS US,O=Oracle Corporation,L=Redwood City,ST=California,C=US")
             )
       )
In nutshell, we have walk through over JDBC thin driver client connection to an ADB requirements and prerequisites.
Autonomous Database (ADB) connectivity with Oracle SQLcl
This blog post takes you through Oracle SQL Developer command line interface connectivity to an autonomous database (ADB). SQLcl is a free command line interface for Oracle database. It will allow interactive or batch execution of SQL and PL/SQL commands with in-line editing, statement completion, and command recall for a feature-rich experience capabilities. Download the tool from the below url:
With SQLcl 4.2 or higher you can also connect to ADB database, either using Oracle Call Interface or JDBC thin connection. Whatever connection mode, OCI or JDBC, it has to be setup before you can use the SQLcl.
Use the below example to connect to a ADB using SQLcl oci connection:
sql -oci

SQLcl: Release 18.4 Production on Wed Apr 03 15:28:40 2019

Copyright (c) 1982, 2019, Oracle.  All rights reserved.

Username? (''?) sales_dwh@adwc1_low
Password? (**********?) **************
Last Successful login time: Wed Apr 03 2019 15:29:19 -07:00

Connected to:
Oracle Database 18c Enterprise Edition Release 18.0.0.0.0 - Production
Version 18.4.0.0.0

SQL>
Use the below example to use SQLcl with JDBC thin connection:
- Start with sql /nolog
- Configure the session to use existing wallet connection:
SQL> set cloudconfig /home/adwc/wallet_ADWC1.zip
Wallet Password: **********- Connect to ADB database , as shown below:
SQL> connect admin@adwc1_medium
In my next post, will discuss JDBC connectivity details.
SQL * Plus connectivity to Autonomous Database (ADB) procedure
Keeping myself occupied learning all about Autonomous Database (ADB) concepts. Thanks to Oracle for the free offer to course and a certification chance. So planned to write a few important topics along the way while learning. This post will focus on autonomous database (ADB) connectivity options, downloading connection credentials and procedure to connect a ADB database using the SQL * Plus tool.
Autonomous Database (ADB) can be connected through SQL * Net, JDBC thick/thin or ODBC. All connections to the database must use SSL for encryption and under any circumstances, unsecured connection are not allowed.
To start with, every ADB database connection must be made over a public internet and application should use a secure connection (SSL). Before using any connectivity method, database connect credentials must be downloaded from the OCI page for the respective database (instance) or region. Below procedure summarizes how to download connect credentials and use SQL * Plus to connect to a ADB.
Downloading connection credentials
As discussed earlier, ADB only accepts secure connections to the database. Therefore, Oracle client credential (wallet) files which contains your connection credentials should be downloaded first. The wallet can be downloaded either from ADB service console, or from the DB Connection button on instance page or through API calls. Use the following method to download the connection credentials from OCI console:
- Navigate to ADB details page and click on DB Connection button
- Based on the connectivity requirement, choose either Instance or Regional wallet type and click on the Download button
- The credentials file is protected with a password. So, you will have to input a password before downloading the file. The password must be 8 characters long, with at least 1 letter and either 1 numeric character or 1 special character
- Once the password is entered and confirmed, download button will be activated to download the connectivity zip file
- Default name for the file is Wallet_databaename.zip, and the zip files contains following files:
- tnsnames.ora & sqlnet.ora
- cwallet.sso & ewallet.p12
- keystore.jks & tuststore.jks
- ojdbc.properties &
Predefined DB Service Names
The tns entries comes with the following predefined values:
- high A high priority app connection for reporting and batch operations which runs in parallel, subject to queuing.
- medium A typical connection service for reporting and batch operations with limited (4) parallel degree.
- low A low priority connection service for reporting and batch operations with no parallelism options.
- tp (for ATP only), typical application connection service for transaction processing operations with no parallelism.
- tpurgent (ATP only) the highest priority application connection for time critical transaction processing operations. Can specify manual parallelism.
SQL * Plus connection to ADB
Unlike other Oracle cloud options, ADB doesn't provide connectivity to the compute node. So, you have to install Oracle client software 11.2.0.4 or higher version on your system. Once the client software is installed, download connection credentials using the procedure described above.
Unzip/uncompress the zip file downloaded into a secure folder on your computer.
Edit the sqlnet.ora file and replace ?/network/admin text with name of the folder containing the credentials, as shown in the below example on a unix/linux client:
WALLET_LOCATION = (SOURCE = (METHOD = file) (METHOD_DATA = (DIRECTORY="/home/adw_credentials")))
SSL_SERVER_DN_MATCH=yes
It is highly recommended to set TNS_ADMIN environmental variable and set the location of the credentials files.
Update the sqlnet.ora and tnsnames.ora files as per below example if you have a firewall connection and requires HTTP proxy to connect internet (this scenario only support clients with 12.2.0.1 or higher version):
- sqlnet.ora should have this entry: SQLNET.USE_HTTPS_PROXY=on
- And the tnsnames.ora entry should contains the following:
ADWC1_high =
       (description=
             (address=
                   (https_proxy=proxyhostname)(https_proxy_port=80)(protocol=tcps)(port=1522)(host=adwc.example.oraclecloud.com)
             )
             (connect_data=(service_name=adwc1_high.adwc.oraclecloud.com)
             )
             (security=(ssl_server_cert_dn="adwc.example.oraclecloud.com,OU=Oracle BMCS US,O=Oracle Corporation,L=Redwood City,ST=California,C=US")
             )
       )
Once you have the client software and connect credentials ready, now you can use the sql * plus tool to connect to a ADB. Refer below syntax:
sqlplus sales_dwh@adwc1_low

SQL*Plus: Release 18.0.0.0.0 - Production on Wed Apr 3 15:09:53 2019
Version 18.5.0.0.0

Copyright (c) 1982, 2018, Oracle.  All rights reserved.

Enter password:
Last Successful login time: Wed Apr 03 2019 14:50:39 -07:00

Connected to:
Oracle Database 18c Enterprise Edition Release 18.0.0.0.0 - Production
Version 18.4.0.0.0

SQL>
You can also see the last successful login time.
References;
https://docs.oracle.com/en/cloud/paas/autonomous-data-warehouse-cloud/user/connect-sqlplus.html#GUID-A3005A6E-9ECF-40CB-8EFC-D1CFF664EC5A
Free Oracle Learning and Certifications for OCI and Autonomous database - Limited period
Hello All,
Oracle announced a limited period free access to Oracle Learning and Certifications on OCI and Autonomous Database technologies.
Its absolutely free of cost for everyone. Indeed it is a very good chance everyone to learn something new to update Oracle knowledge and get certified. Use the below Oracle link for enrolling to courses and certification:
https://www.oracle.com/corporate/blog/free-certifications-oracle-oci-autonomous-033020.html
All the very best and happy learning.
RAC DB upgrade from 11.2.0.4 to 12.1.0.2 ASM prerequisites fail with DUBA
A 3 node Oracle extended RAC has been successfully upgrade from 11.2.0.1 to 12.1.0.2 just last week. As part of the upgrade planning, we started off with GRID home upgrade process from 11.2.0.4 to 12.1.0.2, followed by DB upgrade from 11.2.0.1 to 11.2.0.4 and finally DB upgrade to 12.1.0.2. This was done over the 3 weeks. As there was no direct in-place database upgrade option for a database v11.2.0.1 to 12.1.0.2, we had to take the alternative route.
In previous two blog posts, I have shared the details about the challenges faced and resolved. So, here is another challenge encountered during the database upgrade. Encountered the below pre-requisites failure during the pre-requisites validation by DBUA:
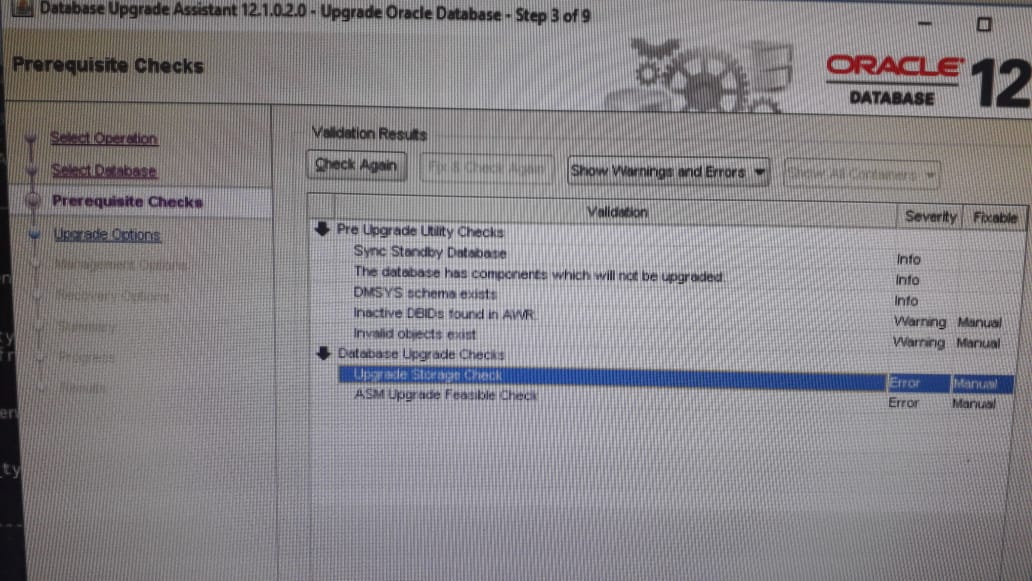
Below is the details of the error:
- ASM Upgrade Feasible Check: The database is using ASM as storage. Before you upgrade database, you need to upgrade ASM using Automatic Storage Management Configuration Assistant (ASMCA) from grid infrastructure home. ASM should be running from grid infrastructure home. Upgrade Storage Check : Disk space usage summary Location +DATA_DG does not exist.
It was wired to see the message despite the fact that the GRID was successfully upgraded, including ASM. After a quick search we have come across of two MOS references , mentioned below, and the solution was just straight forward.
To expedite the post DB upgrade requirements, we did prepare complete environment for EB database.
The solution was to rename the sqlnet.ora file from the 12c network/admin directory. One we did this and resumed DBUA, it went through.
MOS References:
Upgrade database to 12.1.0.2.0, DBUA fails: COULD NOT FIND ANY DISKGROUPS [2039864.1]
Database Upgrade From 11.2.0.4 To 12.1.0.2 Pre-checks Failing while using DBUA [2317976.1]
https://oakinoracle.wordpress.com/2017/05/31/experienced-12c-grid-db-upgrade/
Oracle GI upgrade from 12.1.0.2 to 12.2.0.1 on Exadata
Yet another successful Exadata Grid Infrastructure upgrade to 12.2. Of course the v12.2.0.1 is bit older, but as per customer's request, we had to proceed. As usual there are some takeaway points from this assignment too. I am going to share some of the challenges encountered and fixed during the course of this upgrade.
First thing is first. The 12.2 and above installation and upgrade is really cool with the golden image concept introduction. Even great to know that we can also apply the patch before running the root.sh or root upgrade. I really felt super cool about this.
As part of 2 node Cluster upgrade from 12.1, an 12.2 software gold image is extracted to the 12.2 location and started gridSetup.sh with applyPSU (JAN2020 patch). During OUI validation, gridSetup.sh failing with the following error:
[INS-42505] The installer has detected that the Oracle Grid Infrastructure home software at ($GRID_HOME) is not complete.
The installation was looking older version of jar files, hence, it couldn't find, the warning message appeared. It took very less time to figure out the issue. As JAN20 PSU was applied before the OUI startup, it wasn't reflected, hence, ignored the message and resumed with the setup.
After the successful rootupgrade.sh execution on node 1 and node 2, we found that the session (Xwindow) become inactive and OUI couldn't continue.
With >=12.2, you can easily resume the OUI from the point it failed. All you need to do is the following:
Find out the latest response file used during the failed upgrade in the following location (depending on your 12.2 grid home) shown as example:
/u01/app/12.2.0.1/grid/12.2.0.1_180116/gi_1/install/response
And resume the setup from the first node, as show in below:
gridSetup.sh -executeConfigTools -responseFile <responsefile.rsp>
And the setup resumed and managed to complete the upgrade successfully.
Oracle 11.2.0.1 upgrade with restore point scenario fails
I was recently involved in a 3 instance Oracle RAC v11.2.0.1 database upgrade assignment. My favorite method of database upgrade is manual method. This time I had to opt DBUA tool as per customer demand. A guaranteed restore point was created just before initiating an upgrade process.
When DBUA tool launched and initiated an upgrade process, there were lot of surprises thrown by the tool, like, unable to put the database in flashback database mode etc. It was a scary moment for everyone present around as the tool complained many other issues as proceed along. Finally, the upgrade process was aborted and the DBUA did mention to restore the database from a previous successful backup. It was a heart stop moment.
Luckily no damage was done to the database and restore was not required. Wasn't very sure about guaranteed restore point on v11.2.0.1, so, it was dropped and relaunched the DBUA tool again. And this time the upgrade went through without any surprises and successfully upgraded the database to 11.2.0.4.
Exadata X8M - World's Fastest Database Machine
Exadata X8M has launched during OOW 2019, and termed as world's fastest Database Machine. Let's walkthrough about new additions that has made X8M as world's fastest Database Machine.
An Exadata X8M is the industry's first DB machine integrated with Intel Optane DC persistent memory (read more about this) and 100 gigabit RDMA over converged ethernet. This will be dramatically improves the performance for all sort of workloads, such as OLTP, analytics, IoT, high frequency trading etc by eliminating the storage access bottlenecks. Persistent memory with RoCE networking can reduces IO latency significantly and boosts the performance by 2.5X.
It uses RDMA directly from the DB to access persistent memory in smart storage servers, eliminating the entire OS, IO and network software stacks. Which will deliver the higher throughput with lower latency. Also, frees CPU resources on storage server to execute more smart scan queries for analytic workloads.
Its in-memory performance with all advantages of shared storage benefits the Analytics and OLTP workloads. Direct database access to shared persistent memory accelerates is the real game changer for application that demands large amounts of data.
For more details, read the link below:
https://www.oracle.com/corporate/pressrelease/oow19-oracle-unleashes-worlds-fastest-database-machine-091619.html
Intermittent cellsrv crashes with ORA-07445 after upgrading to 12.2.1.1.7
Exadata X6-2 full and half racks were patched recently with 12.2.1.1.7 Aug/2018 quarterly patch set. An ORA-07445 started to observe and the cellsrv intermittently crashing with ORA-07445 error.
Following error is noticed in the cellsrv alert.log:
ORA-07445: exception encountered: core dump [0000000000000000+0] [11] [0x000000000] [] [] []
The above is registered as a bug whenever cell storage is patched with 12.2.1.1.7 or 12.2.1.1.8. Therefore, if you are planning to patch your cell storage software with one of the above versions, ensure you also apply patch 28181789 to avoid cellsrv intermittently crashing with ORA-07445 error. Otherwise, you need to upgrade the storage software with 18.1.5.
Symptom
Customer may experience intermittent cellsrv crashes with ORA-07445: [0000000000000000+0] [11] [0x000000000] after upgrading storage cell software version to 12.2.1.1.7 or 12.2.1.1.8
Change
Upgrade the Storage cell software to 12.2.1.1.7 or 12.2.1.1.8
Cause
Bug 28181789 - ORA-07445: [0000000000000000+0] AFTER UPGRADING CELL TO 12.2.1.1.7
Fix
Patch 28181789 is available for 12.2.1.1.7 and 12.2.1.1.8 Storage software releases. Follow the README to instructions to apply the patch.
~OR~
apply 18.1.5 and later which includes the fix of 28181789
References;
xadata: Intermittent cellsrv crashes with ORA-07445: [0000000000000000+0] [11] [0x000000000] after upgrading to 12.2.1.1.7 or 12.2.1.1.8 (Doc ID 2421083.1)
Oracle Exadata X8 key capabilities summary
Below is the summary of some of the key benefits of Exadata X8 database machine, software and hardware:
Extreme (unmatched) performance
According to Oracle, the new X8 database machine is capable of delivering unto 60% faster throughput performance in contrast to the earlier Exadata database machines. Having said that, you can pull a 50GB database under one second.
Cost effective extended storage
Petabytes of cost effective storage with option software license. This can significantly reduce the storage cost.
High Memory
Can accommodate upto 28.5 of system memory. Good for heavy workload systems, such as , in-memory databases.
Increased storage capacity
In contrast to earlier models, X8 comes with 40% increase in disk capacity. Each X8 EF system comes with 50TB raw flash capacity. While, the X8 HC with XT storage option, it comes 160TB of raw capacity.
High-performance connectivity
X8 also comes with significant improvement in connectivity. It supports upto 400Gb of client connectivity over multiple 25 GB Ethernet links.
OLTP Read/Write performance
A full X8 rack, typically can do 6.5 million random reads and 5.7 random writes per second for a 8k DB.
Automated features
In addition to the above hardware improvements, it also X8 incorporates autonomous database capability. With ML and AI capabilities, the databases are auto tuned and auto maintained.
List of technical specifications:
- Up to 912 CPU cores and 28.5 TB memory per rack for database processing
- Up to 576 CPU cores per rack dedicated to SQL processing in storage
- From 2 to 19 database servers per rack
- From 3 to 18 storage servers per rack
- Up to 920 TB of flash capacity (raw) per rack
- Up to 3.0 PB of disk capacity (raw) per rack
- Hybrid Columnar Compression often delivers 10X-15X compression ratios
- 40 Gb/second (QDR) InfiniBand Network
- Complete redundancy for high availability
Monitoring & Troubleshooting Oracle Cloud at Customer
The prime advantage of cloud at customer is to deliver all cloud benefits at your data center. Oracle cloud at customer provides the same. When Oracle cloud at customer is chosen, it is Oracle who is responsible to install, configure and manage the software and hardware required to run Oracle cloud at customer. However, customers are responsible for monitoring and troubleshooting resources instantiate on Oracle cloud at customer.
Customers are required to understand the difference between system and user-space monitoring and the tools required. The Oracle cloud at customer subscription consists of the below components:
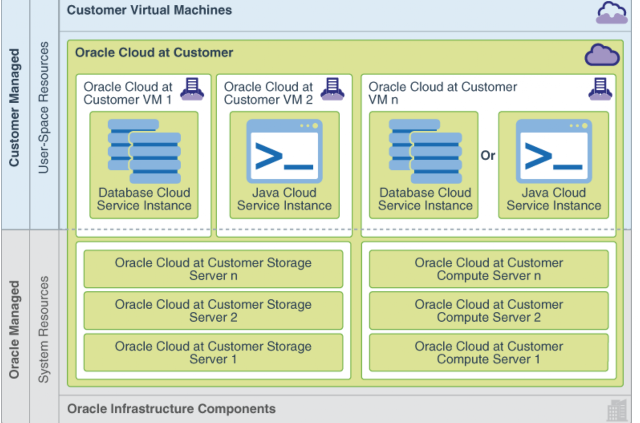
The systems or machine resources, such as : hardware, control panel and cloud services on Oracle cloud at Customer are managed by Oracle remotely using Oracle Advanced Gateway. The OAGW is only used and accessible to Oracle authorized personnel.
The user space components consists the below:
Customers are required to understand the difference between system and user-space monitoring and the tools required. The Oracle cloud at customer subscription consists of the below components:
- Hardware and Software
- Control panel software
- The Oracle Advanced Support Gateway (OASW)
- The Oracle Cloud Service
System monitoring vs User Space Monitoring
Typically, Oracle cloud at customer is monitored at two level:
- System
- User space
Oracle monitors the system and the customer monitors the user space.

The systems or machine resources, such as : hardware, control panel and cloud services on Oracle cloud at Customer are managed by Oracle remotely using Oracle Advanced Gateway. The OAGW is only used and accessible to Oracle authorized personnel.
The user space components consists the below:
- Oracle Cloud accounts
- VMs instances on IaaS or PaaS
- DB that are provisioned within the PaaS subscription
- Applications (Oracle or any third-party)
Oracle manages the following hardware and software components:
- Ethernet switches
- Power Supplies
- Exadata Storage Servers
- Hypervisor running on the physical servers
Customers can assign administrators to manage cloud accounts. Customers also are free to use any external monitoring agents to monitor user-space components.
Why Oracle Cloud @ Customer is a good option?
One of the major concerns moving over cloud is the security for most of the organizations. Though cloud concept is around for quite sometime, still, a majority of customers are concerned about putting their data over cloud. To gain the confidence and at the same to take full advantage of Cloud technologies, various Cloud vendors started offering cloud at customer solutions. In this blog spot, am going to discuss about Oracle cloud at customer solutions, its advantages , subscription model etc.
Oracle Cloud at Customer delivers full advantages of cloud technologies at your data center. You subscribe hardware and software together when you go for cloud at customer option. Though Oracle does the initial setup, configuration and day-to-day system management, you still have all the advantages of security, network of your data center.
Typically, the cloud at customer option consist of the following:
- The hardware required to run Cloud at customer
- Control panel software
- The Oracle Advanced Support Gateway
- Oracle Cloud services
To check your account balance and usage, Oracle recommends that you sign in to your Oracle Cloud Account in an Oracle data region. From there, you can view your overall account usage and Universal Credits balance.
In nutshell, cloud at customer brings the cloud solutions to your data center, where you can apply all the rules of your data centre while taking the full advantages of cloud solutions.
Network design for Oracle Cloud Infrastructure
Assuming, you are planning to migrate your resources from Oracle Cloud Infrastructure Compute classic environment to Oracle Cloud Infrastructure, this blog post explains the details of network design for Cloud Infrastructure environment. It's important to understand and map the network design and details from both environments.
Cloud Inrastructure Compute Classic network has IP Networks and Shared Network model. On other hand, Cloud Infrastructure has Virtual Cloud Networks (VCNs) , Subnets, Availability Domain network model.
Before migration, you must map the network resources between the environments. Source -> Target:
Shared network -> VCN, IP Network -> IP Network, VPN -> IPSec VPN and Fast Connect classic -> FastConnect.
Consider creating below listed network elements in Oracle Cloud Infrastructure:
- VCN and Subnet CIDR Prefixes
- DNS Names
Use the below procedure to configure cloud network for Cloud Infrastructure environment:
- Create one or more VCNs.
- Create an Internet gateway and/or NAT gateway. An Internet gateway is a virtual router that allows resources in a public subnet direct access the public Internet. A NAT gateway allows resources that don't have a public IP addresses to access the Internet, without exposing those resources to incoming traffic from the Internet.
- Configure a service gateway, if required. A service gateway provides a path for private network traffic between your VCN and a public Oracle service such as Oracle Cloud Infrastructure Object Storage.
- Create one or more subnets in each VCN.
- Configure local peering gateways between VCNs, if required.
- Configure security lists, security rules, and route tables for each subnet.