

Chris Muir
Solar Adventures & Saving Money - Win win win win!
Recently I tweeted the following pic which raised some interest, showing the kWh units of electricity used in my house compared to others in the local suburb Kensington in Perth Australia:

Our yearly electricity bill is ~AU$430, down from ~AU$754 in 2013.
I was asked what have we done to drop this low? Sold a child? Installed a massive solar system and battery?
To set context I live in a 1950s single story double brick tiled house in Perth Australia, what the British call a free standing bungalow I believe. My wife and my 2 kids under ten live in 3 bedrooms, 2 bathrooms, 1.5 living rooms and a separate office, approx 16m x 8m. The house is equipped with an evaporative airconditioner, natural gas for cooking, heating & hot water, with the exception of the oven which is electric. We have 2 TVs, 2 monitors, 3 laptops, lots of iphone/ipads, coffee machine, dish washer, clothes washer, fridge, microwave. Heating is a portable natural gas burner, we don't have a clothes dryer as Perth sun provides our drying needs.
So what have we done to reduce use compared to our neighbours?
I've taken a baby steps approach to slowly improving various parts of the house.
To help identify phantom power use we have the following live monitor attached to our house meter ... I find this particularly useful for just watching what's happening in the house to see if something has been left on accidentally, or something is misbehaving. It only shows net use after solar is taken out, but that's fine as that when we're paying the grid and this is what I want to avoid.

The main uses of electricity left when not offset by solar are things like the electric oven in the evening (my NE panels aren't good for offsetting this), the fridge which runs over the night, and the various electronics to a certain or lesser degree depending on what the kids are doing.
Overall I think the main trick in achieving what I've done has been not to attempt to go gung-ho as not only can you easily suffer burn out but the family is likely to rebel. Instead I suggest incrementally improving the house, leaving an active note in your calendar every couple of months to remind yourself to revisit what you achieved and what you can do next. Besides the occasional disagreement about leaving the lights or TV on, mostly my family hasn't much noticed any difference (or they're very patient with me ;-). They still get to do what they want to do as far as I can tell.
In terms of motivation, avoiding the ever increasing electricity charges is definitely part of it. The local government raised electricity by ~3% this year again, and are signalling 7% increases the next two. Our house bills has dropped from AU$754.80 in 2013 before solar, to AU$395 in 2014, $445 in 2015 and $430 for 2016.
My other main motivation is this graph:

...we do get a paltry $0.07 kWh feed in tariff so the size of the blue bar is not that exciting. But what is exciting is I just like knowing that we're a net exporter of energy. (of interest you can really see the winter drop mid year when solar isn't as effective here)
Ideally I'd really like to see the yellow bar drop some more, I think I can shave about another 1/4. As the Australian federal government this year and for the next 15 years is now reducing the upfront solar rebate subsidy, I'm actively looking to max out our solar to 5kw. A battery may be in the future, but currently they are still expensive here, and I suspect my solar system isn't designed well for a battery anyway.
Overall though, I'm particularly happy with the outcome to date. It hasn't been a strain on lifestyle, I feel like I'm sticking it to our government who can't get their renewable energy act together, I'm also helping tell the fossil fuel companies where to go, and finally I'm saving money too.
Win win win win.

Our yearly electricity bill is ~AU$430, down from ~AU$754 in 2013.
I was asked what have we done to drop this low? Sold a child? Installed a massive solar system and battery?
To set context I live in a 1950s single story double brick tiled house in Perth Australia, what the British call a free standing bungalow I believe. My wife and my 2 kids under ten live in 3 bedrooms, 2 bathrooms, 1.5 living rooms and a separate office, approx 16m x 8m. The house is equipped with an evaporative airconditioner, natural gas for cooking, heating & hot water, with the exception of the oven which is electric. We have 2 TVs, 2 monitors, 3 laptops, lots of iphone/ipads, coffee machine, dish washer, clothes washer, fridge, microwave. Heating is a portable natural gas burner, we don't have a clothes dryer as Perth sun provides our drying needs.
So what have we done to reduce use compared to our neighbours?
I've taken a baby steps approach to slowly improving various parts of the house.
- We installed a 2.0kw solar about 3 years ago, it has a 2.2kw inverter, 2.0kw of panels, and at best peaks at 1.8kw during summer, about 1.3kw during winter. The 8x250kw panels face North East.

- In line with the solar, for things like clothes washing and the dish washer, we put them on a timer to run around lunchtime each day while we're at work & lunchtime sun means solar covers all the use.
- I do clean the solar panels, about every 3 months with a big squidgy mop. Perth summer air has lots of dust, and bees seem to like dropping pollen in big wads on the panels too which is easy to clean off with instant power boost.
- All of our lights were moved to fluorescents about 8 years ago, and now I've about 1/2 that are LEDs. Personally I'm finding LED lights way better than fluorescents which tended to blow frequently. LEDs have come down in price, and I keep an eye out for when they're on special too.
- We turn off phantom/standby powers use at the wall ... the tv equipment + laptops were big culprits and an easy fix. To make this easier I've provided powerpacks with individual power switches for each point so they are easier to reach rather than the powerpoints hiding behind cabinetry.
- We moved to a central iphone/ipad/usb/etc charger in the main living room rather than numerous powerpacks spread across the house which silently draw electricity and mostly weren't used for most of the day. With the one charger I can easily add and remove devices once they're charged without the family caring as long as they're charged. In turn my personal iphone & ipad are plugged in during the day for recharging, which takes me no effort at all.
- During winter we try to use a slow cooker during the day which takes further advantage of the available sun.
- During summer to control the house temperature I try and make use of relatively cold outside air in the morning to fill the house up, opening windows and doors to get cross breezes, and close it all down when the house equalizes to the outside temperature or a hot easterly starts blowing. With the evap aircon turning the fan and not the water pump helps to get cold air in the house quickly in the morning if need be. As Perth gets hot in summer (we hit 45C/113F last year), we do need to switch the evap aircon on properly during the day and late afternoon, but the goal is to cool the house with free cool air when I can.
To help identify phantom power use we have the following live monitor attached to our house meter ... I find this particularly useful for just watching what's happening in the house to see if something has been left on accidentally, or something is misbehaving. It only shows net use after solar is taken out, but that's fine as that when we're paying the grid and this is what I want to avoid.

The main uses of electricity left when not offset by solar are things like the electric oven in the evening (my NE panels aren't good for offsetting this), the fridge which runs over the night, and the various electronics to a certain or lesser degree depending on what the kids are doing.
Overall I think the main trick in achieving what I've done has been not to attempt to go gung-ho as not only can you easily suffer burn out but the family is likely to rebel. Instead I suggest incrementally improving the house, leaving an active note in your calendar every couple of months to remind yourself to revisit what you achieved and what you can do next. Besides the occasional disagreement about leaving the lights or TV on, mostly my family hasn't much noticed any difference (or they're very patient with me ;-). They still get to do what they want to do as far as I can tell.
In terms of motivation, avoiding the ever increasing electricity charges is definitely part of it. The local government raised electricity by ~3% this year again, and are signalling 7% increases the next two. Our house bills has dropped from AU$754.80 in 2013 before solar, to AU$395 in 2014, $445 in 2015 and $430 for 2016.
My other main motivation is this graph:

...we do get a paltry $0.07 kWh feed in tariff so the size of the blue bar is not that exciting. But what is exciting is I just like knowing that we're a net exporter of energy. (of interest you can really see the winter drop mid year when solar isn't as effective here)
Ideally I'd really like to see the yellow bar drop some more, I think I can shave about another 1/4. As the Australian federal government this year and for the next 15 years is now reducing the upfront solar rebate subsidy, I'm actively looking to max out our solar to 5kw. A battery may be in the future, but currently they are still expensive here, and I suspect my solar system isn't designed well for a battery anyway.
Overall though, I'm particularly happy with the outcome to date. It hasn't been a strain on lifestyle, I feel like I'm sticking it to our government who can't get their renewable energy act together, I'm also helping tell the fossil fuel companies where to go, and finally I'm saving money too.
Win win win win.
This blog has moved!
No really, it has! You can find my new Oracle blog here.
For the record this older blog will stay to allow readers to continue to benefit from the existing posts.
I hope to see you on the new blog!
For the record this older blog will stay to allow readers to continue to benefit from the existing posts.
I hope to see you on the new blog!
If you can't beat 'em join 'em
A New Year has brought a desire for new challenges. As a result early in the year I'll be taking on a new role as a product manager for ADF at Oracle Corporation.
The decision to move was certainly a difficult one. I've had an excellent 10+ years at SAGE Computing Services under the leadership of Oracle ACE Penny Cookson and the SAGE team, all who've been inspiring to work with. In turn I was fortunate enough to have two offers on my table which were both excellent, but both providing different outcomes. Choices choices.
The end decision has me moving to Oracle Corporation in early February, still based in Perth Australia for now.
One ramification of the move to Oracle is I give up my Oracle ACE Director status. This is a sad moment in many ways because like SAGE I owe the ACE Director program a lot. I feel that the program has allowed me to grow and extend my skills and experiences significantly. The chance to mix with other ACEs and Oracle staff, living up to their experiences & expectations, the chance to attend and present at conferences and share my enthusiasm with delegates has been incredibly rewarding. As a result my thanks go out to both the OTN team for running the program and providing the opportunity, and also to all the ACE and ACE Directors, Oracle staff, user groups reps and Oracle enthusiasts out there I've had pleasure of meeting and befriending over the last 5 years. Seriously your friendships, advice and generosity has meant a lot to me.
With that little bit of news out of the way I'd like to wish everyone a happy New Year and I hope to see you at a conference somewhere soon.
(Post edit: as some people have kindly taken the time to point out, yes it is in fact true, the real reason for the move is I just couldn't bear to be apart from Richard Foote ;-)
Apache Ivy and JDeveloper integration
As software applications grow, a common technique to reduce the complexity is to break the overall solution into separately built and deployed modules. This allows each component to be worked on independently without being overwhelmed with detail, though the cost of reassembling and building the application is the trade off for the added flexibility. When modules become reusable across applications the reassembly and build problem is exasperated and it becomes essential to track which version of each module is required against each application. Such problems can be reduced by the introduction of dependency management tools.
In the Java world there are a few well known tools for dependency management including Apache Ivy and Apache Maven. Strictly speaking Ivy is just a dependency management tool which integrates with Apache Ant, while Maven is a set of tools of where dependency management is but just one of its specialities.
In the ADF world thanks to the inclusion of ADF Libraries (aka. modules) that can be shared across applications, dependency management is also a relevant problem. Recently I went through the exercise of including Apache Ivy into our JDeveloper 11g and Hudson mix for an existing set of applications. This blog post attempts to describe the configuration of Apache Ivy in context of our JDeveloper setup in order to assist others setting up a similar installation. The blog post will introduce a simplistic application (downloadable from here) with 1 dependency to introduce the Ivy features, in very much an A-B-C style to assist the reader's learning.
Readers should be careful to note this post doesn't attempt to explain all the in's and out's of using Apache Ivy, just a successful configuration on our part. Readers are encouraged to seek out further resources to assist their learning of Apache Ivy.
Assumptions
This blog post assumes you understand the following concepts:
• ADF Libraries
• Resource palette
• Apache Ant
• ojdeploy
In the beginning there was... ah... ApplicationA
To start out with our overall application contains one JDeveloper application workspace known as ApplicationA, installed under C:/JDeveloper/mywork as follows:
 ApplicationA initially has no dependencies and can be built and run standalone.
Within the application we create a separate project entitled "Build" with an Ant build scripts entitled "pre-ivy.build.xml" to build our application using ojdeploy as follows:
And then ApplicationA begat ADFLibrary1
Now we'll create a new task flow in a separate application workspace known as ADFLibrary1 which ApplicationA is dependent on:
 We add an ADF Library JAR deployment profile to ADFLibrary1's ViewController project to generate ADFLibrary1.jar to:
C:\JDeveloper\mywork\ADFLibrary1\ViewController\deploy\adflibADFLibrary1.jar
Similar to ApplicationA we add a Build project to our application workspace and a pre-ivy.build.xml Ant build script using ojdeploy:
 Experienced readers will know to setup a Resource Palette "File Connection" to map to C:\JDeveloper\mywork\lib then simply add the JARs from the palette.
Adding Apache Ivy
At this point we have a rudimentary form of dependency management setup, where a logical version 1 of ApplicationA has attached a logical version 1 of ADFLibrary1 through the use of the ADF Library JAR being attached to ApplicationA's ViewController project. Note the word "rudimentary". Currently there is no way to track versions. If we have separate versions of ApplicationA dependent on separate versions of ADFLibrary1, developers have to be very careful to check out and build the correct versions, and there's nothing inherently obvious in the generated JAR file names to gives us an idea of what versions are being used.
Let's introduce Apache Ivy into the mix with this simplistic dependency model as a basis for learning, to see how Ivy solves the versioning dependency issue.
Adding ivy.xml to each module
Ivy requires that each module have an ivy.xml. The ivy.xml file among other things describes for each module:
a) The module name
b) The version of the module
c) Determines what artefacts the module publishes
d) Track the module's dependencies including the version of the dependencies
For our existing ADFLibrary1 we'll add an ivy.xml file to our Build project containing the following details:
a) The module name in the <info> tag
b) The revision/version number in the <info> tag
c) The publication of an ADF Library jar in the <publications> tag
d) And that this module is not dependent on any other modules through the commented out <dependencies> tag
(You might also note the <configurations> tag. Configurations define the type of artefacts we can possible generate for the module. In this case we're creating an ADF Library "JAR", but alternatively for example we could produce a WAR or EAR file or some other sort of artefact. For purposes of this blog post we'll keep this relatively simple and just stick to JARs and EARs).
For our existing ApplicationA its ivy.xml file under the Build project will look as follows:
a) The module name ApplicationA in the <info> tag
b) The revision/version number 1 in the <info> tag
c) The publication of an EAR in the <publications> tag
d) And of most importance, a dependency of ADFLibrary1, specifically release/version 1.
It's this last point that is most important as not only does it track the dependencies between modules (which truthfully JDev was already doing for us) but the ivy.xml file also tracks the version dependency, namely ApplicationA release/version 1 is dependent on version/release 1 of ADFLibrary1.
Apache Ivy Repository
In the previously described application configuration we were assuming the build of ApplicationA and ADFLibrary1 was all on the same developer machine. It's relatively simply for 1 developer to copy the JARs to the correct location to satisfy the dependencies. Yet in a typical development environment there will be multiple developers working on different modules across different developer machines. Moving JARs between developer PCs becomes problematic. We really need some sort of developer repository to share the modules archives.
At this point we introduce an Apache Ivy repository into our solution. Simplistically the Ivy repository is a location where developers can publish JARs to, and other developers when building an application with a dependency, can download the dependencies from.
Ivy supports different types of repositories which are documented under Resolvers in the Ivy documentation. For purposes of this blog post we'll use the simplest repository type of "FileSystem".
In order to make use of the FileSystem Ivy repository all developers must have access to a file (typically called) ivysettings.xml. This file defines for Ivy where the repository resides among other settings. How you distribute this file to developers is up to you, maybe it's located on a shared network location, maybe a copy checked out to a common local location. For purposes of this blog post we'll assume it resides on every developer's machine under C:\JDeveloper\ivy:
 The following reveals the contents of a possible ivysettings.xml file:
1) Note the ivy.repo.dir property. Typically this would point to your own //SomeServer/YourRepositoryLocation which all developers can access on your local network. For the purposes of this blog post, in order to give readers a single zip file that they can download and use, I've changed this setting to instead locate the repository at C:\JDeveloper\ivy\repositories\development. This certainly *isn't* a good location for a shared repository, but one that is workable for demonstration purposes.
2) The <resolvers> <chain> defines the list of repositories for Ivy to publish to or download dependencies from. In this case we've only configured one repository, but there's nothing stopping you having a series of repositories.
3) The <ivy> subtag of the <filesystem> tag defines how Ivy will store and search for it's own metadata files in the repository, of which it stores information such as the module name, versions and more that is essentially copied from your ivy.xml files.
4) The <artifact> tag defines how Ivy will store and search for the actual artefacts you generate (such as the ADF Library JARs) in the repository.
With regards the last 2 points it's best to leave the patterns as the default, as in the end the repository can be treated as a black box. You don't really care how it works, just as long as Ivy allows you to publish and retrieve files from the repository.
Configuring Ant to *understand* Ivy
With the ivy.xml and ivysettings.xml files in place, we now need to configure our Ant build scripts to interpret the settings and work with our repository during builds.
First we download the Apache Ivy and install into a location each developer's machine can access. This blog posts assumes Ivy v2.2.0 and that the associated ivy-2.2.0.jar has been unzipped to C:\JDeveloper\ivy\apache-ivy-2.2.0:
 Next we modify our existing build scripts for each module. In the build.xml file for *both* ADFLibrary1 and ApplicationA we insert the following code:
(Note in the downloadable application this code resides in build.xml, not pre-ivy.build.xml which was documented earlier in this blog post).
1) Setting the property ivy.default.ivy.user.dir changes the default location under which Ivy stores local copies of the data downloaded from the repository.
2) Setting the property ivy.default.ivy.lib.dir defines the location where the JAR files should be ultimately delivered for dependent modules to make use of.
3) The <ivy:configure> tag tells Ivy where the ivysettings.xml file is located which includes the configuration information about the repositories.
4) The <ivy:info> tag tells Ivy where the current modules ivy.xml file is located.
Configuring Ant to *use* Ivy
With the previous Ivy setup we're now ready to start building using Ivy via Ant.
Let's consider our goals. What we want to first do is build and then publish ADFLibrary1 to the Ivy repository. Then subsequently for ApplicationA we want to download ADFLibrary1 from the Ivy repository, then build ApplicationA.
To achieve the first goal, we already have a Build Ant target in the ADFLibrary1 build.xml. So we just need to add another target "Publish" which will take the artefacts generated from the Build target as follows:
1) The <ivy:publish> tag that says which resolver (ie. which repository) to publish too, what to do if the exact file and revision already exists in the repository, and what revision/version to publish the file as. With regards the ${ivy.revision} this variable is derived from the ADFLibrary1's ivy.xml file.
2) The <artifacts> tag which tells the publish command where to find the artifact to publish.
3) Because of the <artifacts> tag there's a dependency that the module has already been built. This could be easily catered for in the overall build script by making an <antcall> to the Build target at the start of the <ivy:publish> tag, but for purposes of simplicity this change hasn't been made for this blog post.
At this point let's see what outputs we see if we run the Build and Publish scripts. First when we run the Build target the JDeveloper log window reports:
Next when we run the Publish task the following output is produced:
 The different files are beyond the discussion here, but to say this is the structure Ivy has put into place.
At this point we've achieved our first goal of build and publishing the ADFLibrary1 to the Ivy repository. Let's more over to our second goal for ApplicationA where we want to download ADFLibrary1 from the Ivy repository, then build ApplicationA.
In order to do this we'll add a new target to the ApplicationA build.xml "Download_dependencies" as follows:
1) The <ivy:cleancache> tag clears the ${ivy.default.ivy.user.dir}\Cache of previously downloaded dependencies. This is only really necessary if when you're uploading dependencies you're not creating new versions, but rather overwriting an existing release. In this later case Ivy will in preference use the cached copy of the JAR rather than retrieving the updated JAR in the repository. Flushing the cache solves this issue as the JARs need to be downloaded each time.
2) The <ivy:resolve> tag which loads the dependency metadata for the current module from the associated ivy.xml file, determines which artefacts to obtain from the repository and downloads them to the ${ivy.default.ivy.user.dir}\Cache directory on the local PC.
3) The <ivy:retrieve> tag then searches the Cache directory for the required JAR files and places them in the location where the application expects to find them, namely C:\JDeveloper\lib
If we run this task we see in the logs:
If you now Build ApplicationA you will see it compiles correctly. To check it doesn't build when the ADFLibrary1.jar is not sitting in the C:\JDeveloper\lib directory, delete the JAR and rebuild ApplicationA.
Making and building with new revisions
Overtime your modules will include new revisions. You will of course be checking these changes in and out of your version control system such as Subversion. How do you cater for the new versions with regards to Ivy?
Imagine the scenario where ApplicationA release 3 is now dependent on ADFLibrary1 revision 6. This requires two simple changes.
Firstly in the ADFLibrary1 ivy.xml, replace the revision number under the <info> tag to 6, build and publish.
Second in ApplicationA's ivy.xml, update it's revision number to 3, then in the <dependencies> tag update the ADFLibrary1 dependency's revision number to 6. Forthright when you download the dependencies for ApplicationA revision 3, it will download revision 6 from the repository.
Conclusion
At this point we have all the moving parts to make use of Ivy with JDeveloper and ADF to implement a dependency management solution. While the example is contrived, it shows the use of:
1) The ivy.xml file to define each module, what it publishes and what it depends on
2) The ivysettings.xml file to define the location of the shared repository
3) The Ivy Ant tasks for publishing modules to the repository, as well as downloading modules from the repository
If I have time I will write a different blog post to show how transitive dependencies work in Ivy. The nice thing about Ivy is it handles these automagically so there's not much to configure, just explain a working example.
Beyond this there really isn't that much else to explain, working out the nuances of Ivy takes around a week, retrofitting it into your environment takes longer, but beyond that Ivy is pretty simple in that it does one thing and it does one thing well.
Finally note I'm not advocating Apache Ivy over Apache Maven with this post, ultimately this post simply documents how to use Ivy with JDeveloper, and readers need to make their own choice which tool if any to use. Future versions of JDeveloper (See the Maven integration section in the following blog post) are scheduled to have improved Maven integration so readers should take care not to discount Maven as an option.
Errata
This was tested against JDev 11.1.2.1.0 and 11.1.1.4.0, but in essence should run against any JDev version with Ant support.
In the Java world there are a few well known tools for dependency management including Apache Ivy and Apache Maven. Strictly speaking Ivy is just a dependency management tool which integrates with Apache Ant, while Maven is a set of tools of where dependency management is but just one of its specialities.
In the ADF world thanks to the inclusion of ADF Libraries (aka. modules) that can be shared across applications, dependency management is also a relevant problem. Recently I went through the exercise of including Apache Ivy into our JDeveloper 11g and Hudson mix for an existing set of applications. This blog post attempts to describe the configuration of Apache Ivy in context of our JDeveloper setup in order to assist others setting up a similar installation. The blog post will introduce a simplistic application (downloadable from here) with 1 dependency to introduce the Ivy features, in very much an A-B-C style to assist the reader's learning.
Readers should be careful to note this post doesn't attempt to explain all the in's and out's of using Apache Ivy, just a successful configuration on our part. Readers are encouraged to seek out further resources to assist their learning of Apache Ivy.
Assumptions
This blog post assumes you understand the following concepts:
• ADF Libraries
• Resource palette
• Apache Ant
• ojdeploy
In the beginning there was... ah... ApplicationA
To start out with our overall application contains one JDeveloper application workspace known as ApplicationA, installed under C:/JDeveloper/mywork as follows:
 ApplicationA initially has no dependencies and can be built and run standalone.
Within the application we create a separate project entitled "Build" with an Ant build scripts entitled "pre-ivy.build.xml" to build our application using ojdeploy as follows:
<?xml version="1.0" encoding="UTF-8" ?>(Note the jdev.ojdeploy.path & jdev.ant.library properties that map to your JDeveloper installation. You will need to change these to suit your environment. This will need to be done for both ApplicationA and the following ADFLibrary1)
<project xmlns="antlib:org.apache.tools.ant" name="Build" basedir=".">
<property name="jdev.ojdeploy.path" value="C:\java\jdeveloper\JDev11gBuild6081\jdeveloper\jdev\bin\ojdeploy.exe"/>
<property name="jdev.ant.library" value="C:\java\jdeveloper\JDev11gBuild6081\jdeveloper\jdev\lib\ant-jdeveloper.jar"/>
<target name="Build">
<taskdef name="ojdeploy" classname="oracle.jdeveloper.deploy.ant.OJDeployAntTask" uri="oraclelib:OJDeployAntTask"
classpath="${jdev.ant.library}"/>
<ora:ojdeploy xmlns:ora="oraclelib:OJDeployAntTask" executable="${jdev.ojdeploy.path}"
ora:buildscript="C:\Temp\build.log" ora:statuslog="C:\Temp\status.log">
<ora:deploy>
<ora:parameter name="workspace" value="C:\JDeveloper\mywork\ApplicationA\ApplicationA.jws"/>
<ora:parameter name="profile" value="ApplicationA"/>
<ora:parameter name="outputfile" value="C:\JDeveloper\mywork\ApplicationA\deploy\ApplicationA"/>
</ora:deploy>
</ora:ojdeploy>
</target>
</project>
And then ApplicationA begat ADFLibrary1
Now we'll create a new task flow in a separate application workspace known as ADFLibrary1 which ApplicationA is dependent on:
 We add an ADF Library JAR deployment profile to ADFLibrary1's ViewController project to generate ADFLibrary1.jar to:
C:\JDeveloper\mywork\ADFLibrary1\ViewController\deploy\adflibADFLibrary1.jar
Similar to ApplicationA we add a Build project to our application workspace and a pre-ivy.build.xml Ant build script using ojdeploy:
<?xml version="1.0" encoding="UTF-8" ?>From here we want to attach ADFLibrary1.jar to ApplicationA's ViewController project. Overtime we might have many JARs we want to attach, so rather than mapping to several different deploy directories under each ADF Library application workspace, we'll assume the libraries are instead available under a central "lib" directory as follows:
<project xmlns="antlib:org.apache.tools.ant" name="Build" basedir=".">
<property name="jdev.ojdeploy.path" value="C:\java\jdeveloper\JDev11gBuild6081\jdeveloper\jdev\bin\ojdeploy.exe"/>
<property name="jdev.ant.library" value="C:\java\jdeveloper\JDev11gBuild6081\jdeveloper\jdev\lib\ant-jdeveloper.jar"/>
<target name="Build">
<taskdef name="ojdeploy" classname="oracle.jdeveloper.deploy.ant.OJDeployAntTask" uri="oraclelib:OJDeployAntTask"
classpath="${jdev.ant.library}"/>
<ora:ojdeploy xmlns:ora="oraclelib:OJDeployAntTask" executable="${jdev.ojdeploy.path}"
ora:buildscript="C:\Temp\build.log" ora:statuslog="C:\Temp\status.log">
<ora:deploy>
<ora:parameter name="workspace" value="C:\JDeveloper\mywork\ADFLibrary1\ADFLibrary1.jws"/>
<ora:parameter name="project" value="ViewController"/>
<ora:parameter name="profile" value="ADFLibrary1"/>
<ora:parameter name="outputfile" value="C:\JDeveloper\mywork\ADFLibrary1\ViewController\deploy\ADFLibrary1"/>
</ora:deploy>
</ora:ojdeploy>
</target>
</project>
 Experienced readers will know to setup a Resource Palette "File Connection" to map to C:\JDeveloper\mywork\lib then simply add the JARs from the palette.
Adding Apache Ivy
At this point we have a rudimentary form of dependency management setup, where a logical version 1 of ApplicationA has attached a logical version 1 of ADFLibrary1 through the use of the ADF Library JAR being attached to ApplicationA's ViewController project. Note the word "rudimentary". Currently there is no way to track versions. If we have separate versions of ApplicationA dependent on separate versions of ADFLibrary1, developers have to be very careful to check out and build the correct versions, and there's nothing inherently obvious in the generated JAR file names to gives us an idea of what versions are being used.
Let's introduce Apache Ivy into the mix with this simplistic dependency model as a basis for learning, to see how Ivy solves the versioning dependency issue.
Adding ivy.xml to each module
Ivy requires that each module have an ivy.xml. The ivy.xml file among other things describes for each module:
a) The module name
b) The version of the module
c) Determines what artefacts the module publishes
d) Track the module's dependencies including the version of the dependencies
For our existing ADFLibrary1 we'll add an ivy.xml file to our Build project containing the following details:
<?xml version="1.0" encoding="UTF-8"?>Of note:
<ivy-module version="2.0">
<info organisation="sage" module="ADFLibrary1" revision="1"/>
<configurations>
<conf name="jar" description="Java archive"/>
<conf name="ear" description="Enterprise archive"/>
</configurations>
<publications>
<artifact name="ADFLibrary1" conf="jar" ext="jar"/>
</publications>
<!-- <dependencies> There are no dependencies for this module <dependencies/> -->
</ivy-module>
a) The module name in the <info> tag
b) The revision/version number in the <info> tag
c) The publication of an ADF Library jar in the <publications> tag
d) And that this module is not dependent on any other modules through the commented out <dependencies> tag
(You might also note the <configurations> tag. Configurations define the type of artefacts we can possible generate for the module. In this case we're creating an ADF Library "JAR", but alternatively for example we could produce a WAR or EAR file or some other sort of artefact. For purposes of this blog post we'll keep this relatively simple and just stick to JARs and EARs).
For our existing ApplicationA its ivy.xml file under the Build project will look as follows:
<?xml version="1.0" encoding="UTF-8"?>Of note:
<ivy-module version="2.0">
<info organisation="sage" module="ApplicationA" revision="1"/>
<configurations>
<conf name="jar" description="Java archive"/>
<conf name="ear" description="Enterprise archive"/>
</configurations>
<publications>
<artifact name="ApplicationA" conf="ear" ext="ear"/>
</publications>
<dependencies>
<dependency org="sage" name="ADFLibrary1" rev="1">
<artifact name="ADFLibrary1" ext="jar"/>
</dependency>
</dependencies>
</ivy-module>
a) The module name ApplicationA in the <info> tag
b) The revision/version number 1 in the <info> tag
c) The publication of an EAR in the <publications> tag
d) And of most importance, a dependency of ADFLibrary1, specifically release/version 1.
It's this last point that is most important as not only does it track the dependencies between modules (which truthfully JDev was already doing for us) but the ivy.xml file also tracks the version dependency, namely ApplicationA release/version 1 is dependent on version/release 1 of ADFLibrary1.
Apache Ivy Repository
In the previously described application configuration we were assuming the build of ApplicationA and ADFLibrary1 was all on the same developer machine. It's relatively simply for 1 developer to copy the JARs to the correct location to satisfy the dependencies. Yet in a typical development environment there will be multiple developers working on different modules across different developer machines. Moving JARs between developer PCs becomes problematic. We really need some sort of developer repository to share the modules archives.
At this point we introduce an Apache Ivy repository into our solution. Simplistically the Ivy repository is a location where developers can publish JARs to, and other developers when building an application with a dependency, can download the dependencies from.
Ivy supports different types of repositories which are documented under Resolvers in the Ivy documentation. For purposes of this blog post we'll use the simplest repository type of "FileSystem".
In order to make use of the FileSystem Ivy repository all developers must have access to a file (typically called) ivysettings.xml. This file defines for Ivy where the repository resides among other settings. How you distribute this file to developers is up to you, maybe it's located on a shared network location, maybe a copy checked out to a common local location. For purposes of this blog post we'll assume it resides on every developer's machine under C:\JDeveloper\ivy:
 The following reveals the contents of a possible ivysettings.xml file:
<ivysettings>Points to consider:
<property name="ivy.repo.dir" value="C:\JDeveloper\ivy\repositories\development"/>
<resolvers>
<chain>
<filesystem name="repository">
<ivy pattern="${ivy.repo.dir}/[module]/ivy[module]_[revision].xml" />
<artifact pattern="${ivy.repo.dir}/[module]/[type][artifact]_[revision].[ext]"/>
</filesystem>
</chain>
</resolvers>
</ivysettings>
1) Note the ivy.repo.dir property. Typically this would point to your own //SomeServer/YourRepositoryLocation which all developers can access on your local network. For the purposes of this blog post, in order to give readers a single zip file that they can download and use, I've changed this setting to instead locate the repository at C:\JDeveloper\ivy\repositories\development. This certainly *isn't* a good location for a shared repository, but one that is workable for demonstration purposes.
2) The <resolvers> <chain> defines the list of repositories for Ivy to publish to or download dependencies from. In this case we've only configured one repository, but there's nothing stopping you having a series of repositories.
3) The <ivy> subtag of the <filesystem> tag defines how Ivy will store and search for it's own metadata files in the repository, of which it stores information such as the module name, versions and more that is essentially copied from your ivy.xml files.
4) The <artifact> tag defines how Ivy will store and search for the actual artefacts you generate (such as the ADF Library JARs) in the repository.
With regards the last 2 points it's best to leave the patterns as the default, as in the end the repository can be treated as a black box. You don't really care how it works, just as long as Ivy allows you to publish and retrieve files from the repository.
Configuring Ant to *understand* Ivy
With the ivy.xml and ivysettings.xml files in place, we now need to configure our Ant build scripts to interpret the settings and work with our repository during builds.
First we download the Apache Ivy and install into a location each developer's machine can access. This blog posts assumes Ivy v2.2.0 and that the associated ivy-2.2.0.jar has been unzipped to C:\JDeveloper\ivy\apache-ivy-2.2.0:
 Next we modify our existing build scripts for each module. In the build.xml file for *both* ADFLibrary1 and ApplicationA we insert the following code:
(Note in the downloadable application this code resides in build.xml, not pre-ivy.build.xml which was documented earlier in this blog post).
<property name="ivy.default.ivy.user.dir" value="C:\JDeveloper\ivy"/>Items to note:
<property name="ivy.default.ivy.lib.dir" value="C:\JDeveloper\lib"/>
<path id="ivy.lib.path">
<fileset dir="C:\JDeveloper\ivy\apache-ivy-2.2.0" includes="*.jar"/>
</path>
<taskdef resource="org/apache/ivy/ant/antlib.xml" uri="antlib:org.apache.ivy.ant" classpathref="ivy.lib.path"/>
<ivy:configure file="C:\JDeveloper\ivy\ivysettings.xml"/>
<ivy:info file="./ivy.xml"/>
1) Setting the property ivy.default.ivy.user.dir changes the default location under which Ivy stores local copies of the data downloaded from the repository.
2) Setting the property ivy.default.ivy.lib.dir defines the location where the JAR files should be ultimately delivered for dependent modules to make use of.
3) The <ivy:configure> tag tells Ivy where the ivysettings.xml file is located which includes the configuration information about the repositories.
4) The <ivy:info> tag tells Ivy where the current modules ivy.xml file is located.
Configuring Ant to *use* Ivy
With the previous Ivy setup we're now ready to start building using Ivy via Ant.
Let's consider our goals. What we want to first do is build and then publish ADFLibrary1 to the Ivy repository. Then subsequently for ApplicationA we want to download ADFLibrary1 from the Ivy repository, then build ApplicationA.
To achieve the first goal, we already have a Build Ant target in the ADFLibrary1 build.xml. So we just need to add another target "Publish" which will take the artefacts generated from the Build target as follows:
<target name="Publish">Items to note:
<ivy:publish resolver="repository" overwrite="true" pubrevision="${ivy.revision}" update="true">
<ivy:artifacts pattern="../ViewController/deploy/[artifact].[ext]"/>
</ivy:publish>
</target>
1) The <ivy:publish> tag that says which resolver (ie. which repository) to publish too, what to do if the exact file and revision already exists in the repository, and what revision/version to publish the file as. With regards the ${ivy.revision} this variable is derived from the ADFLibrary1's ivy.xml file.
2) The <artifacts> tag which tells the publish command where to find the artifact to publish.
3) Because of the <artifacts> tag there's a dependency that the module has already been built. This could be easily catered for in the overall build script by making an <antcall> to the Build target at the start of the <ivy:publish> tag, but for purposes of simplicity this change hasn't been made for this blog post.
At this point let's see what outputs we see if we run the Build and Publish scripts. First when we run the Build target the JDeveloper log window reports:
Buildfile: C:\JDeveloper\mywork\ADFLibrary1\Build\build.xmlAt the beginning of the output you can see Ivy being initialized but at the moment it's mostly not used. From the output you can see the JAR being built by ojdeploy and placed under C:/JDeveloper/mywork/ADFLibrary1/ViewController/deploy.
[ivy:configure] :: Ivy 2.2.0 - 20100923230623 :: http://ant.apache.org/ivy/ ::
[ivy:configure] :: loading settings :: file = C:\JDeveloper\ivy\ivysettings.xml
Build:
[ora:ojdeploy] ----build file----
[ora:ojdeploy] <?xml version = '1.0' standalone = 'yes'?>
[ora:ojdeploy] <ojdeploy-build>
[ora:ojdeploy] <deploy>
[ora:ojdeploy] <parameter name="workspace" value="C:\JDeveloper\mywork\ADFLibrary1\ADFLibrary1.jws"/>
[ora:ojdeploy] <parameter name="project" value="ViewController"/>
[ora:ojdeploy] <parameter name="profile" value="ADFLibrary1"/>
[ora:ojdeploy] <parameter name="outputfile" value="C:\JDeveloper\mywork\ADFLibrary1\ViewController\deploy\ADFLibrary1"/>
[ora:ojdeploy] </deploy>
[ora:ojdeploy] <defaults>
[ora:ojdeploy] <parameter name="statuslogfile" value="C:\Temp\status.log"/>
[ora:ojdeploy] </defaults>
[ora:ojdeploy] </ojdeploy-build>
[ora:ojdeploy] ------------------
[ora:ojdeploy] 07/12/2011 1:31:42 PM oracle.security.jps.util.JpsUtil disableAudit
[ora:ojdeploy] INFO: JpsUtil: isAuditDisabled set to true
[ora:ojdeploy] 07/12/2011 1:31:43 PM oracle.jdevimpl.deploy.fwk.TopLevelDeployer prepareImpl
[ora:ojdeploy] INFO: ---- Deployment started. ----
[ora:ojdeploy] 07/12/2011 1:31:43 PM oracle.jdevimpl.deploy.fwk.TopLevelDeployer printTargetPlatform
[ora:ojdeploy] INFO: Target platform is Standard Java EE.
[ora:ojdeploy] 07/12/2011 1:31:43 PM oracle.jdevimpl.deploy.common.ProfileDependencyAnalyzer deployImpl
[ora:ojdeploy] INFO: Running dependency analysis...
[ora:ojdeploy] 07/12/2011 1:31:43 PM oracle.jdeveloper.deploy.common.BuildDeployer build
[ora:ojdeploy] INFO: Building...
[ora:ojdeploy] Compiling...
[ora:ojdeploy] [1:31:45 PM] Successful compilation: 0 errors, 0 warnings.
[ora:ojdeploy] 07/12/2011 1:31:45 PM oracle.jdevimpl.deploy.common.ModulePackagerImpl deployProfiles
[ora:ojdeploy] INFO: Deploying profile...
[ora:ojdeploy] 07/12/2011 1:31:45 PM oracle.adfdt.controller.adfc.source.deploy.AdfcConfigDeployer deployerPrepared
[ora:ojdeploy] INFO: Moving WEB-INF/adfc-config.xml to META-INF/adfc-config.xml
[ora:ojdeploy]
[ora:ojdeploy] 07/12/2011 1:31:45 PM oracle.jdeveloper.deploy.jar.ArchiveDeployer logFileWritten
[ora:ojdeploy] INFO: Wrote Archive Module to file:/C:/JDeveloper/mywork/ADFLibrary1/ViewController/deploy/ADFLibrary1.jar
[ora:ojdeploy] 07/12/2011 1:31:45 PM oracle.jdevimpl.deploy.fwk.TopLevelDeployer finishImpl
[ora:ojdeploy] INFO: Elapsed time for deployment: 3 seconds
[ora:ojdeploy] 07/12/2011 1:31:45 PM oracle.jdevimpl.deploy.fwk.TopLevelDeployer finishImpl
[ora:ojdeploy] INFO: ---- Deployment finished. ----
[ora:ojdeploy] Status summary written to /C:/Temp/status.log
Next when we run the Publish task the following output is produced:
Buildfile: C:\JDeveloper\mywork\ADFLibrary1\Build\build.xmlBeyond the initial Ivy setup, of importance we can see the calls to <ivy:publish> pulling the JAR from the previous Build step to the repository. If we look at our C: drive where the repository is located we can indeed see files now sitting in the repository:
[ivy:configure] :: Ivy 2.2.0 - 20100923230623 :: http://ant.apache.org/ivy/ ::
[ivy:configure] :: loading settings :: file = C:\JDeveloper\ivy\ivysettings.xml
Publish:
[ivy:publish] :: publishing :: sage#ADFLibrary1
[ivy:publish] published ADFLibrary1 to C:\JDeveloper\ivy\repositories\development/ADFLibrary1/jarADFLibrary1_1.jar
[ivy:publish] published ivy to C:\JDeveloper\ivy\repositories\development/ADFLibrary1/ivyADFLibrary1_1.xml
 The different files are beyond the discussion here, but to say this is the structure Ivy has put into place.
At this point we've achieved our first goal of build and publishing the ADFLibrary1 to the Ivy repository. Let's more over to our second goal for ApplicationA where we want to download ADFLibrary1 from the Ivy repository, then build ApplicationA.
In order to do this we'll add a new target to the ApplicationA build.xml "Download_dependencies" as follows:
<target name="Download_dependencies">Of note:
<ivy:cleancache/>
<ivy:resolve/>
<ivy:retrieve pattern="${ivy.default.ivy.lib.dir}/[artifact].[ext]" type="jar"/>
</target>
1) The <ivy:cleancache> tag clears the ${ivy.default.ivy.user.dir}\Cache of previously downloaded dependencies. This is only really necessary if when you're uploading dependencies you're not creating new versions, but rather overwriting an existing release. In this later case Ivy will in preference use the cached copy of the JAR rather than retrieving the updated JAR in the repository. Flushing the cache solves this issue as the JARs need to be downloaded each time.
2) The <ivy:resolve> tag which loads the dependency metadata for the current module from the associated ivy.xml file, determines which artefacts to obtain from the repository and downloads them to the ${ivy.default.ivy.user.dir}\Cache directory on the local PC.
3) The <ivy:retrieve> tag then searches the Cache directory for the required JAR files and places them in the location where the application expects to find them, namely C:\JDeveloper\lib
If we run this task we see in the logs:
Buildfile: C:\JDeveloper\mywork\ApplicationA\Build\build.xmlBeyond the initial configuration of Ivy, in the output you can see the &ivy;resolve> tag resolving the dependency of ApplicationA on ADFLibrary1 version 1, then downloading the file to the cache. Finally the <retrieve> tag retrieves the file from the cache and copies it to the local lib directory (though this isn't that obvious from the logs).
[ivy:configure] :: Ivy 2.2.0 - 20100923230623 :: http://ant.apache.org/ivy/ ::
[ivy:configure] :: loading settings :: file = C:\JDeveloper\ivy\ivysettings.xml
Download_dependencies:
[ivy:resolve] :: resolving dependencies :: sage#ApplicationA;1
[ivy:resolve] confs: [jar, ear]
[ivy:resolve] found sage#ADFLibrary1;1 in repository
[ivy:resolve] downloading C:\JDeveloper\ivy\repositories\development\ADFLibrary1\jarADFLibrary1_1.jar ...
[ivy:resolve] .. (6kB)
[ivy:resolve] .. (0kB)
[ivy:resolve] [SUCCESSFUL ] sage#ADFLibrary1;1!ADFLibrary1.jar (0ms)
[ivy:resolve] :: resolution report :: resolve 109ms :: artifacts dl 0ms
---------------------------------------------------------
| | modules || artifacts |
| conf | number| search|dwnlded|evicted|| number|dwnlded|
---------------------------------------------------------
| jar | 1 | 1 | 1 | 0 || 1 | 1 |
| ear | 1 | 1 | 1 | 0 || 1 | 1 |
---------------------------------------------------------
[ivy:retrieve] :: retrieving :: sage#ApplicationA
[ivy:retrieve] confs: [jar, ear]
[ivy:retrieve] 1 artifacts copied, 0 already retrieved (6kB/0ms)
If you now Build ApplicationA you will see it compiles correctly. To check it doesn't build when the ADFLibrary1.jar is not sitting in the C:\JDeveloper\lib directory, delete the JAR and rebuild ApplicationA.
Making and building with new revisions
Overtime your modules will include new revisions. You will of course be checking these changes in and out of your version control system such as Subversion. How do you cater for the new versions with regards to Ivy?
Imagine the scenario where ApplicationA release 3 is now dependent on ADFLibrary1 revision 6. This requires two simple changes.
Firstly in the ADFLibrary1 ivy.xml, replace the revision number under the <info> tag to 6, build and publish.
Second in ApplicationA's ivy.xml, update it's revision number to 3, then in the <dependencies> tag update the ADFLibrary1 dependency's revision number to 6. Forthright when you download the dependencies for ApplicationA revision 3, it will download revision 6 from the repository.
Conclusion
At this point we have all the moving parts to make use of Ivy with JDeveloper and ADF to implement a dependency management solution. While the example is contrived, it shows the use of:
1) The ivy.xml file to define each module, what it publishes and what it depends on
2) The ivysettings.xml file to define the location of the shared repository
3) The Ivy Ant tasks for publishing modules to the repository, as well as downloading modules from the repository
If I have time I will write a different blog post to show how transitive dependencies work in Ivy. The nice thing about Ivy is it handles these automagically so there's not much to configure, just explain a working example.
Beyond this there really isn't that much else to explain, working out the nuances of Ivy takes around a week, retrofitting it into your environment takes longer, but beyond that Ivy is pretty simple in that it does one thing and it does one thing well.
Finally note I'm not advocating Apache Ivy over Apache Maven with this post, ultimately this post simply documents how to use Ivy with JDeveloper, and readers need to make their own choice which tool if any to use. Future versions of JDeveloper (See the Maven integration section in the following blog post) are scheduled to have improved Maven integration so readers should take care not to discount Maven as an option.
Errata
This was tested against JDev 11.1.2.1.0 and 11.1.1.4.0, but in essence should run against any JDev version with Ant support.
ADF bug: missing af:column borders in af:table for IE7
There’s a rather obscure JDeveloper bug that only effects IE7, for af:columns in af:tables that show af:outputText fields based on dates that are null (phew, try and say that with a mouth full of wheaties). It occurs in 11.1.1.4.0 and 11.1.2.0.0 (and all versions in between it’s assumed).
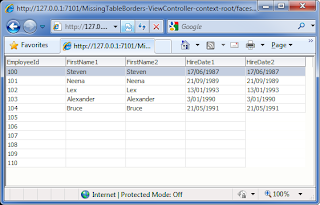 In the previous picture from IE7 if you look closely, you’ll notice that the HireDate2 column has lost its border for the null entries. Note the other columns even when they are null, still have a border.
If we look under IE8 (or any other browser for that matter) we see the problem doesn’t occur at all:
 The problem is being caused by 2 separate issues:
1) IE7 does not render borders for HTML table cells (ie. the tag) if the cell contains no data. This can be fixed if the cell contains a tag.
2) ADF Faces RC includes the tag for empty table cells, except for null date af:outputText fields who in addition have child tags that aren’t converter and validator tags.
To demonstrate the bug the MissingTableBorders application includes a simple test case. The application contains a View Object “EmployeesView” with a query based on the Oracle HR sample schema:
 Next is the code for our JSPX page “Employees.jspx” containing an af:table based on the VO from above. I’ve deliberately cut out the surroundings tags to focus on the tags that matter:
a) There are two columns to display data from the first_name column. The only difference between them is the first_name2 column includes an additional af:clientAttribute tag.
b) There are two columns to display data from the hire_date column. Similar to the first_name columns, they only differ in the fact hire_date2 includes an af:clientAttribute tag.
When this page renders in the browser the generate HTML content for the rows of the table are as follows (note the formatting and the comment were added by me to make it easier to read):
If we look at records 105 to 110 note:
a) The FirstName1 column when null includes a to forcefully place a blank entry into the cell.
b) The FirstName2 column does exactly the same, remembering the FirstName2 column includes an additional af:clientAttribute tag.
c) For the HireDate1 column it also includes a . Remember the HireDate1 column *does*not* include an af:clientAttribute tag.
d) For the HireDate2 column it *does*not* include an tag, even though the HireDate2 values are null. Remember the HireDate2 column *does*include* an af:clientAttribute tag.
At this point we only see differing behaviour with af:outputText values in af:columns where they show Dates *and* the af:outputText includes an af:clientAttribute tag.
From my testing, converter and validator tags added to the af:outputText don't exhibit the same behaviour. However any other tag, not just adding an af:clientAttribute tag but even an af:clientListener as example will result in the missing tag.
This in itself isn't an issue but when we consider IE7. If you render this page in IE8 the null date columns with an af:clientAttribute tag will still show the cell borders:
Yet in IE7 we get this:
While the issue is particular to IE7, the issue could be fixed by ADF Faces RC consistently generating the entry as described in the HTML generated above.
In discussing this bug (12942411) with Oracle staff it turns out there is a broader base bug 9682969 where this issue occurs for more than just date columns. Unfortunately the problem is not easily fixable by Oracle as it requires the af:table and af:column components to know if the child component (in this example an af:outputText) will be null before it and the data it refers to is accessed and rendered.
The simple workaround as proposed by Oracle is to not render the child component at all if the data value is null, simply by including code similar to the following:
My thanks to Oracle staff who assisted in looking and resolving this issue.
A sample application can be downloaded from here.
 In the previous picture from IE7 if you look closely, you’ll notice that the HireDate2 column has lost its border for the null entries. Note the other columns even when they are null, still have a border.
If we look under IE8 (or any other browser for that matter) we see the problem doesn’t occur at all:
 The problem is being caused by 2 separate issues:
1) IE7 does not render borders for HTML table cells (ie. the tag) if the cell contains no data. This can be fixed if the cell contains a tag.
2) ADF Faces RC includes the tag for empty table cells, except for null date af:outputText fields who in addition have child tags that aren’t converter and validator tags.
To demonstrate the bug the MissingTableBorders application includes a simple test case. The application contains a View Object “EmployeesView” with a query based on the Oracle HR sample schema:
SELECT emp.EMPLOYEE_ID,The query is designed to return two String columns that will have a mix of null and non null values, and two date columns that will also have a mix of null and non null values. If we run the Business Components Browser the data appears as follows:
(CASE WHEN employee_id < 105 THEN first_name ELSE null END) AS FIRST_NAME1,
(CASE WHEN employee_id < 105 THEN first_name ELSE null END) AS FIRST_NAME2,
(CASE WHEN employee_id < 105 THEN hire_date ELSE null END) AS HIRE_DATE1,
(CASE WHEN employee_id < 105 THEN hire_date ELSE null END) AS HIRE_DATE2
FROM EMPLOYEES emp
WHERE emp.EMPLOYEE_ID BETWEEN 100 AND 110
ORDER BY emp.EMPLOYEE_ID
 Next is the code for our JSPX page “Employees.jspx” containing an af:table based on the VO from above. I’ve deliberately cut out the surroundings tags to focus on the tags that matter:
<af:tableThe code was created by JDeveloper by drag and dropping the VO from the data control palette, with the following changes:
value="#{bindings.EmployeesView1.collectionModel}"
var="row"
rows="#{bindings.EmployeesView1.rangeSize}"
emptyText="#{bindings.EmployeesView1.viewable ? 'No data.' : 'Access Denied.'}"
fetchSize="#{bindings.EmployeesView1.rangeSize}"
rowBandingInterval="0"
selectedRowKeys="#{bindings.EmployeesView1.collectionModel.selectedRow}"
selectionListener="#{bindings.EmployeesView1.collectionModel.makeCurrent}"
rowSelection="single"
id="t1">
<af:column
sortProperty="EmployeeId"
sortable="false"
headerText="#{bindings.EmployeesView1.hints.EmployeeId.label}"
id="c5">
<af:outputText value="#{row.EmployeeId}" id="ot4">
<af:convertNumber groupingUsed="false" pattern="#{bindings.EmployeesView1.hints.EmployeeId.format}"/>
</af:outputText>
</af:column>
<af:column
sortProperty="FirstName1"
sortable="false"
headerText="#{bindings.EmployeesView1.hints.FirstName1.label}"
id="c4">
<af:outputText value="#{row.FirstName1}" id="ot5">
</af:outputText>
</af:column>
<af:column
sortProperty="FirstName2"
sortable="false"
headerText="#{bindings.EmployeesView1.hints.FirstName2.label}"
id="c3">
<af:outputText value="#{row.FirstName2}" id="ot2">
<af:clientAttribute name="ItemValue" value="#{row.FirstName2}"/>
</af:outputText>
</af:column>
<af:column
sortProperty="HireDate1"
sortable="false"
headerText="#{bindings.EmployeesView1.hints.HireDate1.label}"
id="c1">
<af:outputText value="#{row.HireDate1}" id="ot3">
<af:convertDateTime pattern="#{bindings.EmployeesView1.hints.HireDate1.format}"/>
</af:outputText>
</af:column>
<af:column
sortProperty="HireDate2"
sortable="false"
headerText="#{bindings.EmployeesView1.hints.HireDate2.label}"
id="c2">
<af:outputText value="#{row.HireDate2}" id="ot1">
<af:convertDateTime pattern="#{bindings.EmployeesView1.hints.HireDate2.format}"/>
<af:clientAttribute name="ItemValue" value="#{row.HireDate2}"/>
</af:outputText>
</af:column>
</af:table>
a) There are two columns to display data from the first_name column. The only difference between them is the first_name2 column includes an additional af:clientAttribute tag.
b) There are two columns to display data from the hire_date column. Similar to the first_name columns, they only differ in the fact hire_date2 includes an af:clientAttribute tag.
When this page renders in the browser the generate HTML content for the rows of the table are as follows (note the formatting and the comment were added by me to make it easier to read):
<tbody>If you look at records 100 to 104 all columns include data.
<!-- ---------- Record 100 ---------- -->
<tr _afrrk="0" class="xxy ">
<td style="width:100px;" nowrap="" class="xxv"><nobr>100</nobr></td>
<td style="width:100px;" nowrap="" class="xxv"><nobr>Steven</nobr></td>
<td style="width:100px;" nowrap="" class="xxv"><nobr><span id="t1:0:ot2">Steven</span></nobr></td>
<td style="width:100px;" nowrap="" class="xxv"><nobr>17/06/1987</nobr></td>
<td style="width:100px;" nowrap="" class="xxv"><nobr><span id="t1:0:ot1">17/06/1987</span></nobr></td>
</tr>
<!-- ---------- Record 101 ---------- -->
<tr _afrrk="1" class="xxy">
<td nowrap="" class="xxv"><nobr>101</nobr></td>
<td nowrap="" class="xxv"><nobr>Neena</nobr></td>
<td nowrap="" class="xxv"><nobr><span id="t1:1:ot2">Neena</span></nobr></td>
<td nowrap="" class="xxv"><nobr>21/09/1989</nobr></td>
<td nowrap="" class="xxv"><nobr><span id="t1:1:ot1">21/09/1989</span></nobr></td>
</tr>
<!-- ---------- Record 102 ---------- -->
<tr _afrrk="2" class="xxy">
<td nowrap="" class="xxv"><nobr>102</nobr></td><td nowrap="" class="xxv"><nobr>Lex</nobr></td>
<td nowrap="" class="xxv"><nobr><span id="t1:2:ot2">Lex</span></nobr></td>
<td nowrap="" class="xxv"><nobr>13/01/1993</nobr></td>
<td nowrap="" class="xxv"><nobr><span id="t1:2:ot1">13/01/1993</span></nobr></td>
</tr>
<!-- ---------- Record 103 ---------- -->
<tr _afrrk="3" class="xxy">
<td nowrap="" class="xxv"><nobr>103</nobr></td>
<td nowrap="" class="xxv"><nobr>Alexander</nobr></td>
<td nowrap="" class="xxv"><nobr><span id="t1:3:ot2">Alexander</span></nobr></td>
<td nowrap="" class="xxv"><nobr>3/01/1990</nobr></td>
<td nowrap="" class="xxv"><nobr><span id="t1:3:ot1">3/01/1990</span></nobr></td>
</tr>
<!-- ---------- Record 104 ---------- -->
<tr _afrrk="4" class="xxy">
<td nowrap="" class="xxv"><nobr>104</nobr></td>
<td nowrap="" class="xxv"><nobr>Bruce</nobr></td>
<td nowrap="" class="xxv"><nobr><span id="t1:4:ot2" class="">Bruce</span></nobr></td>
<td nowrap="" class="xxv"><nobr>21/05/1991</nobr></td>
<td nowrap="" class="xxv"><nobr><span id="t1:4:ot1">21/05/1991</span></nobr></td>
</tr>
<!-- ---------- Record 105 ---------- -->
<tr _afrrk="5" class="xxy"><td nowrap="" class="xxv"><nobr>105</nobr></td>
<td nowrap="" class="xxv"><nobr></nobr> </td>
<td nowrap="" class="xxv"><nobr><span id="t1:5:ot2"></span></nobr> </td>
<td nowrap="" class="xxv"><nobr></nobr> </td>
<td nowrap="" class="xxv"><nobr><span id="t1:5:ot1"></span></nobr></td>
</tr>
<!-- ---------- Record 106 ---------- -->
<tr _afrrk="6" class="p_AFSelected p_AFFocused xxy">
<td nowrap="" class="xxv"><nobr>106</nobr></td><td nowrap="" class="xxv"><nobr></nobr> </td>
<td nowrap="" class="xxv"><nobr><span id="t1:6:ot2"></span></nobr> </td>
<td nowrap="" class="xxv"><nobr></nobr> </td>
<td nowrap="" class="xxv"><nobr><span id="t1:6:ot1"></span></nobr></td>
</tr>
<!-- ---------- Record 107 ---------- -->
<tr _afrrk="7" class="xxy"><td nowrap="" class="xxv"><nobr>107</nobr></td>
<td nowrap="" class="xxv"><nobr></nobr> </td>
<td nowrap="" class="xxv"><nobr><span id="t1:7:ot2"></span></nobr> </td>
<td nowrap="" class="xxv"><nobr></nobr> </td>
<td nowrap="" class="xxv"><nobr><span id="t1:7:ot1"></span></nobr></td>
</tr>
<!-- ---------- Record 108 ---------- -->
<tr _afrrk="8" class="xxy">
<td nowrap="" class="xxv"><nobr>108</nobr></td>
<td nowrap="" class="xxv"><nobr></nobr> </td>
<td nowrap="" class="xxv"><nobr><span id="t1:8:ot2"></span></nobr> </td>
<td nowrap="" class="xxv"><nobr></nobr> </td>
<td nowrap="" class="xxv"><nobr><span id="t1:8:ot1"></span></nobr></td>
</tr>
<!-- ---------- Record 109 ---------- -->
<tr _afrrk="9" class="xxy">
<td nowrap="" class="xxv"><nobr>109</nobr></td>
<td nowrap="" class="xxv"><nobr></nobr> </td>
<td nowrap="" class="xxv"><nobr><span id="t1:9:ot2"></span></nobr> </td>
<td nowrap="" class="xxv"><nobr></nobr> </td>
<td nowrap="" class="xxv"><nobr><span id="t1:9:ot1"></span></nobr></td>
</tr>
<!-- ---------- Record 110 ---------- -->
<tr _afrrk="10" class="xxy">
<td nowrap="" class="xxv"><nobr>110</nobr></td>
<td nowrap="" class="xxv"><nobr></nobr> </td>
<td nowrap="" class="xxv"><nobr><span id="t1:10:ot2"></span></nobr> </td>
<td nowrap="" class="xxv"><nobr></nobr> </td>
<td nowrap="" class="xxv"><nobr><span id="t1:10:ot1"></span></nobr></td>
</tr>
</tbody>
If we look at records 105 to 110 note:
a) The FirstName1 column when null includes a to forcefully place a blank entry into the cell.
b) The FirstName2 column does exactly the same, remembering the FirstName2 column includes an additional af:clientAttribute tag.
c) For the HireDate1 column it also includes a . Remember the HireDate1 column *does*not* include an af:clientAttribute tag.
d) For the HireDate2 column it *does*not* include an tag, even though the HireDate2 values are null. Remember the HireDate2 column *does*include* an af:clientAttribute tag.
At this point we only see differing behaviour with af:outputText values in af:columns where they show Dates *and* the af:outputText includes an af:clientAttribute tag.
From my testing, converter and validator tags added to the af:outputText don't exhibit the same behaviour. However any other tag, not just adding an af:clientAttribute tag but even an af:clientListener as example will result in the missing tag.
This in itself isn't an issue but when we consider IE7. If you render this page in IE8 the null date columns with an af:clientAttribute tag will still show the cell borders:
Yet in IE7 we get this:While the issue is particular to IE7, the issue could be fixed by ADF Faces RC consistently generating the entry as described in the HTML generated above.In discussing this bug (12942411) with Oracle staff it turns out there is a broader base bug 9682969 where this issue occurs for more than just date columns. Unfortunately the problem is not easily fixable by Oracle as it requires the af:table and af:column components to know if the child component (in this example an af:outputText) will be null before it and the data it refers to is accessed and rendered.
The simple workaround as proposed by Oracle is to not render the child component at all if the data value is null, simply by including code similar to the following:
My thanks to Oracle staff who assisted in looking and resolving this issue.
A sample application can be downloaded from here.
ADF Faces - a logic bomb in the order of bean instantiations
One of my talented colleagues discovered an interesting ADF logic bomb which I thought I'd share here. The issue is with the instantiation order of ADF Faces scoped beans in JDev 11g when using Bounded Task Flows embedded as regions in another page.
Regular readers would be familiar that Oracle's ADF solution is built on top of JavaServer Faces (JSF). ADF supports bean scopes such as ViewScope, PageFlowScope and BackingBeanScope on top of the regular JSF ApplicationScope, SessionScope and RequestScope beans. Readers should also be familiar that the beans have a defined life (ie. scope) as detailed in the JDev Web Guide:
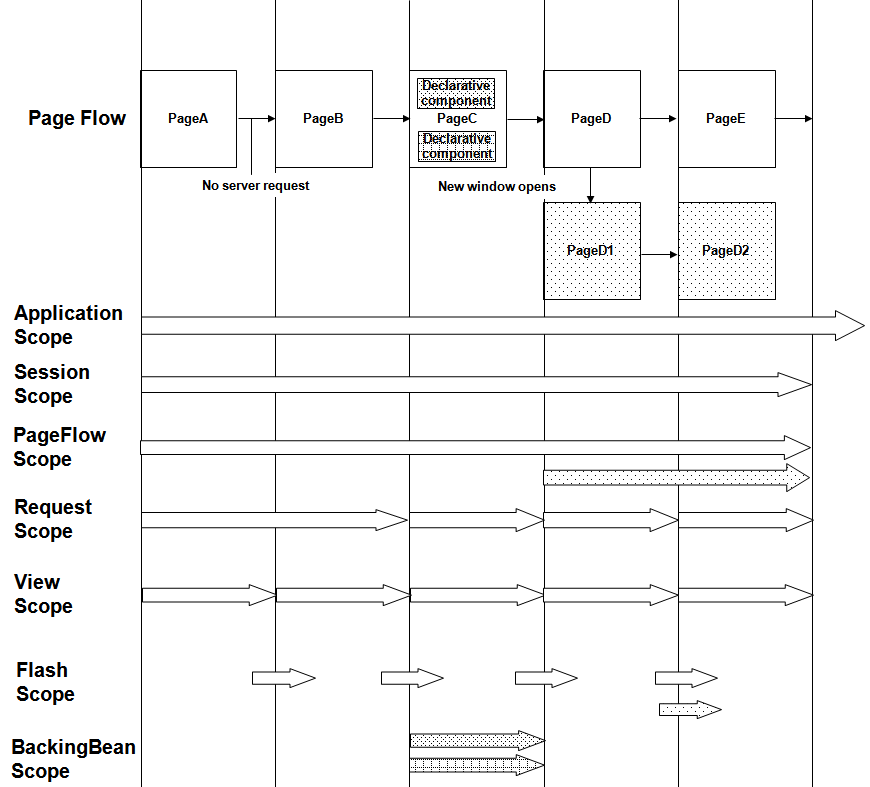 (Source: Oracle JDeveloper Web Guide 11.1.2.1 section 5.6 figure 5-11)
In specifically focusing on the life cycle of ADF PageFlowScope and BackingBeanScope beans, the guide states (to paraphrase):
1) A PageFlowScope bean for a Task Flow (either bounded or unbounded) survives for the life of the task flow.
2) A BackingBeanScope bean for a page fragment will survive from when receiving a request from the client and sending a response back.
The implication of this is when we're using Bounded Task Flows (BTFs) based on page fragments, it's typical to have a PageFlowScope bean to accept and carry the parameters of the BTF, and one or more BackingBeanScope beans for each fragment within the BTF.
Sample Application
With this in mind let's explore a simple application that shows this sort of usage in play. You can download the sample application from here.
The application's Unbounded Task Flow (UTF) includes a single SessionScope bean MySessionBean carrying one attribute mySessionBeanString as follows:
The UTF also includes a single page MyPage.jspx containing the following code:
When this page is first rendered the inputText makes reference to the SessionScope variable. JSF doesn't pre-initialize managed beans, only on first access do they get instantiated. As such as soon as the inputText is rendered we should see the message from the MySessionBean constructor when it accesses the mySessionBeanString via the EL expression:
MySessionBean initialized
If we were to comment out the region, run this page and press the commandButton, we would only see the initialized message once, as the session bean lives for the life of the user's session.
Now let's move onto considering the region and embedded Bounded Task Flow (BTF) called FragmentBTF.xml. Points of note for the BTF are:
a) The Task Flow binding has its Refresh property = ifNeeded
b) And the BTF expects a parameter entitled btfParameterString, which takes its value from our SessionScope beans variable:
 In terms of the FragmentBTF (as separate to the region/task flow binding) it has the following characteristics:
a) The BTFs has its initializers and finalizers set to call a "none" scope TaskFlowUtilsBean to simply print a message when the task flow is initialized and finalized. This will help us to understand when the BTF restarts and terminates.
b) The BTF has one incoming parameter btfParameterString. To store this value the BTF has its own PageFlowScope bean called MyPageFlowBean, with a variable myPageFlowBeanString to carry the parameter value.
c) The BTF contains a single fragment MyFragment.jsff with the following code:
c.1) An inputText to output the current value for the MyPageFlowBean.myPageFlowBeanString. Remember this value is indirectly derived from the btfParamaterString of the BTF.
c.2) A second inputText to output the value from another bean, this time a BackingScopeBean which we consider next.
d) The BackingBeanScope bean is where we'll see some interesting behaviour. Let's explain its characteristics first:
d.1) The BackingBeanScope bean entitled MyBackingBean is managed by the BTF.
d.2) It is only referenced by the MyFragment.jsff within the BTF, via the inputText above in c.2.
d.3) The BackingBeanScope bean has the following code which includes the usual System.out.println on the constructor:
d.5) However note that the constructor of the bean grabs a reference to the PageFlowScope bean and uses that to access the myPageFlowBeanString value, writing the value to the myBackingBeanString.
While this example is abstract for purposes of this blog post, it's not uncommon in context of a BTF for a backing bean to want to access state from the BTF's page flow scope bean. As such the technique is to use the JSF classes to evaluate an EL expression to return the page flow scope bean. This is what the resolveELExpression method in the backing bean does, called via the constructor and given to a by-reference-variable in the backing bean to hold for its life/scope.
At this point we have all the moving parts of our very small application.
Scenario One - Initialization
Let's run through the sequence of events we expect to occur when this page renders for the first time agaom, this time including the BTF-region processing as well as the parent page's processing:
1) From earlier we know that when the page first renders we'll see the SessionScope bean's constructor logged as the inputText in MyPage.jspx accesses mySessionBeanString.
MySessionBean initialized
2) Next as the region in MyPage.jspx is rendered, the FragmentBTF is called for the first time and we can see two log messages produced:
MyPageFlowBean initialized
Task Flow initialized
It's interesting we see the PageFlowScope bean instantiated before the Task Flow but this makes sense as the MySessionBean.mySessionBeanString needs to be passed as a parameter to the BTF before the BTF actually starts.
3) As the MyFragment.jsff renders for the first time, we then see the MyBackingBean initialized for the first time:
MyBackingBean initialized
So to summarize at this point by just running the page and doing nothing else, the following log entries will have been shown:
MySessionBean initialized
MyPageFlowBean initialized
Task Flow initialized
MyBackingBean initialized
In turn the page looks like this, note the value from the MySessionBean pushing itself to the MyPageFlowBean and the MyBackingBean:
 The order the beans are instantiated and the values down the page all makes logical sense when we've an understanding of how the page is rendered.
Scenario 2 - The logic bomb
With the page now running we'll now investigate how there's a bomb in our logic.
Up to now if we've been developing an application based on this structure, we've probably run this page a huge amount of times and seen the exact same order from above. One of the problems for developers is we start and stop our application so many times, we don't use the system like a real user does where the application is up and running for a long time. This can hide issues from the developers.
With our page running, say we want to change the SessionScope bean's value. Easy enough to do, we simply change the value in the mySessionBeanString inputText:
 When we press the "Page Submit" commandButton embedded in MyPage.jspx, given our understanding so far we'd expect the following behaviour:
1) As the session scope bean lives for the life of the user's session, we don't expect to see the bean newly instantiated.
2) Because the region's task flow binding refresh property is set to ifNeeded, and the source value of the btfParameterString has been updated, we expect the BTF to restart. As the content of the region are executed, based on our previous understanding logically we should see the following log entries:
Task Flow finalized
MyPageFlowBean initialized
Task Flow initialized
MyBackingBean initialized
(Note the Task Flow finalized message first. This is separate to this discussion but given the BTF is restarting, the previous BTF instance need to be finalized first).
Yet the actual log entries we see are:
MyBackingBean initialized
Task Flow finalized
MyPageFlowBean initialized
Task Flow initialized
And the resulting page looks like this:
 Something definitely fishing is going on here. In the logs we see the BackingBean is now initialized before the previous Task Flow is finalized and before the PageFlowScope bean is instantiated. In turn on the running page we can see the "fishy" value has made it to the PageFlowScope bean but not the BackingBean. What's going on?
The explanation is simple enough based on 2 rules we've established in this post:
1) Firstly we know beans are only instantiated on access.
2) In returning to the Oracle documentation the scope of a BackingBean is:
"A BackingBeanScope bean for a page fragment will survive from when receiving a request from the client and sending a response back."
With these two rules in mind, when we consider the first scenario, the reason the BackingBean is instantiated after the PageFlowScope bean is because the contents of the BTF fragment are rendered after the BTF is started. As such the access to the BackingBean is *after* the PageFlowScope bean as the fragment hasn't been rendered yet.
With the second scenario, as the fragment is already rendered on the screen, the reason the BackingBean is instantiated before the PageFlowScope bean (and even the termination and restart of the BTF) is the incoming request from the user will reference the BackingBean (maybe writing values back to the bean) causing it to initialize at the beginning of the request as per rule 2 above. Officially "Erk!". Then as the BackingBean in its constructor references the PageFlowScope bean, it gets a handle on the previous BTF instance's PageFlowScope bean as the new BTF instance has yet to start and create a new PageFlowScope instance with the new value passed from the caller, and thus why we see the old value in the page for myBackingBeanString.
The specific coding mistake in the examples above is the retrieval of the PageFlowScope bean in the BackingBeanScope's constructor. The solution is that any methods of the BackingBeanScope that require the value from the PageFlowScope should resolve access to the PageFlowScope each time it's required, not once in the constructor. If you consider the blog post References to UIComponents in Session-Scope beans by Blake Sullivan you'll see a number of techniques for solving this issue.
Conclusion
Understanding the scope of beans is definitely important for JSF and ADF programming. But the scope of a bean doesn't imply the order of instantiation, and the order of instantiation is not guaranteed so we need to be careful our understanding doesn't make assumptions about when beans will be in/out of scope.
Readers who are familiar with JSF2.0 know that CDI and Annotations will work around these issues. However for ADF programmers CDI for the ADF scoped beans is currently not a choice (though this may change). See the Annotations section of the ADF-JSF2.0 whitepaper from Oracle.
Errata
This blog post was written against JDev 11.1.1.4.0.
Regular readers would be familiar that Oracle's ADF solution is built on top of JavaServer Faces (JSF). ADF supports bean scopes such as ViewScope, PageFlowScope and BackingBeanScope on top of the regular JSF ApplicationScope, SessionScope and RequestScope beans. Readers should also be familiar that the beans have a defined life (ie. scope) as detailed in the JDev Web Guide:
(Source: Oracle JDeveloper Web Guide 11.1.2.1 section 5.6 figure 5-11)In specifically focusing on the life cycle of ADF PageFlowScope and BackingBeanScope beans, the guide states (to paraphrase):
1) A PageFlowScope bean for a Task Flow (either bounded or unbounded) survives for the life of the task flow.
2) A BackingBeanScope bean for a page fragment will survive from when receiving a request from the client and sending a response back.
The implication of this is when we're using Bounded Task Flows (BTFs) based on page fragments, it's typical to have a PageFlowScope bean to accept and carry the parameters of the BTF, and one or more BackingBeanScope beans for each fragment within the BTF.
Sample Application
With this in mind let's explore a simple application that shows this sort of usage in play. You can download the sample application from here.
The application's Unbounded Task Flow (UTF) includes a single SessionScope bean MySessionBean carrying one attribute mySessionBeanString as follows:
public class MySessionBean {

  private String mySessionBeanString = "mySessionBeanValue";

  public MySessionBean() {
    System.out.println("MySessionBean initialized");
  }

  public void setMySessionBeanString(String mySessionBeanString) {
    this.mySessionBeanString = mySessionBeanString;
  }

  public String getMySessionBeanString() {
    return mySessionBeanString;
  }
}
Note the System.out.println on the constructor to tell us when the bean is instantiated.The UTF also includes a single page MyPage.jspx containing the following code:
<?xml version='1.0' encoding='UTF-8'?>In MyPage.jspx note the inputText control to output the SessionScope String from MySessionBean, and a commandButton to submit any changes. Second note the region containing a call to a BTF entitled FragmentBTF. However let's put the region aside for a moment and talk about the inputText and SesssionScope bean.
When this page is first rendered the inputText makes reference to the SessionScope variable. JSF doesn't pre-initialize managed beans, only on first access do they get instantiated. As such as soon as the inputText is rendered we should see the message from the MySessionBean constructor when it accesses the mySessionBeanString via the EL expression:
MySessionBean initialized
If we were to comment out the region, run this page and press the commandButton, we would only see the initialized message once, as the session bean lives for the life of the user's session.
Now let's move onto considering the region and embedded Bounded Task Flow (BTF) called FragmentBTF.xml. Points of note for the BTF are:
a) The Task Flow binding has its Refresh property = ifNeeded
b) And the BTF expects a parameter entitled btfParameterString, which takes its value from our SessionScope beans variable:
 In terms of the FragmentBTF (as separate to the region/task flow binding) it has the following characteristics:
a) The BTFs has its initializers and finalizers set to call a "none" scope TaskFlowUtilsBean to simply print a message when the task flow is initialized and finalized. This will help us to understand when the BTF restarts and terminates.
b) The BTF has one incoming parameter btfParameterString. To store this value the BTF has its own PageFlowScope bean called MyPageFlowBean, with a variable myPageFlowBeanString to carry the parameter value.
public class MyPageFlowBean {

  private String myPageFlowBeanString;

  public MyPageFlowBean() {
    System.out.println("MyPageFlowBean initialized");
  }

  public void setMyPageFlowBeanString(String myPageFlowBeanString) {
    this.myPageFlowBeanString = myPageFlowBeanString;
  }

  public String getMyPageFlowBeanString() {
    return myPageFlowBeanString;
  }
}
Again note the System.out.println to help us understand when the PageFlowScope bean is initialized.c) The BTF contains a single fragment MyFragment.jsff with the following code:
<?xml version='1.0' encoding='UTF-8'?>Inside the fragment are:
c.1) An inputText to output the current value for the MyPageFlowBean.myPageFlowBeanString. Remember this value is indirectly derived from the btfParamaterString of the BTF.
c.2) A second inputText to output the value from another bean, this time a BackingScopeBean which we consider next.
d) The BackingBeanScope bean is where we'll see some interesting behaviour. Let's explain its characteristics first:
d.1) The BackingBeanScope bean entitled MyBackingBean is managed by the BTF.
d.2) It is only referenced by the MyFragment.jsff within the BTF, via the inputText above in c.2.
d.3) The BackingBeanScope bean has the following code which includes the usual System.out.println on the constructor:
public class MyBackingBean {

  private String myBackingBeanString;
  private MyPageFlowBean myPageFlowBean;

  public MyBackingBean() {
    System.out.println("MyBackingBean initialized");

    myPageFlowBean = (MyPageFlowBean)resolveELExpression("#{pageFlowScope.myPageFlowBean}");

    myBackingBeanString = myPageFlowBean.getMyPageFlowBeanString();
  }

  public static Object resolveELExpression(String expression) {
    FacesContext fctx = FacesContext.getCurrentInstance();
    Application app = fctx.getApplication();
    ExpressionFactory elFactory = app.getExpressionFactory();
    ELContext elContext = fctx.getELContext();
    ValueExpression valueExp = elFactory.createValueExpression(elContext, expression, Object.class);
    return valueExp.getValue(elContext);
  }

  public void setMyBackingBeanString(String myBackingBeanString) {
    this.myBackingBeanString = myBackingBeanString;
  }

  public String getMyBackingBeanString() {
    return myBackingBeanString;
  }
}
d.4) It contains a variable myBackingBeanString which is referenced via an EL expression by the inputText explained in c.2.d.5) However note that the constructor of the bean grabs a reference to the PageFlowScope bean and uses that to access the myPageFlowBeanString value, writing the value to the myBackingBeanString.
While this example is abstract for purposes of this blog post, it's not uncommon in context of a BTF for a backing bean to want to access state from the BTF's page flow scope bean. As such the technique is to use the JSF classes to evaluate an EL expression to return the page flow scope bean. This is what the resolveELExpression method in the backing bean does, called via the constructor and given to a by-reference-variable in the backing bean to hold for its life/scope.
At this point we have all the moving parts of our very small application.
Scenario One - Initialization
Let's run through the sequence of events we expect to occur when this page renders for the first time agaom, this time including the BTF-region processing as well as the parent page's processing:
1) From earlier we know that when the page first renders we'll see the SessionScope bean's constructor logged as the inputText in MyPage.jspx accesses mySessionBeanString.
MySessionBean initialized
2) Next as the region in MyPage.jspx is rendered, the FragmentBTF is called for the first time and we can see two log messages produced:
MyPageFlowBean initialized
Task Flow initialized
It's interesting we see the PageFlowScope bean instantiated before the Task Flow but this makes sense as the MySessionBean.mySessionBeanString needs to be passed as a parameter to the BTF before the BTF actually starts.
3) As the MyFragment.jsff renders for the first time, we then see the MyBackingBean initialized for the first time:
MyBackingBean initialized
So to summarize at this point by just running the page and doing nothing else, the following log entries will have been shown:
MySessionBean initialized
MyPageFlowBean initialized
Task Flow initialized
MyBackingBean initialized
In turn the page looks like this, note the value from the MySessionBean pushing itself to the MyPageFlowBean and the MyBackingBean:
 The order the beans are instantiated and the values down the page all makes logical sense when we've an understanding of how the page is rendered.
Scenario 2 - The logic bomb
With the page now running we'll now investigate how there's a bomb in our logic.
Up to now if we've been developing an application based on this structure, we've probably run this page a huge amount of times and seen the exact same order from above. One of the problems for developers is we start and stop our application so many times, we don't use the system like a real user does where the application is up and running for a long time. This can hide issues from the developers.
With our page running, say we want to change the SessionScope bean's value. Easy enough to do, we simply change the value in the mySessionBeanString inputText:
 When we press the "Page Submit" commandButton embedded in MyPage.jspx, given our understanding so far we'd expect the following behaviour:
1) As the session scope bean lives for the life of the user's session, we don't expect to see the bean newly instantiated.
2) Because the region's task flow binding refresh property is set to ifNeeded, and the source value of the btfParameterString has been updated, we expect the BTF to restart. As the content of the region are executed, based on our previous understanding logically we should see the following log entries:
Task Flow finalized
MyPageFlowBean initialized
Task Flow initialized
MyBackingBean initialized
(Note the Task Flow finalized message first. This is separate to this discussion but given the BTF is restarting, the previous BTF instance need to be finalized first).
Yet the actual log entries we see are:
MyBackingBean initialized
Task Flow finalized
MyPageFlowBean initialized
Task Flow initialized
And the resulting page looks like this:
 Something definitely fishing is going on here. In the logs we see the BackingBean is now initialized before the previous Task Flow is finalized and before the PageFlowScope bean is instantiated. In turn on the running page we can see the "fishy" value has made it to the PageFlowScope bean but not the BackingBean. What's going on?
The explanation is simple enough based on 2 rules we've established in this post:
1) Firstly we know beans are only instantiated on access.
2) In returning to the Oracle documentation the scope of a BackingBean is:
"A BackingBeanScope bean for a page fragment will survive from when receiving a request from the client and sending a response back."
With these two rules in mind, when we consider the first scenario, the reason the BackingBean is instantiated after the PageFlowScope bean is because the contents of the BTF fragment are rendered after the BTF is started. As such the access to the BackingBean is *after* the PageFlowScope bean as the fragment hasn't been rendered yet.
With the second scenario, as the fragment is already rendered on the screen, the reason the BackingBean is instantiated before the PageFlowScope bean (and even the termination and restart of the BTF) is the incoming request from the user will reference the BackingBean (maybe writing values back to the bean) causing it to initialize at the beginning of the request as per rule 2 above. Officially "Erk!". Then as the BackingBean in its constructor references the PageFlowScope bean, it gets a handle on the previous BTF instance's PageFlowScope bean as the new BTF instance has yet to start and create a new PageFlowScope instance with the new value passed from the caller, and thus why we see the old value in the page for myBackingBeanString.
The specific coding mistake in the examples above is the retrieval of the PageFlowScope bean in the BackingBeanScope's constructor. The solution is that any methods of the BackingBeanScope that require the value from the PageFlowScope should resolve access to the PageFlowScope each time it's required, not once in the constructor. If you consider the blog post References to UIComponents in Session-Scope beans by Blake Sullivan you'll see a number of techniques for solving this issue.
Conclusion
Understanding the scope of beans is definitely important for JSF and ADF programming. But the scope of a bean doesn't imply the order of instantiation, and the order of instantiation is not guaranteed so we need to be careful our understanding doesn't make assumptions about when beans will be in/out of scope.
Readers who are familiar with JSF2.0 know that CDI and Annotations will work around these issues. However for ADF programmers CDI for the ADF scoped beans is currently not a choice (though this may change). See the Annotations section of the ADF-JSF2.0 whitepaper from Oracle.
Errata
This blog post was written against JDev 11.1.1.4.0.
PageFlowScope with Unbounded Task Flows: the magic sauce for multi-browser-tab support in JDeveloper ADF applications
Within JDev 11g+ experienced ADF programmers will be familiar with PageFlowScope beans used by tasks flows, in particular Bounded Task Flows (BTFs) where they provide the equivalent of session scope for variables for the life of the BTF for a specific user session. Indeed the Oracle documentation says the following about PageFlowScope beans:
Choose this scope if you want the managed bean to be accessible across the activities within a task flow. A managed bean that has a pageFlow scope shares state with pages from the task flow that access it. A managed bean that has a pageFlow scope exists for the life span of the task flowSource: Oracle Fusion Dev Guide 11.2.1 Section 18.2.4 What You May Need to Know About Memory Scope for Task Flows
Given we know BTFs have a distinct beginning and end for each user session, a "life span" as such, and conversely Unbounded Task Flows (UTFs) live for the life of the application which is nearly forever, it would appear that PageFlowScope beans only apply to BTFs. However PageFlowScope beans provide some magic sauce with UTFs that shouldn't be ignored. Before we can have a look at this magic sauce we need to cover some background on modern browsers.
Multi-tab browsers and the challenge for web applications
Readers will be familiar that over the last several years browsers have increased in sophistication, providing users with more and more features. One such feature is that of tabs, more commonly referred to as multi-tab browsing. Back in the dim dark ages of the Internet (circa 2005?) if users wanted to surf more than one website at a time they needed to open multiple instances of their browser. Typically each browser instance took out a single connection and server-side session (assuming a stateful application) with whichever server they were visiting. If the user had multiple instances open to the same website this resulted in the same amount of connections and sessions.
At some point in time web browsers introduced the support for tabs, allowing within the one browser instance the user to surf multiple websites in separate tabs. I'll take a guess and say the browser authors when introducing this feature had a careful think about how users visit websites, and they realized users when searching for information on websites might spawn several tabs all visiting the same website but each tab viewing different pages within that single website.
So browsers introduced a feature set to give users the ability to search for information even faster, yet the browser vendors also recognized an issue. Potentially users were now relatively free to spawn lots of tabs (and if you're like some users you keep on spawning tabs, never closing any, until you shut down the browser). If the old regime of a connection per tab was followed at the client (browser) side, and a session per connection at the server (website) side, computing resources would be strained.
How to fix? Simple really, per website on the browser side, regardless the number of tabs open to a website via a browser, it should share the connections across the tabs. Result? Instant resource saving on the client. In turn on the server side as there isn't any default way to identify the different tabs as their separate requests hit the server through the same connection, the server too need only store 1 session.
Today from the users' perspective (at least the tech savvy users) multi-browser tabs is an expected feature and one when not available for whatever reason causes frustration either with the browser or the website they are using. This implies any web application we build really needs to support (or at least not hinder) this functionality.
What's this got to do with ADF?
The question is probably rhetorical for readers at this point, but what's this got to with ADF?
Traditionally JavaServer Faces (JSF) programmers and ADF programmers have been taught if you want to maintain state (variables) for the life of a user's session you put it in a SessionScope bean. Examples of such variables include the time the user first accessed the system, the customer ID of the current customer that the user is working with on the phone, or the items in a shopping cart. Definitely these should go in SessionScope.
Or should they?
With modern browsers what should happen with these variables when the user spawns two tabs to our application sharing the same connection/session? Looking at our previous examples it's easy to agree the time the user first accessed the system would be one and the same across both tabs. But what about our other examples?
For our customer ID example, reasonably in some applications you might want two different tabs to show two different pages for information on the same customer, so SessionScope seems reasonable enough. But alternatively imagine you're a call centre operator, taking a call from one customer while finishing recording data about the previous customer. It would be mighty handy to have two browser tabs to do this. As a result the separate tabs really require their own SessionScope customer ID. How to do that?
The question gets murkier when considering shopping carts. For an Amazon user having two separate carts on two separate browser tabs would seem undesirable. But let's take another call centre example where an operator is taking a phone call from a customer wanting to place two separate orders. Things get tricky if the customer is moving items between the orders, so different tabs supporting different orders could be desirable. Again the vanilla SessionScope bean won't solve this.
So we can see sometimes depending on the needs of the application, we need to provision session state for separate browser tabs. At the moment JSF1.X/2.0 has no inbuilt solution for this problem (there's been much discussion about including a new ConversationScope bean in the past), but as you can probably guess a PageFlowScope at the UTF level in ADF solves this problem. For every browser tab opening a page in the UTF that references a managed PageFlowScope bean a separate instance of the bean will be created.
The hint of the secret life of the PageFlowScope is revealed in Section 5.7 Passing Values Between Pages of the JDev Web Guide 11.1.2 where it states:
The ADF Faces pageFlowScope scope makes it easier to pass values from one page to another, thus enabling you to develop master-detail pages more easily. Values added to the pageFlowScope scope automatically continue to be available as the user navigates from one page to another, even if you use a redirect directive. But unlike session scope, these values are visible only in the current page flow or process. If the user opens a new window and starts navigating, that series of windows will have its own process. Values stored in each window remain independent.Specifically note the last 2 sentences.
How does ADF technically solve identifying the separate tabs?
Earlier on we mentioned from the server's point of view, because multi-browser tabs share the same connection with the server, by default the server has no inherit mechanism to differentiate the separate browser tabs and therefore no mechanism to know when to spawn separate PageFlowScope beans. So how does ADF actually technically solve identifying the separate tabs?
Imagine you've created an ADF application to lodge infringements. Some infringements take seconds to fill out and complete, others take time to gather the data, requiring multiple tabs to enter more than one infringement at a time.
For such an ADF application we could serve the service via a link on our portal such as:
http://www.wewantyourmoney.com/infringements/ticket
In this case ticket represents a JSPX file in our UTF of our application.
On accessing the URL for the first time regular ADF users will know the server in responding with the required page will also replace the URL with something like the following:
http://www.wewantyourmoney.com/infringements/ticket?_adf.ctrl-state=p1zuym5lv_3
This parameter and its value is also buried in the HTML source to be used on the next request. Also inside the page source is a form parameter Adf-Window-Id with a unique value given by the server.
When the page is submitted along with the hidden _adf.ctrl-state and Adf-Window-Id parameter gained from the previous server response, this gives ADF a mechanism for tracking the current session and current page instance.
(Side note: Behind the scenes the server is smart enough to check the session parameters against the previous known connection/session to stop intruders impersonating another user's session ... you can test this by intercepting the next request before it goes out and changing the _adf.ctrl-state parameter before it hits the server. ADF will complain displaying the following error message "ADFC-12000: State ID in request is invalid for the current session.")
If the server receives another request for the same "naked" URL from the same connection/session, ADF simply assumes a new tab instance, spawns a separate PageFlowScope bean instance, and returns separate _adf.ctrl-state and Adf-Window-Id values in the response. Any subsequent requests to the server from separate multiple tabs for the same user connection are therefore easily separated and the correct PageFlowScope bean instance used.
Alternatively if the user tries to trick the server by copying the URL from another tab with the _adf.ctrl-state variable in the URL, but obviously missing a payload containing the _adf.ctrl-state form parameter and the Adf-Window-Id parameter, again ADF is smart enough to detect this as a new browser tab and spawns a new PageFlowScope bean. This piece of logic is important because it's possible for users to bookmark the current page's URL with the URL parameter, and attempt to come back to it after a spawning a new tab. As such we wouldn't want ADF to be tricked by this simple common use case into thinking the user is in the same original tab when in fact they're launching the application from an old bookmark.
Finally it should be noted if the user session times out or logs out, the PageFlowScope bean will fall out of scope and any reference to the PageFlowScope there after will result in new instance of the bean created.
Demonstration
The following link provides a small demo application from JDev 11.1.2. To set this application up you need to:
a) unzip it and open it in JDev
b) in your integrated WLS server create a user account which you will use to log in to the application
The application is comprised of 4 pages:
 a) an unauthenticated Splash page to start the application
b) 2 separate authenticated pages named FirstPage and SecondPage that will demonstrate the bean scopes during an authenticated session
c) an unauthenticated ExitPage which will be called when the user logs out of SecondPage
From here run the Splash.jsf page. Your browser will eventually open with the following URL:
http://localhost:7101/MultiBrowserTabExample/faces/Splash
 Select the Go First Page button, at the login enter your credentials, upon which you'll see First Page:
 The two fields have default values gathered from two separate beans, one a SessionScope bean and the other a PageFlowScope bean. Note in the JDev log window you'll see log entries from the constructors of both beans, implying they were just instantiated to show the values on the page, and thus why the default values are shown.
Selecting the Go Second Page button takes us to the Second Page where we have the option to change the values:
 As example lets change the value for the SessionScope to Alpha and the PageFlowScope value to Beta:
 On returning to the first page through the associated button we see that Alpha and Beta values have been successfully carried across requests
 Now open a new browser tab to original Splash page using the following URL:
http://localhost:7101/MultiBrowserTabExample/faces/Splash
Diagrammatically to show this, what I've done in the following set of pictures is put the original tab to the left of the image, and the new tab to the right of the image so I could show both tabs at the same time. As such we now have:
 In the second tab if we then select the Go First Page button we bypass the login screen automatically as the user is already logged in, and we arrive on the SecondPage as follows:
 In the JDev log window we see a new instance of the PageFlowScope bean has been created, but not the SessionScope bean. This backs up what is shown in the new second tab because we can see that the SessionScope value is shared across both tabs, but the PageFlowScope value isn't and we've reverted to the default value (provided through the new PageFlowScope instance).
From here in the second tab we can navigate to the Second Page and update the values of the SessionScope and PageFlowScope beans to Charlie and Delta respectively:
 In the second tab if we then return to the FirstPage we see that it maintains the Charlie and Delta values:
 ...and more importantly in the first tab if we then navigate to the Second Page we see:
 In this picture we can see that the SessionScope Charlie value has been shared across both tabs, but the first tab has retained it's original Beta values for it's PageFlowScope bean, showing that the PageFlowScopes are indeed separate across browser tabs.
To conclude the examples, if in the first tab we select the Logout button we automatically move to the ExitPage and we see:
 This shows both the SessionScope and PageFlowScope bean resetting back to the original values. The JDev log window also logs the constructor calls of both beans verifying that the old beans have been completed and 2 new instances created.
Finally if we return to the second tab that is still sitting on the First Page, any action results in ADF throwing an exception "java.lang.IllegalStateException: No window for windowId:w2". To be honest I expected an error here because the user behind the scenes has logged out, but this error message looks less than useful. Presumably we need to take care of this specific error in some manner, probably with a task flow Exception handler, but is beyond the scope of this post.
Not all things are born equal - final note on SessionScope vs PageFlowScope
Don't get confused on the use of SessionScope and PageFlowScope beans. Not everything you would have traditionally put in SessionScope need now go in a UTF PageFlowScope bean. How many frequent flyer miles the user has left, the user's preferences and their birthday are good candidates for SessionScope. But if across tabs you will allow the user to test separate values for projecting sales figures, a counter for the numbers of steps completed in submitting separate expense reports or even the tiles placed in a game of tic tac toe, PageFlowScope will be more appropriate.
ADF take aways from Oracle Open World 2011
With the huge amount of sessions at Oracle Open World, it’s often hard to find the little gems of information amongst all the marketing. This is true of ADF like all other technologies at the conference, there’s simply a lot of information to digest and filter. Luckily Oracle publishes the presentations PPTs afterwards and it’s possible to find a jewel or two in all the content with some careful searching.
For the ADF developers among us, this blog post attempts to summarize some of the main ADF takeaways from Oracle Open World 2011. Please remember this is my summary, not Oracle’s (I am not an Oracle employee), and Oracle publishes all of this content under the Safe Harbor statement which means they cannot be held to anything they published.
All the links in this post are not guaranteed to be up forever as Oracle may remove them in the near future. I suggest if you're interested in reading the presentations download them now.
Finally I apologize for some of the clunky grammer and phrases in this post, I wrote it on the plane back to Australia with the usual jetlag that fogs the brain.
ADF Mobile
Of the large announcements at Oracle Open World 2011, the soon-to-be-released (2012) Mobile edition of ADF was the most significant in the ADF space. Some key points of the new platform is it supports both iOS and Android, runs on device with a mini JVM, and uses PhoneGap to allow the native app to access the device’s native facilities.
For me the most telling part was the architecture diagram from the Develop Mobile Apps for iOS, Android, and More: Converging Web and Native Applications presentation by Oracle Corporation’s Joe Huang, Denis Tyrell, and Srini India:
 Data Visualization Controls
Katarina Obradovic-Sarkic, Dana Singleterry and Jairam Ramanathan from Oracle included screenshots of upcoming DVT components in their Building Visually Appealing Web 2.0 Data DashBoards. First we see a new Network Diagrammer:
 As can be seen the component demonstrates the relationship between disparate nodes. This is incredibly useful for visualizing relationships in data. Another screenshot showing a different data relationship structure:
 In terms of graphs Oracle is looking at a Treemap graph:
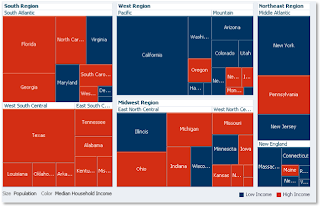 …and a Sunburst graph:
 ...both useful for showing hierarchical data visually. Of all the DVT controls the Timeline graph excites me most, something I’ve asked for in the past:
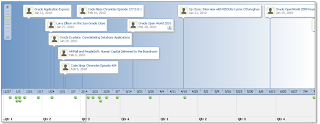 However I must clearly stress to readers these DVT controls are not in the current 11.1.2.1.0 release, and under Oracle’s safe harbor statement is not guarantying they will ever see be released (but fingers crossed anyway huh?).
Maven integration
As the ADF EMG moderator I’m involved in a lot of discussions in the community about the IDE and the framework. One hot topic is JDeveloper’s Maven support. 11.1.2.0.0 introduced the first cut of Maven support for the IDE, as discussed by Oracle’s Susan Duncan’s Team Productivity with Maven, Hudson and Team Productivity Center. This first slide shows the current Maven support:
 Of more interest is the planned Maven features for 12c, which not only tells me Oracle is committed to Maven support, but also there are definitely limitations in the current implementation:
 Most importantly here for me is the first 2 bullet points, which means I wont recommend to customers working with Maven until Oracle makes these available. Don’t get me wrong though, a couple years back there was no Maven support and it’s great Oracle is working to fill that gap completely.
What can Fusion Applications teach us about ADF?
Unlike OOW10, this year at Oracle Open World there was considerable more Fusion Applications demonstrations and presentations. This has been a boon as previously we’ve seen a lot of demos of dashboard-like-screens that while pretty don’t show us where the real work occurs for users. Fatema Madraswala from PwC and Rob Watson from Oracle included screenshots of the Fusion Applications Talent Management system (The very first Fusion go-live case study:
 It’s curious to me that while Oracle has put a lot of effort into communicating the User Experience design effort put into Fusion Applications, then we see a screen that looks Oracle-Forms like, especially with it’s tabbed interface. In turn the worksheet at the bottom looks cluttered with buttons and fields. Yet with respect designing user interfaces for complex business systems is surely not easy.
I recommend ADF developers to search out as many Fusion Applications screenshots as possible as it reveals an insight into how to build the UI and what is and isn’t possible.
What about E-Business Suite?
EBS customers might feel the whole ADF/SOA bandwagon is passing them bye, what with the focus on Fusion Applications. Yet this year saw presentations tailor fitted to cover integrations points with EBS. I must admit I can’t really comment on the quality of the solutions as I have no direct experience with EBS, so I’ll leave experienced readers to make their own assessment. Check out the presentation entitled Extending Oracle E-Business Suite with Oracle ADF and Oracle SOA Suite from Oracle’s Veshaal Singh, Mark Nelson and Tanya Williams.
MetaData Services
As extension to the Fusion Applications demos, I’m detecting more down-and-dirty technical presentations on MedaData Services (MDS) where the framework can support personalizations and customizations. Gangadhar Konduri and a fellow Oracle colleague discussed the theory and demonstrated customizing a Fusion Applications module, with a focus to what technical people need to know. I must admit in the past I’ve been a little skeptical of MDS et all, not for it’s implementation but just the lack of information around on how to maintain and work with it from a developer/administrator point of view. However I’ll need to step back and reassess that opinion. You can read more in Gangadhar’s Managing Customizations and Personalization in Oracle ADF MetaData Services.
For ADF Experts
For the ADF experts who feel many of the presentations aren’t aimed at them, it’s well worth catching one of Steven Davelaar’s presentation. Steven who is the JHeadstart Product Manager at Oracle extends and pushes the ADF framework to its limits. His presentations often include large amounts of code where I discover new properties and techniques way beyond my current level of expertise. This year Steven presented Building Highly Reusable ADF Task Flows and Empowering Multitasking with an Oracle ADF UI Powerhouse for the ADF EMG (great title Steven ;-).
ADF Tuning
From my own perspective one of the most important presentations I attended was Oracle’s Duncan Mill’s ADF – Real World Performance Tuning presentation. As I now have several clients with production level ADF applications, my focus has moved away from the basics of creating ADF applications to architecture and performance. Duncan’s presentation aggregated a wide range of tuning hints into an easily digestible guide, highly valuable.
FMW Roadmaps
In a separate presentation entitled Certified Configurations of Oracle ExaLogic, Oracle Fusion Middleware, BI and Oracle Fusion Apps by Pavana Jain and Deborah Thompson from Oracle Corp, the future roadmap for FMW releases was revealed. Readers are reminded the safe harbor statement means Oracle doesn’t have to stick to what they present, so take the slides as guidelines only.
The first slide shows the approximate dates of each version:
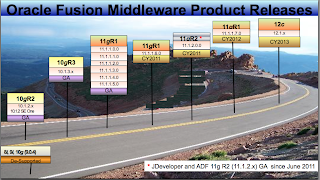 The second slide reveals which 11g FMW products will be included in each release:
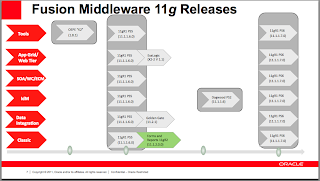 Some readers might find it curious why the 11g 11.1.1.X.0 series continues to at least 11.1.1.7.0 while there is already an 11.1.2.0.0 release of JDev. My understanding this is occurring because Fusion Apps will continue on the 11.1.1.X.0 series for some time yet thus extending the life of that branch.
Finally the third slide the same for the 12c FMW products:
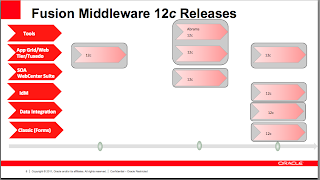 Oh and the ADF EMG had a great event too
The ADF EMG also had a "super" Super User Group Sunday, but people are probably a little sick of me talking about it, so I'll just push you to a link instead.
ADF Faces: Optimizing retrieving beans programmatically
From time to time in JSF and ADF Faces RC applications there’s the need from one managed bean to retrieve another programatically, typically from a lesser scoped bean to a greater, such as a requestScope bean retrieving a sessionScope bean to access its methods. There’s essentially 3 avenues to solving this problem programatically:
1) The following JSF 1.1 createValueBinding method that retrieves the bean using EL:
2) A JSF 2.0 compliant way using evaluateExpressionGet also evaluating EL to retrieve a bean:
3) Or a direct programmatic method that doesn’t use EL:
 (Note each run included an initialization section that wasn’t recorded in the statistics, designed to prime the beans and the access methods such that startup times didn’t impact the results).
The numbers represent nanoseconds but their individual values mean little. However the ratios between each method is of more interest and the following conclusions can be made:
a) The older createValueBinding method is slower than the evaluateExpressionGet method, at least initially but this trends to insignificant over subsequent runs.
b) The direct method is faster than the other methods in all cases.
c) Particular gains are to be made in using the direct method to access application, session and request scoped beans. Less so but still positive gains for view and pageFlow scoped beans.
Sample App
The sample app can be downloaded from here.
Platform
MacBookPro 2.3GHz Core i7, 8GB RAM, Mac OS X 10.6.8
JDev 11.1.2 JDK 64bit 1.6.0_26
Thanks
My thanks must go to Simon Lessard who inspired this post sometime back.
1) The following JSF 1.1 createValueBinding method that retrieves the bean using EL:
FacesContext ctx = FacesContext.getCurrentInstance();Note parts of this code were deprecated since JSF 1.1
Application app = ctx.getApplication();
ValueBinding bind = app.createValueBinding("#{beanName}");
Bean bean = (Bean) bind.getValue(ctx);
2) A JSF 2.0 compliant way using evaluateExpressionGet also evaluating EL to retrieve a bean:
FacesContext context = FacesContext.getCurrentInstance();(Thanks to BalusC on StackOverFlow for the technique).
Bean bean = (Bean) context.getApplication().evaluateExpressionGet(context, "#{beanName}", Bean.class);
3) Or a direct programmatic method that doesn’t use EL:
ExternalContext exctxt = FacesContext.getCurrentInstance().getExternalContext();With these 3 approaches in mind it’s interesting to gather some statistics on how long it takes each method to retrieve each type of bean. The following chart shows 5 consecutive runs of each method, per bean type, where each method is repeated in a loop 10000 times (so we can see the statistical differences).
AppBean appBean = (AppBean) exctxt.getApplicationMap().get("appBeanName");
SessionBean sessionBean = (SessionBean) exctxt.getSessionMap().get("sessionBeanName");
RequestBean sessionBean = (RequestBean) exctxt.getRequestMap().get("requestBeanName");
AdfFacesContext adfctxt = AdfFacesContext.getCurrentInstance();
ViewBean viewBean = (ViewBean)adfctxt.getViewScope().get("viewBeanName");
PageFlowBean pageFlowBean = (PageFlowBean)adfctxt.getPageFlowScope().get("pageFlowBeanName");
 (Note each run included an initialization section that wasn’t recorded in the statistics, designed to prime the beans and the access methods such that startup times didn’t impact the results).
The numbers represent nanoseconds but their individual values mean little. However the ratios between each method is of more interest and the following conclusions can be made:
a) The older createValueBinding method is slower than the evaluateExpressionGet method, at least initially but this trends to insignificant over subsequent runs.
b) The direct method is faster than the other methods in all cases.
c) Particular gains are to be made in using the direct method to access application, session and request scoped beans. Less so but still positive gains for view and pageFlow scoped beans.
Sample App
The sample app can be downloaded from here.
Platform
MacBookPro 2.3GHz Core i7, 8GB RAM, Mac OS X 10.6.8
JDev 11.1.2 JDK 64bit 1.6.0_26
Thanks
My thanks must go to Simon Lessard who inspired this post sometime back.
My OOW Presentations
If you're heading to OOW this year, it'd be great to have you at either one of my following presentations:
Session ID: 02240
Session Title: Angels in the Architecture: An Oracle Application Development Framework Architectural Blueprint
Venue / Room: Marriott Marquis - Golden Gate B
Date and Time: Wednesday 10/5/11, 01:00 PM
Oracle Application Development Framework (Oracle ADF) in Oracle JDeveloper 11g presents an interesting service-oriented solution with the adoption of bounded task flows and Oracle ADF libraries. Yet unlike its Release 10.1.3 counterpart, in which the tendency was to build one large application from the start, the 11g solution comes with its own challenges in terms of bringing the multiple moving parts into a composite master Oracle ADF application. This session presents a blueprint for Oracle ADF application architecture that can be applied to small and large projects alike to assist beginners in pulling 11g Oracle ADF applications together.
Session ID: 2241
Session Title: A Change Is as Good as a REST: Oracle JDeveloper 11g's REST Web Services
Venue / Room: Marriott Marquis - Golden Gate A
Date and Time: Thursday 10/6/11, 03:00 PM
It can seem like a hard slog to develop SOAP-based Web services, with their contract-first design requirements and over-engineered specification that includes everything but the kitchen sink. REST-based Web services provide light relief for quick Web service development, whereas the constraints of SOAP Web services feel extreme for some short, sharp development. Luckily, Oracle JDeveloper provides support for both styles, and this presentation includes a short and sweet demonstration of getting REST Web services up and running by using Oracle JDeveloper's support for the Java API for RESTful Web Services (JAX-RS).
In turn don't forget the day of ADF presentations for the ADF EMG on the User Group Sunday at Open World.
Book Review: Middleware and Cloud Computing: Oracle on Amazon Web Services and Rackspace Cloud
 With the explosion of Internet content, especially that for the IT industry, it leaves an interesting question hanging over the worth (if any) of IT textbooks. When you can find an answer on just about anything online, what’s the point of shelling out money, especially for IT texts that have been overpriced for sometime?
Frank Munz’s Middleware and Cloud Computing: Oracle on Amazon Web Services and Rackspace Cloud book is a good reminder of one key fact about text books in context of an internet society, they can save you a lot of research and time on the internet looking for the nitty-gritty details.
The book is clearly aimed at system administrators & architects who are looking for details about moving Oracle Fusion Middleware (FMW) products to the cloud. A healthy dose of system admin knowledge is required of readers, with discussions on operating system (particularly Linux), us of command lines, and a knowledge of networking concepts would greatly assist too. FMW knowledge isn’t assumed, with an introductory chapter included, but knowledge in Oracle’s WebLogic Server (WLS) would be highly beneficial to readers, and a familiarity of Java EE technologies too.
Munz’s book is broken into logical halves. The first is a general introduction into “as a Service” cloud computing concepts. For readers who have heard the terminology but haven’t kept up with all the in’s and out’s of what a cloud service is, this provides an opportunity to learn the lingo and also learn how to critique the cloud offerings, which is (let’s just say) over hyped by IT marketing.
The first part of the book also takes care to look in depth at Amazon Web Services (AWS), including images, instances, storage and even pricing. In this area the book departs from a typical theoretical text encouraging readers to create their own AWS accounts and gives details on how to configure and run your own instance. The text however doesn’t just focus on AWS, and also looks at Rackspace’s equivalent cloud services.
The second half is where Munz’s book shines. Moving on from cloud basics, readers are led through considerations on designing and architecture within the cloud, management, availability and scalability, all in context of FMW and specifically of WLS and its supported JEE technologies. In each area the reader is brought back to specific considerations and limitations of Amazon’s & Rackspace’s platforms. On completing the book it becomes obvious this is a well thought out inclusion, as like enterprise home-baked operating systems and network infrastructure, cloud vendors’ platform are not born equal or include every feature required. The implication being certain FMW features and designs simply won’t work on specific cloud platforms.
The book isn’t without fault. Munz does take a narrative approach that may not be everybody’s cup of tea. In turn there’s a section that takes an unfortunate cop out on not tackling Oracle’s (let’s just say) less than favourable licensing. Yet overall the outcome for FMW professionals, in particular administrators and architects, is a positive one, and a recommended read. In turn it’s the careful research into actually testing what FMW features will really work on each cloud vendor’s platform, all collated into 1 book rather than sprayed across the internet, which will save readers significant time: prewarned is prearmed.
Book Review: Oracle ADF Enterprise Application Development Made Simple
There are very few pieces of software where a casual approach can be taken to the process of software development. Software development is intrinsically a difficult process, gathering requirements, design, development and testing all taking large effort. In reaction enterprises have setup and adopted strict development processes to build software (or at least the successful enterprises have ;-).
ADF and JDeveloper are sold as productivity boosters for developers. Yet in the end they are just a technology platform. By themselves they don't solve the complexities of software development process as a whole (though they do make parts of it easier).
This leaves IT departments struggling, as they might like the potential of ADF as a platform, but they intrinsically know there's more to software development, there's the process of development to consider. How will the tasks of requirement gathering, design, development & testing be applied to ADF? And more importantly how to shortcut the process of establishing these for ADF within the enterprise? There's a need to bring the two concepts together, the technology & the process, to help the adoption of ADF in the enterprise.
As ADF matures we're slowly seeing more books on Oracle's strategic JSF based web framework. Up to now the books have focused on the holistic understanding of the technical framework, the tricky & expert level implementation, or more recently the speed of development. Sten Vesterli's Oracle ADF Enterprise Application Development - Made Simple is the first to apply the processes and methodologies of design and development to ADF.
Of particular delight Sten's book starts out by suggesting building a proof of concept to skill up teams in ADF, to learn the complexities, & gather empirical evidence of the effort required. From here a focus on estimation and considerations of team structure are raised, all valuable stuff for the enterprise trying to control the tricky process of software development.
In order to make use of reuse, the next few chapters focus on the infrastructure and ADF constructs that need to be setup before a real project commences, including page templates, ADF BC framework classes and more. This is the stuff you wish you'd been told to create first if you forged ahead in building with ADF without any guidance.
Then chapter by chapter the tasks of building, adding security, internalization and other development efforts are covered. There's even a chapter on using JMeter to stress test your ADF app (with a link back to my blog! Thanks Sten).
As can be seen from the topics, there's relatively little consideration of actually implementing ADF Business Components or ADF Faces RC. As such it must be said reading this book won't make you an expert in the technical side of ADF, but rather will address how you can take a sensible approach to the overall development process.
All in all Sten Vesterli's Oracle ADF Enterprise Application Development - Made Simple is another valuable book in my ADF bookshelf and a recommended read for enterprise specialists looking at adopting ADF into their organisation.
Disclaimer: I know Sten personally and in addition Packt Publishing has provided me Sten's book for free to review.
Task flows: Sayonara auto AM nesting in 11.1.2.0.0. Hello, ah, let's call it Bruce.
In my post from last week I documented the changing behaviour of task flows and Application Module nesting between the 11.1.2.0.0 and 11.1.1.X.0 series of ADF & JDeveloper. In that post I detected a distinct change in the underlying behaviour of how ADF works with ADF BC Application Modules with certain task flow options and I was concerned this would destroy the scalability of our applications. To understand those concerns and the rest of this post you need to read that post to comprehend where I was coming from.
One of the fortunate things of being apart of the Oracle ACE Director program is behind the scenes, we and Oracle staff are often chatting and helping each other out, which I'm incredibly appreciative of. In this case I must raise my hat to Steven Davelaar and John Stegeman for their out of hours assistance in one form or another.
Regarding my last post, John made a reasonable point that I was making/drawing my conclusions far too early, that in fact I needed to test the complete task flow transaction life cycle to see if the behaviour of the task flows has changed in 11.1.2.0.0. In particular John's good memory led him back to this OTN forum post by Steve Muench that stated:
In fact, in a future release we will likely be changing that implementation detail so that the AMs are always used from their own AM pool, however they will share a transaction/connection.Steve's point from late 2010, and the one that John was re-affirming is that even though the underlying implementation may change, the end effect from the Bounded Task Flow (BTF) programmer's point of view, everything can still work the same. And this is what I needed to check, looking at what AM methods are called is not enough. I needed to check the actual database connections and transaction behaviour.
From my post I was concerned without auto AM nesting, a page comprised of several BTFs with separate AMs would spawn as many database connections compromising the scalability of the application. From the logs I thought this was the case as I could see two root AMs created and a separate (ie. two) call to prepareSession() for each. My assumption being this meant two connections were being raised with the database under 11.1.2.0.0, where alternatively using 11.1.1.X.0 is was only one database connection using the auto AM nesting feature.
However a query on the v$session table in the database using the 11.1.2.0.0 solution:
SELECT * FROM v$session WHERE username = 'HR';
...showed only 1 connection. So regardless that there is 2 roots AMs instantiated under 11.1.2.0.0, they share connections (and therefore transactions too). In other words, while the end result is the same, the underlying implementation has changed.
I don't have a snazzy name for this new implementation vs the older auto AM nesting, so I figure we should call it Bruce to keep it simple (with apologies to Monty Python).
The only discrepancies between implementations we can see is that the prepareSession() and similar AM methods that deal with the connection or transaction (eg. afterConnect(), afterCommit()) are now called on the secondary AM as it's treated as a root AM rather than a nested AM. This was not the behaviour under 11.1.1.X.0 as nested AMs delegate that responsibility back to the root AM. This in turn may cause you a minor hiccup if you've overridden these method in a framework extension of the AppModuleImpl as they'll now be called across all your AMs, including those who used to be auto nested.
In returning to Steve Muench's point:
In fact, in a future release we will likely be changing that implementation detail so that the AMs are always used from their own AM pool, however they will share a transaction/connection.Via http://localhost:7101/dms/Spy I've verified this is the case with Bruce, where under 11.1.1.X.0 is used to be a single AM pool, but now under 11.1.2.0.0 there is 2 AM pools & 1 defined connection. The end effect and my primary concern from the previous blog post is now mute, the scalability of database connections is maintained. Bruce is a winner.
The interesting change under 11.1.2.0.0 is the 1 AM pool vs many AM pools. Ignoring if at design time create nested AMs under the 1 root AM, traditionally with the runtime auto nesting AM feature you'd still have 1 root AM pool. Now for each root AM you'll end up with an associated AM pool. If you're app is made up of hundreds of AMs that were nested and used the AM pool of their parent, you'll now end up with hundreds of AM pools. Whether this is a problem is hard to tell without load testing an application with this setup, but Steve Muench does comment in a follow up to the OTN forum post "The AM pool in an of itself is not additional overhead, no."
So potentially the midtier is less scalable as it needs to maintain more pools and process them, to what degree we don't know. Yet, more importantly, we now have a relatively more flexible solution in terms of tuning the AM pools, because previously
it was an all or nothing affair with 1 AM pool under the auto AM nesting 11.1.1.X.0 approach (again ignoring design time nesting AMs under the root AM), and now with Bruce we've lots of find grained AM pools to tune. As such each pool can be tuned where an AM pool for a little used BTF can be set to consume less resources over a BTF with an AM pool that is hit frequently.
So, besides a couple of minor implementation changes (and if you find more please post a comment), it looks like Bruce is a winner.
Again thanks must go to John Stegeman for his assistance in working through his issues, and Steven Davelaar for his offer of support.
Task Flows: Sayonara automated nesting of Application Modules JDev 11.1.2.0.0?
-- Post edit --
Any readers of this post should also read the following follow-up post.
-- End post edit --
In a previous blog post I discussed the concept of automated nesting of Application Modules (AMs) when using Bounded Task Flows (BTFs) with a combination of the transactional options Always Begin New Transaction, Always Use Existing Transaction and Use Existing Transaction if possible. The automated nesting of AMs is a very important feature as when you have a page made up of disparate regions containing task flows, and those regions have their own AMs, without the auto-nesting feature you end up with the page creating as many connections as there are independent region-AMs. Thus your application is less scalable, and architectural your application must be built in a different manner to avoid this issue in the first place.
This automated nesting of AMs is exhibited in the 11.1.1.X.0 series of JDeveloper and the ADF framework including JDev 11.1.1.4.0 & 11.1.1.5.0. Unfortunately, either by error or design this feature is gone in 11.1.2.0.0. Having checked the JDev 11.1.2.0.0 release notes and what's new notes, I can't see any mention of this change.
In turn I don't believe (please correct me if I'm wrong) there to be a section in the Fusion Guide that specifically talks about the interactions of the task flow transaction options and Application Module creation. The documentation talks about one or the other, not both in combination. This is somewhat of a frustrating documentation omission to me because it means Oracle can change the behaviour without being held accountable to any documentation stating how it was meant to work in the first place. All I have is a number of separate posts and discussions with Oracle Product Managers describing the behaviour which cannot be considered official.
In the rest of this post I'll demonstrate the changing behaviour between versions. It would be appreciated if any readers find errors in both the code, or even factual errors that you follow up with a comment on this blog please. I'm always wary of misleading others, I write my blog to inform and educate, not lead people down the garden path.
4 test applications
For this post you can download a single zip containing 4 different test applications to demonstrate the changing behaviour:
a) ByeByeAutoAMNestingJSPX111140
b) ByeByeAutoAMNestingJSPX111150
c) ByeByeAutoAMNestingJSPX111200
d) ByeByeAutoAMNestingFacelets111200
Why so many versions? My current client site is using 11.1.1.4.0, not 11.1.1.5.0, so I wanted to check there was consistent behaviour in the pre-11.1.2.0.0 releases. For this blog post I'll talk about the 11.1.1.5.0 version, but the exactly same behaviour is demonstrated under 11.1.1.4.0.
In addition I know that in the 11.1.2.0.0 release because of the support for JSPX & Facelets, that the controllers have different implementations, so it is necessary to see if the issue is different between the two VDL implementations.
Besides the support for 4 different versions of JDev, and in the 11.1.2.0.0 the different VDLs, each application is constructed in exactly the same fashion, using a near identical Model and ViewController setup. The following sections describe what has been setup in both these projects across all the example applications.
The Model project
Each application has exactly the same ADF BC setup connecting to Oracle's standard HR schema. The Model project in each application includes EOs and VOs that map to the employees and locaitons tables in the HR schema. The tables and the data they store are not consequential to this post, we simply need some Entity Objects (EOs) and View Objects (VOs) to expose through our Application Modules (AMs) to describe the AM nesting behaviour.
 In the diagram above you can see the EOs and VOs. In addition I've defined 2 root level AMs EmployeesAppModule and LocationsAppModule. The EmployeesAppModule exposes the EmployeesView VO and the LocationsAppModule exposes the LocationsView.
To be clear, note I've defined these as separate root level AMs. So at the ADF BC level there is no nesting of the AMs defined. What we'll attempt to do is show the automatic nesting of AMs at the task flow level, or not, as the case might be.
In order to comprehend if the automated AM nesting is working at runtime, it's useful to add some logging to the ADF Business Components to show us such things as:
1) When our Application Modules are being created
2) If the AMs are created as root AMs or nested AMs
As such in each of the AMs we'll include the following logging code. The following example shows the EmployeesAppModuleImpl changes. Exactly the same would be written into the LocationsAppModuleImpl, with the exception of changing the log messages:
Each application has a near identical ViewController project with the same combination of task flows, pages & fragments. The only exception being the 11.1.2.0.0 applications, where the Facelets application doesn't use JSPX pages or fragments, but rather Facelets equivalents. This section describes the commonalities across all applications.
Each application essentially is made up of 3 parts:
a) A Start page
b) A Bounded Task Flow (BTF) named ParentTaskFlow comprised of a single page ParentPage
c) A BTF named ChildTaskFlow comprised of a single fragment ChildFragment
Start Page
1) The start page is designed to call the ParentTaskFlow through a task flow call.
ParentTaskFlow
1) The ParentTaskFlow is set to Always Begin New Transaction and Isolated data control scope.
2) The ParentTaskFlow page contains an af:table showing data from the EmployeesView of the EmployeesAppModuleDataControl.
3) The ParentTaskFlow page also contains a region that embeds the ChildTaskFlow
ChildTaskFlow
1) The ChildTaskFlow is set to Use Existing Transaction if Possible and Shared data control scope
2) The ChildFragment fragment contains an af:table showing data from the LocationsView of the LocationsAppModuleDataControl
The behaviour under 11.1.1.5.0
When we run our 11.1.1.5.0 application, and navigate from the Start Page to the ParentTaskFlow BTF showing the ParentPage, in the browser we see a page showing data from both the Employees VO and Locations VO. Of more interest this is what we see in the logs:
As the ParentTaskFlow is designed to start a new transaction, when the first binding in the page exercises the EmployeesAppModule via the associated Fata Control and View Object embedded in the table, ADF instantiates the AM as the root AM and attaches it to the Data Control Frame.
The Data Control Frame exists for chained BTFs who are joining transactions. So in this example the Employees AM is the first AM to join the Data Control Frame and it becomes the root AM. A little oddly we see the EmployeesAppModuleImpl then created again and nested under a root instance of itself. I'm not really sure why this occurs, but it might just be some sort of algorithmic consistency required for the Data Control Frame. Maybe readers might have something to share on this point?
It's worth noting the significance of a root AM unlike a nested AM, is only the root AM connects to the database and manages the transactions through commits and rollbacks. Nested AMs delegate these responsibilities back to the root AM. This is why we can see the prepareSession() call for the EmployeesAppModule.
When the page processing gets to the bindings associated with the ChildTaskFlow, within the fragment of the ChildTaskFlow it discovers the LocationsAppModule via the associated Data Control and View Object embedded in the table. Now we must remember that the ChildTaskFlow has the Use Existing Transaction if Possible and Shared data control scope options set. From the Fusion Guide this transaction option says:
"Use Existing Transaction if possible - When called, the bounded task flow either participates in an existing transaction if one exists, or starts a new transaction upon entry of the bounded task flow if one doesn't exist."
In order for the BTF to be part of the same transaction, it must use the same database connection too. As such regardless in the ADF Business Components where we defined the two separate Application Modules as root AMs (which by definition implies they have separate transactions & database connections), it's expected the task flow transaction options overrides this and forces the second AM to "nest" AM under the first AM as it wants to "participate in the existing transaction if it exists."
So to be clear, this is the exact behaviour we see in the logs of our 11.1.1.X.0 JDeveloper series of applications. The end result is our application takes 1 connection out with the database rather than 2.
The behaviour under 11.1.2.0.0
Under JDeveloper 11.1.1.2.0.0 regardless if we run the JSPX or Facelets application, with exactly the same combination of task flow elements and transaction options, this is what we see in the log:
The effect of this is our application now uses 2 connections rather than 1, and in turn the BTF transaction options don't appear to be working as prescribed.
Is it just a case of philosophy?
Maybe this is just a case of philosophy? Prior to JDev 11.1.2.0.0 the ADFc controller (who implements the task flows) was the winner in how the underlying ADF BC Application Modules were created and nested. Maybe in 11.1.2.0.0 Oracle has decided that no, in fact the ADFm model layer should control its own destiny?
Who knows – I don't see any documentation in the release notes or what's new notes to tell me this has changed. The task flow transaction option documentation is all I have. As such if you've relied on this feature, your architecture is built on this feature as we have, we're now in a position we can't upgrade our application to 11.1.2.0.0 without major rework.
To get clarification from Oracle I'll lodge an SR and will keep the blog up to date on any information discovered.
-- Post edit --
Any readers of this post should also read the following follow-up post.
-- End post edit --
Any readers of this post should also read the following follow-up post.
-- End post edit --
In a previous blog post I discussed the concept of automated nesting of Application Modules (AMs) when using Bounded Task Flows (BTFs) with a combination of the transactional options Always Begin New Transaction, Always Use Existing Transaction and Use Existing Transaction if possible. The automated nesting of AMs is a very important feature as when you have a page made up of disparate regions containing task flows, and those regions have their own AMs, without the auto-nesting feature you end up with the page creating as many connections as there are independent region-AMs. Thus your application is less scalable, and architectural your application must be built in a different manner to avoid this issue in the first place.
This automated nesting of AMs is exhibited in the 11.1.1.X.0 series of JDeveloper and the ADF framework including JDev 11.1.1.4.0 & 11.1.1.5.0. Unfortunately, either by error or design this feature is gone in 11.1.2.0.0. Having checked the JDev 11.1.2.0.0 release notes and what's new notes, I can't see any mention of this change.
In turn I don't believe (please correct me if I'm wrong) there to be a section in the Fusion Guide that specifically talks about the interactions of the task flow transaction options and Application Module creation. The documentation talks about one or the other, not both in combination. This is somewhat of a frustrating documentation omission to me because it means Oracle can change the behaviour without being held accountable to any documentation stating how it was meant to work in the first place. All I have is a number of separate posts and discussions with Oracle Product Managers describing the behaviour which cannot be considered official.
In the rest of this post I'll demonstrate the changing behaviour between versions. It would be appreciated if any readers find errors in both the code, or even factual errors that you follow up with a comment on this blog please. I'm always wary of misleading others, I write my blog to inform and educate, not lead people down the garden path.
4 test applications
For this post you can download a single zip containing 4 different test applications to demonstrate the changing behaviour:
a) ByeByeAutoAMNestingJSPX111140
b) ByeByeAutoAMNestingJSPX111150
c) ByeByeAutoAMNestingJSPX111200
d) ByeByeAutoAMNestingFacelets111200
Why so many versions? My current client site is using 11.1.1.4.0, not 11.1.1.5.0, so I wanted to check there was consistent behaviour in the pre-11.1.2.0.0 releases. For this blog post I'll talk about the 11.1.1.5.0 version, but the exactly same behaviour is demonstrated under 11.1.1.4.0.
In addition I know that in the 11.1.2.0.0 release because of the support for JSPX & Facelets, that the controllers have different implementations, so it is necessary to see if the issue is different between the two VDL implementations.
Besides the support for 4 different versions of JDev, and in the 11.1.2.0.0 the different VDLs, each application is constructed in exactly the same fashion, using a near identical Model and ViewController setup. The following sections describe what has been setup in both these projects across all the example applications.
The Model project
Each application has exactly the same ADF BC setup connecting to Oracle's standard HR schema. The Model project in each application includes EOs and VOs that map to the employees and locaitons tables in the HR schema. The tables and the data they store are not consequential to this post, we simply need some Entity Objects (EOs) and View Objects (VOs) to expose through our Application Modules (AMs) to describe the AM nesting behaviour.
 In the diagram above you can see the EOs and VOs. In addition I've defined 2 root level AMs EmployeesAppModule and LocationsAppModule. The EmployeesAppModule exposes the EmployeesView VO and the LocationsAppModule exposes the LocationsView.
To be clear, note I've defined these as separate root level AMs. So at the ADF BC level there is no nesting of the AMs defined. What we'll attempt to do is show the automatic nesting of AMs at the task flow level, or not, as the case might be.
In order to comprehend if the automated AM nesting is working at runtime, it's useful to add some logging to the ADF Business Components to show us such things as:
1) When our Application Modules are being created
2) If the AMs are created as root AMs or nested AMs
As such in each of the AMs we'll include the following logging code. The following example shows the EmployeesAppModuleImpl changes. Exactly the same would be written into the LocationsAppModuleImpl, with the exception of changing the log messages:
public class EmployeesAppModuleImpl extends ApplicationModuleImpl {
  // Other generated methods

  public static ADFLogger logger = ADFLogger.createADFLogger(EmployeesAppModuleImpl.class);

  @Override
  protected void create() {
    super.create();
    if (isRoot())
      logger.info("EmployeesAppModuleImpl created as ROOT AM");
    else
      logger.info("EmployeesAppModuleImpl created as NESTED AM under " + this.getRootApplicationModule().getName());
  }

  @Override
  protected void prepareSession(Session session) {
    super.prepareSession(session);
    if (isRoot())
      logger.info("EmployeesAppModuleImpl prepareSession() called as ROOT AM");
    else
      logger.info("EmployeesAppModuleImpl prepareSession() called as NESTED AM under " + this.getRootApplicationModule().getName());
  }
}
View Controller projectEach application has a near identical ViewController project with the same combination of task flows, pages & fragments. The only exception being the 11.1.2.0.0 applications, where the Facelets application doesn't use JSPX pages or fragments, but rather Facelets equivalents. This section describes the commonalities across all applications.
Each application essentially is made up of 3 parts:
a) A Start page
b) A Bounded Task Flow (BTF) named ParentTaskFlow comprised of a single page ParentPage
c) A BTF named ChildTaskFlow comprised of a single fragment ChildFragment
Start Page
1) The start page is designed to call the ParentTaskFlow through a task flow call.
ParentTaskFlow
1) The ParentTaskFlow is set to Always Begin New Transaction and Isolated data control scope.
2) The ParentTaskFlow page contains an af:table showing data from the EmployeesView of the EmployeesAppModuleDataControl.
3) The ParentTaskFlow page also contains a region that embeds the ChildTaskFlow
ChildTaskFlow
1) The ChildTaskFlow is set to Use Existing Transaction if Possible and Shared data control scope
2) The ChildFragment fragment contains an af:table showing data from the LocationsView of the LocationsAppModuleDataControl
The behaviour under 11.1.1.5.0
When we run our 11.1.1.5.0 application, and navigate from the Start Page to the ParentTaskFlow BTF showing the ParentPage, in the browser we see a page showing data from both the Employees VO and Locations VO. Of more interest this is what we see in the logs:
<EmployeesAppModuleImpl> <create> EmployeesAppModuleImpl created as ROOT AMBased on my previous blog post on investigating and explaining the automated Application Module nesting feature in the 11.1.1.X.0 JDeveloper series, this is what I believe is occurring.
<EmployeesAppModuleImpl> <prepareSession> EmployeesAppModuleImpl prepareSession() called as ROOT AM
<EmployeesAppModuleImpl> <create> EmployeesAppModuleImpl created as NESTED AM under EmployeesAppModule
<LocationsAppModuleImpl> <create> LocationsAppModuleImpl created as NESTED AM under EmployeesAppModule
As the ParentTaskFlow is designed to start a new transaction, when the first binding in the page exercises the EmployeesAppModule via the associated Fata Control and View Object embedded in the table, ADF instantiates the AM as the root AM and attaches it to the Data Control Frame.
The Data Control Frame exists for chained BTFs who are joining transactions. So in this example the Employees AM is the first AM to join the Data Control Frame and it becomes the root AM. A little oddly we see the EmployeesAppModuleImpl then created again and nested under a root instance of itself. I'm not really sure why this occurs, but it might just be some sort of algorithmic consistency required for the Data Control Frame. Maybe readers might have something to share on this point?
It's worth noting the significance of a root AM unlike a nested AM, is only the root AM connects to the database and manages the transactions through commits and rollbacks. Nested AMs delegate these responsibilities back to the root AM. This is why we can see the prepareSession() call for the EmployeesAppModule.
When the page processing gets to the bindings associated with the ChildTaskFlow, within the fragment of the ChildTaskFlow it discovers the LocationsAppModule via the associated Data Control and View Object embedded in the table. Now we must remember that the ChildTaskFlow has the Use Existing Transaction if Possible and Shared data control scope options set. From the Fusion Guide this transaction option says:
"Use Existing Transaction if possible - When called, the bounded task flow either participates in an existing transaction if one exists, or starts a new transaction upon entry of the bounded task flow if one doesn't exist."
In order for the BTF to be part of the same transaction, it must use the same database connection too. As such regardless in the ADF Business Components where we defined the two separate Application Modules as root AMs (which by definition implies they have separate transactions & database connections), it's expected the task flow transaction options overrides this and forces the second AM to "nest" AM under the first AM as it wants to "participate in the existing transaction if it exists."
So to be clear, this is the exact behaviour we see in the logs of our 11.1.1.X.0 JDeveloper series of applications. The end result is our application takes 1 connection out with the database rather than 2.
The behaviour under 11.1.2.0.0
Under JDeveloper 11.1.1.2.0.0 regardless if we run the JSPX or Facelets application, with exactly the same combination of task flow elements and transaction options, this is what we see in the log:
<EmployeesAppModuleImpl> <create> EmployeesAppModuleImpl created as ROOT AMAs such regardless that the Oracle task flow documentation for the latest release says that the second task flow with the Use Existing Transaction if Possible option should join the transaction of the calling BTF, it doesn't. As can see from the logs both AMs are now treated as root and are preparing their own session/connection with the database.
<EmployeesAppModuleImpl> <prepareSession> EmployeesAppModuleImpl prepareSession() called as ROOT AM
<LocationsAppModuleImpl> <create> LocationsAppModuleImpl created as ROOT AM
<LocationsAppModuleImpl> <prepareSession> LocationsAppModuleImpl prepareSession() called as ROOT AM
The effect of this is our application now uses 2 connections rather than 1, and in turn the BTF transaction options don't appear to be working as prescribed.
Is it just a case of philosophy?
Maybe this is just a case of philosophy? Prior to JDev 11.1.2.0.0 the ADFc controller (who implements the task flows) was the winner in how the underlying ADF BC Application Modules were created and nested. Maybe in 11.1.2.0.0 Oracle has decided that no, in fact the ADFm model layer should control its own destiny?
Who knows – I don't see any documentation in the release notes or what's new notes to tell me this has changed. The task flow transaction option documentation is all I have. As such if you've relied on this feature, your architecture is built on this feature as we have, we're now in a position we can't upgrade our application to 11.1.2.0.0 without major rework.
To get clarification from Oracle I'll lodge an SR and will keep the blog up to date on any information discovered.
-- Post edit --
Any readers of this post should also read the following follow-up post.
-- End post edit --
"The Year of the ADF developer" at Oracle Open World 2011
 What's one of the worst things about attending Oracle Open World? From my point of view it's the huge amount of marketing. Booooorrrring. I'm a developer, I want to hear technical stuff, not sales talk!!
For ADF developers attending OOW in 2011 this is all set to change. Not only has Oracle lined up a number of ADF presentations during the mainstream conference, but the ADF Enterprise Methodology Group (ADF EMG) has a whole day of sessions on the user group Sunday October 2nd!
Think about it. That's a mini ADF conference just for ADF programmers! Even better it will be hosted by ADF experts from around the world to share their day-to-day ADF experiences with you, not just in a brief 1hr session, but 6 sessions in total. That's a lot of ADF content and an addition for no extra cost to your OOW tickets.
So I officially declare OOW'11 "The Year of the ADF developer".
Who have we got lined up for you? I'm glad you asked. We have such A1 ADF presenters as:
* Sten Vesterli - Oracle ACE Director, author of the latest ADF book "Oracle ADF Enterprise Application Development - Made Simple" and best speaker at the 2010 ODTUG Kscope conference.
* Frank Nimphius - Oracle Corp's own superstar ADF product manager who produces near-1000 blog posts a day, the ADF code harvests, articles in Oracle Magazine and is a top contributor to the OTN forums in assisting others write successful ADF applications.
* Maiko Rocha - part of Oracle Corp's own WebCenter A-Team who solves some of the most complex and challenging issues Oracle customers throw at ADF and WebCenter.
* Andrejus Baranovskis - ADF blogging wiz whose detailed posts on ADF architecture & best practices has shown many an ADF novice how to put together a working, optimised application using a huge range of ADF features.
* Wilfred van der Deijl - the author of potentially the most important ADF plug-in OraFormsFaces, which gives you the ability to integrate Oracle Forms & ADF into the same running web pages.
* Steven Davelaar - one of the key brains behind Oracle's JHeadstart, and a well known ADF presenter who shows how to push ADF to the extreme for productive development.
* Lucas Jellema - the Fusion Middleware blogging powerhouse from AMIS in the Netherlands, showing how to solve just a
bout any problem in the ADF and FMW space.
Excited? You should be.
But more importantly what are they presenting?
- 09:00 - Sten - Session 32460 - Oracle ADF Enterprise Methodology Group: Starting an Enterprise Oracle ADF Project
- 10:15 - Frank & Maiko - Session 32480 - Oracle ADF Enterprise Methodology Group: Learn Oracle ADF Task Flows in Only 60 Minutes
- 11:30 - Andrejus - Session 32481 - Oracle ADF Enterprise Methodology Group: A+-Quality Oracle ADF Code
- 12:45 - Wilfred - Session 32500 - Oracle ADF Enterprise Methodology Group: Transitioning from Oracle Forms to Oracle ADF
- 14:00 - Steven - Session 32501 - Oracle ADF Enterprise Methodoloy Group: Empower Multitasking with an Oracle ADF UI Powerhouse
- 15:15 - Lucas - Session 32502 - Oracle ADF Enterprise Methodology Group: Gold Nuggets in Oracle ADF Faces
All sessions will be held on Sunday October 2nd, so you need to make sure you turn up a day earlier if you only traditionally attend the main part of the conference.
All sessions are in Moscone West room 2000, though remember to check on the day in case the sessions have been moved.
I hope you’re excited as we are in the ADF EMG sessions at Oracle Open World 2011. We really hope you can attend and spread the word about what we’ve got going this year. Remember the ADF EMG is only as good as it’s members’ participation – it’s your group.
(Thanks must go to Bambi Price and the APOUC for giving us the room to hold these presentations at OOW'11).
JDev 11.1.2.0.0 – af:showDetailItems and af:regions – the power of Facelets – part 3
The previous blog posts in this series (part 1 and part 2) looked at the behaviour of the af:region tag embedded in a af:showDetailItem tag with JDeveloper 11.1.1.4.0. This post investigates the changing nature of the "deferred" activation property for the underlying af:region task flow binding in JDev 11.1.2.0.0.
JDeveloper 11.1.2.0.0 introduces JSF 2.0 and Facelets as the predominate display technologies for ADF Faces RC pages. As Oracle's JSF 2.0 roadmap for ADF states: "The introduction of Facelets addresses the shortcomings of JSP and improves the developer page design and reuse experience."
One of these improvements is how the "deferred" activation property for task flow bindings under af:regions works, and we no longer require the programmatic solution.
The behaviour using JSPX
Before we can show how Facelets improves the use of embedded task flows in an closed af:showDetailItem tag, it's worthwhile showing that using JSPXs under 11.1.2.0.0 still has the previous behaviour where a programmatic solution is required.
If we take the same code from the previous posts written in JDev 11.1.1.4.0, specifically using a JSPX page, this time entitled BasicShowDetailItem.jspx:
 Also as per the previous posts, we're using the LogBegin Method Call in the task flow above, as well as task flow initializers and finalizers to helps us understand if the CharlieTaskFlow has been executed at all:
 The code that does the logging again is similar as the previous posts:
 On running this code under a JSPX page in 11.1.2.0.0, even though the af:showDetailItem that contains the af:region and task flow are closed, we see the following log output that shows that the task flow is still being executed:
From here we'll show an example using Facelets. From here the example is virtually identical, except the page containing the af:region, as well as the fragment from the CharlieTaskFlow have to be created as Facelets page and fragment respectively.
As example the Facelet page code entitled FaceletsShowDetailItem.jsf looks as follows:
 On running the Facelet page, even though the af:showDetailItem containing the af:region isn't open, unlike our previous behaviour using JSPX where we could see the task flow unnecessary initialized, from our logs with Facelets we can see that's not happening:
Sample Application
A sample application for 11.1.2.0.0 application is available here.
Thanks
This post was inspired by Oracle's Steve Davelaar who highlighted the new region processing in JDev 11.1.2. The introduction of the new 11.1.2 feature led me to explore the default behaviour under 11.1.1.4.0 without the new feature.
JDeveloper 11.1.2.0.0 introduces JSF 2.0 and Facelets as the predominate display technologies for ADF Faces RC pages. As Oracle's JSF 2.0 roadmap for ADF states: "The introduction of Facelets addresses the shortcomings of JSP and improves the developer page design and reuse experience."
One of these improvements is how the "deferred" activation property for task flow bindings under af:regions works, and we no longer require the programmatic solution.
The behaviour using JSPX
Before we can show how Facelets improves the use of embedded task flows in an closed af:showDetailItem tag, it's worthwhile showing that using JSPXs under 11.1.2.0.0 still has the previous behaviour where a programmatic solution is required.
If we take the same code from the previous posts written in JDev 11.1.1.4.0, specifically using a JSPX page, this time entitled BasicShowDetailItem.jspx:
<?xml version='1.0' encoding='UTF-8'?>Note the embedded af:region containing a call to a task flow CharlieTaskFlow:
<jsp:root xmlns:jsp="http://java.sun.com/JSP/Page" version="2.1" xmlns:f="http://java.sun.com/jsf/core"
xmlns:af="http://xmlns.oracle.com/adf/faces/rich">
<jsp:directive.page contentType="text/html;charset=UTF-8"/>
<f:view>
<af:document title="ShowDetailJSPX" id="d1">
<af:form id="f1">
<af:panelAccordion id="pa1">
<af:showDetailItem text="DummyShowDetailItem" disclosed="true" id="sdi1">
<af:outputText value="DummyValue" id="ot1"/>
</af:showDetailItem>
<af:showDetailItem text="Charlie" disclosed="false" id="sdi2">
<af:region value="#{bindings.CharlieTaskFlow1.regionModel}" id="r1"/>
<af:commandButton text="Submit2" id="cb2"/>
</af:showDetailItem>
</af:panelAccordion>
</af:form>
</af:document>
</f:view>
</jsp:root>
 Also as per the previous posts, we're using the LogBegin Method Call in the task flow above, as well as task flow initializers and finalizers to helps us understand if the CharlieTaskFlow has been executed at all:
 The code that does the logging again is similar as the previous posts:
public class CharlieBean {

    public static ADFLogger logger = ADFLogger.createADFLogger(CharlieBean.class);

    private String charlieValue = "charlie1";

    public void setCharlieValue(String charlieValue) {
        logger.info("setCharlieValue called(" + (charlieValue == null ? "<null>" : charlieValue) + ")");
        this.charlieValue = charlieValue;
    }

    public String getCharlieValue() {
        logger.info("getCharlieValue called(" + (charlieValue == null ? "<null>" : charlieValue) + ")");
        return charlieValue;
    }

    public void taskFlowInit() {
        logger.info("Task flow initialized");
    }

    public void taskFlowFinalizer() {
        logger.info("Task flow finalized");
    }

    public void logBegin() {
        logger.info("Task flow beginning");
    }
}
...and for the record we've inserted a custom JSF PhaseListener to assist interpreting the logger output:public class PhaseListener implements javax.faces.event.PhaseListener {
public static ADFLogger logger = ADFLogger.createADFLogger(PhaseListener.class);
public void beforePhase(PhaseEvent phaseEvent) {
logger.info(phaseEvent.getPhaseId().toString());
}
public void afterPhase(PhaseEvent phaseEvent) {
logger.info(phaseEvent.getPhaseId().toString());
}
public PhaseId getPhaseId() {
return PhaseId.ANY_PHASE;
}
}And finally in this example, note the task flow binding options "activation" and "active". We'll set this back to the defaults "deferred" and null to show the behaviour of task flows under 11.1.2.0.0 using JSPXs: On running this code under a JSPX page in 11.1.2.0.0, even though the af:showDetailItem that contains the af:region and task flow are closed, we see the following log output that shows that the task flow is still being executed:
<PhaseListener> <beforePhase> RESTORE_VIEW 1The behaviour using Facelets
<PhaseListener> <afterPhase> RESTORE_VIEW 1
<PhaseListener> <beforePhase> RESTORE_VIEW 1
<PhaseListener> <afterPhase> RESTORE_VIEW 1
<PhaseListener> <beforePhase> RENDER_RESPONSE 6
<CharlieBean> <taskFlowInit> Task flow initialized
<CharlieBean> <logBegin> Task flow beginning
<PhaseListener> <afterPhase> RENDER_RESPONSE 6
From here we'll show an example using Facelets. From here the example is virtually identical, except the page containing the af:region, as well as the fragment from the CharlieTaskFlow have to be created as Facelets page and fragment respectively.
As example the Facelet page code entitled FaceletsShowDetailItem.jsf looks as follows:
<?xml version='1.0' encoding='UTF-8'?>Then compared to our previous JSPX example, every other option is exactly the same. The most significant option is the task flow binding activation and active properties, which we can see are still set to "deferred" and null:
<!DOCTYPE html PUBLIC "-//W3C//DTD XHTML 1.0 Transitional//EN" "http://www.w3.org/TR/xhtml1/DTD/xhtml1-transitional.dtd">
<f:view xmlns:f="http://java.sun.com/jsf/core" xmlns:af="http://xmlns.oracle.com/adf/faces/rich">
<af:document title="ShowDetailItemFacelet.jsf" id="d1">
<af:form id="f1">
<af:panelAccordion id="pa1">
<af:showDetailItem text="DummyShowDetailItem" disclosed="true" id="sdi1">
<af:outputText value="DummyValue" id="ot1"/>
</af:showDetailItem>
<af:showDetailItem text="Charlie" disclosed="false" id="sdi2">
<af:region value="#{bindings.CharlieTaskFlow1.regionModel}" id="r1"/>
<af:commandButton text="Submit2" id="cb2"/>
</af:showDetailItem>
</af:panelAccordion>
</af:form>
</af:document>
</f:view>
 On running the Facelet page, even though the af:showDetailItem containing the af:region isn't open, unlike our previous behaviour using JSPX where we could see the task flow unnecessary initialized, from our logs with Facelets we can see that's not happening:
<PhaseListener> <beforePhase> RESTORE_VIEW 1Once we open the af:showDetailItem, the task flow is then correctly initialized:
<PhaseListener> <afterPhase> RESTORE_VIEW 1
<PhaseListener> <beforePhase> RESTORE_VIEW 1
<PhaseListener> <afterPhase> RESTORE_VIEW 1
<PhaseListener> <beforePhase> RENDER_RESPONSE 6
<PhaseListener> <afterPhase> RENDER_RESPONSE 6
<PhaseListener> <beforePhase> RESTORE_VIEW 1This small change saves us from having to programmatically control the refresh of the task flows, and in addition shows that Oracle is enhancing the support for ADF through Facelets rather than the traditional JSPX view display technology. This should encourage greenfield developers to pursue Facelets in context of JDev 11.1.2.0.0.
<PhaseListener> <afterPhase> RESTORE_VIEW 1
<PhaseListener> <beforePhase> APPLY_REQUEST_VALUES 2
<PhaseListener> <afterPhase> APPLY_REQUEST_VALUES 2
<PhaseListener> <beforePhase> PROCESS_VALIDATIONS 3
<PhaseListener> <afterPhase> PROCESS_VALIDATIONS 3
<PhaseListener> <beforePhase> UPDATE_MODEL_VALUES 4
<PhaseListener> <afterPhase> UPDATE_MODEL_VALUES 4
<PhaseListener> <beforePhase> INVOKE_APPLICATION 5
<PhaseListener> <afterPhase> INVOKE_APPLICATION 5
<PhaseListener> <beforePhase> RENDER_RESPONSE 6
<CharlieBean> <taskFlowInit> Task flow initialized
<CharlieBean> <logBegin> Task flow beginning
<CharlieBean> <getCharlieValue> getCharlieValue called(charlie1)
<CharlieBean> <getCharlieValue> getCharlieValue called(charlie1)
<PhaseListener> <afterPhase> RENDER_RESPONSE 6
Sample Application
A sample application for 11.1.2.0.0 application is available here.
Thanks
This post was inspired by Oracle's Steve Davelaar who highlighted the new region processing in JDev 11.1.2. The introduction of the new 11.1.2 feature led me to explore the default behaviour under 11.1.1.4.0 without the new feature.
JDev 11.1.1.4.0 – af:showDetailItems and af:regions – programmatic activation - part 2
The previous blog post in this series looked at the default behaviour of the ADF framework in 11.1.1.4.0 of the af:region tag embedded in a af:showDetailItem tag. In this post we'll look at programmatically controlling the activation of regions to stop unnecessary processing.
This example will be simplified to only look at one af:region in the hidden second af:showDetailItem. The basic page entitled ShowDetailItemWithRegion looks as follows:
The CharlieTaskFlow looks as follows:
 Similar to the last post, the LogBegin Method Call simple calls a bean method to log the actual start-of-processing for the bean. In turn both the initializer and finalizer of the task flows are also logged. A pageFlowScope bean CharlieBean1 shows all the methods:
 And the following in the logs:
This in many circumstances is going to be undesirable behaviour. Imagine a screen made up of several af:showDetailItems, most closed, where the user rarely opens the closed collections. From a performance point of view the hidden task flows are partially executed when their results may never be used by the users and is a waste of resources.
The solution to this is in the task flow binding that backs the af:region of the main page. When dropping the task flow onto the page as an af:region, a task flow binding is also added to the relating pageDef file:
 The task flow binding includes a number of properties revealed by the property inspector, of which the "activation" and "active" properties we're interested in:
 These properties can be used to control the activation and deactivation of the task flow backing the af:region. Under JDev 11.1.1.4.0 the values for the activation property are:
1) <default> (immediate)
2) conditional
3) deferred
4) immediate
While option 1 says it's the default, in fact option 3 "deferred" will be picked by default when the task flow binding is created (go figure?). This in itself is odd because the documentation for 11.1.1.4.0 states that the deferred option defaults back to "immediate" if we're not using Facelets (which we're not, this is an 11.1.2 feature). So 3 out of 4 options in the end are immediate, and the other is conditional. (Agreed, this is somewhat confusing, but it'll become clearer in the next blog post looking at these properties under 11.1.2, that the deferred option takes on a different meaning)
The "immediate" activation behaviour implies that the task flow binding will always be executed when the pageDef for the page is accessed. This explains why the hidden task flow in the af:showDetailItem af:region is actively initialized, mainly because the ADF lifecycle that in turn processes the page bindings is bolted on top of the JSF lifecycle, and the task flow binding doesn't know its indirectly related af:region is rendered in an af:showDetailItem that is closed.
The "conditional" activation behaviour in conjunction with the active property allows us to programmatically control the activation based on an EL expression. It's with this option we can solve the issue of our task flows being early executed.
To implement this in our current solution we create a new sessionBean to keep track of if the region is activated or not:
 Note by default the regionActivation is false to match the state of our second af:showDetailItem which is closed by default.
We also need to include some logic to toggle the regionActivation flag when the show af:showDetailItem is opened, as well as programmatically refreshing the af:region. To do this we can create a disclosureListener that refers to a new backing bean, as well as a component binding for the af:region. As such the code in our original page is modified as follows:
In turn our requestScope DisclosureBean bean looks as follows:
Now when we run our page for the first time we see the following log output:
 What happens when we close the af:showDetailItem? The logs show:
The next post in this series will look at the "deferred" activation option for task flows in JDev 11.1.2.
Sample Application
A sample application containing solutions for part 2 of this series is available here.
Thanks
This post was inspired by Oracle's Steve Davelaar who highlighted the new region processing in JDev 11.1.2. The introduction of the new 11.1.2 feature led me to explore the default behaviour under 11.1.1.4.0 without the new feature.
This example will be simplified to only look at one af:region in the hidden second af:showDetailItem. The basic page entitled ShowDetailItemWithRegion looks as follows:
<?xml version='1.0' encoding='UTF-8'?>Note the first af:showDetailItem is disclosed (open) and purely exists to act as the open af:showDetailItem with the second af:showDetailItem we're actually interested in is closed. Note the second af:showDetailItem has our embedded af:region calling CharlieTaskFlow.
<jsp:root xmlns:jsp="http://java.sun.com/JSP/Page" version="2.1" xmlns:f="http://java.sun.com/jsf/core"
xmlns:h="http://java.sun.com/jsf/html" xmlns:af="http://xmlns.oracle.com/adf/faces/rich">
<jsp:directive.page contentType="text/html;charset=UTF-8"/>
<f:view>
<af:document id="d1">
<af:form id="f1">
<af:panelAccordion id="pa1">
<af:showDetailItem text="DummyShowDetailItem" disclosed="true" id="sdi1">
<af:outputText value="DummyValue" id="ot1"/>
</af:showDetailItem>
<af:showDetailItem text="Charlie" disclosed="false" id="sdi2">
<af:region value="#{bindings.CharlieTaskFlow1.regionModel}" id="r1"/>
<af:commandButton text="Submit2" id="cb2"/>
</af:showDetailItem>
</af:panelAccordion>
</af:form>
</af:document>
</f:view>
</jsp:root>
The CharlieTaskFlow looks as follows:
 Similar to the last post, the LogBegin Method Call simple calls a bean method to log the actual start-of-processing for the bean. In turn both the initializer and finalizer of the task flows are also logged. A pageFlowScope bean CharlieBean1 shows all the methods:
package test.view;And finally the CharlieFragment.jsff contains the following code:
import oracle.adf.share.logging.ADFLogger;
public class CharlieBean {
public static ADFLogger logger = ADFLogger.createADFLogger(CharlieBean.class);
private String charlieValue = "charlie1";
public void setCharlieValue(String charlieValue) {
logger.info("setCharlieValue called(" + (charlieValue == null ? "<null>" : charlieValue) + ")");
this.charlieValue = charlieValue;
}
public String getCharlieValue() {
logger.info("getCharlieValue called(" + (charlieValue == null ? "<null>" : charlieValue) + ")");
return charlieValue;
}
public void taskFlowInit() {
logger.info("Task flow initialized");
}
public void taskFlowFinalizer() {
logger.info("Task flow finalized");
}
public void logBegin() {
logger.info("Task flow beginning");
}
}
<?xml version='1.0' encoding='UTF-8'?>In turn we've configured the same PhaseListener class to assist us in reading the debug output:
<jsp:root xmlns:jsp="http://java.sun.com/JSP/Page" version="2.1" xmlns:af="http://xmlns.oracle.com/adf/faces/rich">
<af:inputText label="Charlie value" value="#{pageFlowScope.charlieBean1.charlieValue}" id="it1"/>
</jsp:root>
public class PhaseListener implements javax.faces.event.PhaseListener {

  public static ADFLogger logger = ADFLogger.createADFLogger(PhaseListener.class);

  public void beforePhase(PhaseEvent phaseEvent) {
    logger.info(phaseEvent.getPhaseId().toString());
  }

  public void afterPhase(PhaseEvent phaseEvent) {
    logger.info(phaseEvent.getPhaseId().toString());
  }

  public PhaseId getPhaseId() {
    return PhaseId.ANY_PHASE;
  }
} When we run the parent page we see: And the following in the logs:
<PhaseListener> <beforePhase> RESTORE_VIEW 1Once again as we discovered from the first blog post in this series we can see that even though the CharlieTaskFlow is not showing, it is being initialized and executed to at least the LogBegin activity, though not as far as CharlieFragment.jsff.
<PhaseListener> <afterPhase> RESTORE_VIEW 1
<PhaseListener> <beforePhase> RESTORE_VIEW 1
<PhaseListener> <afterPhase> RESTORE_VIEW 1
<PhaseListener> <beforePhase> RENDER_RESPONSE 6
<CharlieBean> <taskFlowInit> Task flow initialized
<CharlieBean> <logBegin> Task flow beginning
<PhaseListener> <afterPhase> RENDER_RESPONSE 6
This in many circumstances is going to be undesirable behaviour. Imagine a screen made up of several af:showDetailItems, most closed, where the user rarely opens the closed collections. From a performance point of view the hidden task flows are partially executed when their results may never be used by the users and is a waste of resources.
The solution to this is in the task flow binding that backs the af:region of the main page. When dropping the task flow onto the page as an af:region, a task flow binding is also added to the relating pageDef file:
 The task flow binding includes a number of properties revealed by the property inspector, of which the "activation" and "active" properties we're interested in:
 These properties can be used to control the activation and deactivation of the task flow backing the af:region. Under JDev 11.1.1.4.0 the values for the activation property are:
1) <default> (immediate)
2) conditional
3) deferred
4) immediate
While option 1 says it's the default, in fact option 3 "deferred" will be picked by default when the task flow binding is created (go figure?). This in itself is odd because the documentation for 11.1.1.4.0 states that the deferred option defaults back to "immediate" if we're not using Facelets (which we're not, this is an 11.1.2 feature). So 3 out of 4 options in the end are immediate, and the other is conditional. (Agreed, this is somewhat confusing, but it'll become clearer in the next blog post looking at these properties under 11.1.2, that the deferred option takes on a different meaning)
The "immediate" activation behaviour implies that the task flow binding will always be executed when the pageDef for the page is accessed. This explains why the hidden task flow in the af:showDetailItem af:region is actively initialized, mainly because the ADF lifecycle that in turn processes the page bindings is bolted on top of the JSF lifecycle, and the task flow binding doesn't know its indirectly related af:region is rendered in an af:showDetailItem that is closed.
The "conditional" activation behaviour in conjunction with the active property allows us to programmatically control the activation based on an EL expression. It's with this option we can solve the issue of our task flows being early executed.
To implement this in our current solution we create a new sessionBean to keep track of if the region is activated or not:
package test.view;We then modify our task flow binding in our page to use "conditional" activation, and an EL expression to refer to the state of the regionActivation variable within our sessionScope ActiveRegionBean:
public class ActiveRegionBean {
private Boolean regionActivation = false;
public void setRegionActivation(Boolean regionActivation) {
this.regionActivation = regionActivation;
}
public Boolean getRegionActivation() {
return regionActivation;
}
}
 Note by default the regionActivation is false to match the state of our second af:showDetailItem which is closed by default.
We also need to include some logic to toggle the regionActivation flag when the show af:showDetailItem is opened, as well as programmatically refreshing the af:region. To do this we can create a disclosureListener that refers to a new backing bean, as well as a component binding for the af:region. As such the code in our original page is modified as follows:
<af:showDetailItem text="Charlie" disclosed="false" id="sdi2"Note the new disclosureListener property on the af:showDetailItem, and the binding property on the af:region.
disclosureListener="#{disclosureBean.openCharlie}">
<af:region value="#{bindings.CharlieTaskFlow1.regionModel}" id="r1"
binding="#{disclosureBean.charlieRegion}"/>
<af:commandButton text="Submit2" id="cb2"/>
</af:showDetailItem>
In turn our requestScope DisclosureBean bean looks as follows:
public class DisclosureBean {
private RichRegion charlieRegion;
public static Object resolveELExpression(String expression) {
FacesContext fctx = FacesContext.getCurrentInstance();
Application app = fctx.getApplication();
ExpressionFactory elFactory = app.getExpressionFactory();
ELContext elContext = fctx.getELContext();
ValueExpression valueExp = elFactory.createValueExpression(elContext, expression, Object.class);
return valueExp.getValue(elContext);
}
public void openCharlie(DisclosureEvent disclosureEvent) {
ActiveRegionBean activeRegionBean = (test.view.ActiveRegionBean)resolveELExpression("#{activeRegionBean}");
if (disclosureEvent.isExpanded()) {
activeRegionBean.setRegionActivation(true);
AdfFacesContext.getCurrentInstance().addPartialTarget(charlieRegion);
// } else {
// activeRegionBean.setRegionActivation(false);
}
}
public void setCharlieRegion(RichRegion charlieRegion) {
this.charlieRegion = charlieRegion;
}
public RichRegion getCharlieRegion() {
return charlieRegion;
}
} Note in the openCharlie() method we check if the disclosureEvent is for opening or closing the af:showDetailItem. If opening, we set the sessionScope's regionActivation to true which will be picked up by the task flow binding's active property to initialize the CharlieTaskFlow. In turn we add a programmatic refresh to the charlieRegion in order for the updates to the task flow to be seen in the actual page.Now when we run our page for the first time we see the following log output:
<PhaseListener> <beforePhase> RESTORE_VIEW 1Note that from our previous runtime example, we can't see the following entries:
<PhaseListener> <afterPhase> RESTORE_VIEW 1
<PhaseListener> <beforePhase> RESTORE_VIEW 1
<PhaseListener> <afterPhase> RESTORE_VIEW 1
<PhaseListener> <beforePhase> RENDER_RESPONSE 6
<PhaseListener> <afterPhase> RENDER_RESPONSE 6
<CharlieBean> <taskFlowInit> Task flow initializedThis implies the CharlieBean hasn't been activated unnecessarily even when the af:showDetailItem is closed. If we then expand the af:showDetailItem, the logs reveal that the task flow is started accordingly:
<CharlieBean> <logBegin> Task flow beginning
<PhaseListener> <beforePhase> RESTORE_VIEW 1Here we can see the initialization of the CharlieTaskFlow. In turn unlike the default behaviour, we can now also see that getCharlieValue() is being called. The resulting web page:
<PhaseListener> <afterPhase> RESTORE_VIEW 1
<PhaseListener> <beforePhase> APPLY_REQUEST_VALUES 2
<PhaseListener> <afterPhase> APPLY_REQUEST_VALUES 2
<PhaseListener> <beforePhase> PROCESS_VALIDATIONS 3
<PhaseListener> <afterPhase> PROCESS_VALIDATIONS 3
<PhaseListener> <beforePhase> UPDATE_MODEL_VALUES 4
<PhaseListener> <afterPhase> UPDATE_MODEL_VALUES 4
<PhaseListener> <beforePhase> INVOKE_APPLICATION 5
<PhaseListener> <afterPhase> INVOKE_APPLICATION 5
<CharlieBean> <taskFlowInit> Task flow initialized
<CharlieBean> <logBegin> Task flow beginning
<PhaseListener> <beforePhase> RENDER_RESPONSE 6
<CharlieBean> <getCharlieValue> getCharlieValue called(charlie1)
<CharlieBean> <getCharlieValue> getCharlieValue called(charlie1)
<PhaseListener> <afterPhase> RENDER_RESPONSE 6
 What happens when we close the af:showDetailItem? The logs show:
<PhaseListener> <beforePhase> RESTORE_VIEW 1getCharlieValue() is called to fire any ValueChangeListener. But also we can see the CharlieBean1 finalizer called. Because in our request bean we've deactivated our region, the task flow is forced to close. This may or may not be desired functionality, because once open, you might wish the task flow to maintain its state. If you do wish the task flow state to be retained the openCharlie() method in the request scope bean should be modified as follows:
<PhaseListener> <afterPhase> RESTORE_VIEW 1
<PhaseListener> <beforePhase> APPLY_REQUEST_VALUES 2
<PhaseListener> <afterPhase> APPLY_REQUEST_VALUES 2
<PhaseListener> <beforePhase> PROCESS_VALIDATIONS 3
<CharlieBean> <getCharlieValue> getCharlieValue called(charlie1)
<PhaseListener> <afterPhase> PROCESS_VALIDATIONS 3
<PhaseListener> <beforePhase> UPDATE_MODEL_VALUES 4
<PhaseListener> <afterPhase> UPDATE_MODEL_VALUES 4
<PhaseListener> <beforePhase> INVOKE_APPLICATION 5
<PhaseListener> <afterPhase> INVOKE_APPLICATION 5
<CharlieBean> <taskFlowFinalizer> Task flow finalized
<PhaseListener> <beforePhase> RENDER_RESPONSE 6
<PhaseListener> <afterPhase> RENDER_RESPONSE 6
if (disclosureEvent.isExpanded()) {
activeRegionBean.setRegionActivation(true);
AdfFacesContext.getCurrentInstance().addPartialTarget(charlieRegion);
// } else {
// activeRegionBean.setRegionActivation(false);
} At the conclusion of this post we can see that the default behaviour of regions and task flows under the af:showDetailItem tag can at least be programmatically controlled to stop unnecessary execution of the underlying task flows. Interestingly this was a similar problem to Oracle Forms, where separate data blocks contained within tab pages would be eagerly executed unless code was put in place to stop this.The next post in this series will look at the "deferred" activation option for task flows in JDev 11.1.2.
Sample Application
A sample application containing solutions for part 2 of this series is available here.
Thanks
This post was inspired by Oracle's Steve Davelaar who highlighted the new region processing in JDev 11.1.2. The introduction of the new 11.1.2 feature led me to explore the default behaviour under 11.1.1.4.0 without the new feature.
JDev 11.1.1.4.0 – af:showDetailItems and af:regions – immediate activation - part 1
ADF's af:showDetailItem tag is used as a child to parent tags such as the af:panelAccordion and af:panelTabbed. JDeveloper's online documentation states the following about the af:showDetailItem tag:
The showDetailItem component is used inside of a panelAccordion or panelTabbed component to contain a group of children. It is identified visually by the text attribute value and lays out its children. Note the difference between "disclosed" and "rendered": if "rendered" is false, it means that this the accordion header bar or tab link and its corresponding contents are not available at all to the user, whereas if "disclosed" is false, it means that the contents of the item are not currently visible, but may be made visible by the user since the accordion header bar or tab link are still visible.
The lifecycle (including validation) is not run for any components in a showDetailItem which is not disclosed. The lifecycle is only run on the showDetailItem(s) which is disclosed.I've never been a fan of the property "disclosed", why not just call it "open"? At least developers then don't have to deal with double negatives like disclosed="false". Regardless the last paragraph highlights an interesting point that the contents of the af:showDetailItem are not processed by the JSF lifecycle if the showDetailItem is currently closed (disclosed="false"). That's desired behaviour, particularly if you have a page with multiple af:showDetailItem tags that in turn query from the business service layer, potentially kicking off a large range of ADF BC queries. Ideally you don't want the queries to fire if their relating af:showDetailItem tag is currently closed.
This feature can be demonstrated via a simple example. Note the following BasicShowDetailItem.jspx page constructed under JDev 11.1.1.4.0:
To assist understanding what's happening we'll also include our own PhaseListener logs such that we can see the JSF lifecycle in action:
 Note that the first af:showDetailItem is disclosed (open) and the second af:showDetailItem is closed. Also note the first af:showDetailItem is showing the alpha value from our requestScope bean, but the beta value is hiding in the 2nd closed af:showDetailItem.
At this stage the logger class gives us an insight into how the requestScope Basicbean has been used. In the log window we can see:
As expected note that the getter for Beta was not called, as it's not displayed. To take the example one step further, if we hit the submit button available in first af:showDetailItem, the log output still shows no mention of the beta accessors, only calls to getAlphaValue():
What's happens if we open the 2nd af:showDetailItem, which closes the 1st af:showDetailItem:
 In the log window we see:
1) A single get and set of alpha value – why? – because the af:showDetailItem button still issues a submit to the midtier. At the point in time the second af:showDetailItem's button is pressed, alpha is still showing, and its changes need to be communicated back to the midtier. The getAlphaValue() is to test if the values changed to fire the ValueChangeListener, and the setAlphaValue() is a call to write the new value submitted to the midtier.
An observant reader might pick up the fact that in this log the getAlphaValue call returns a value of alpha rather than alpha2. Surely in the step prior to this one we had already set the value to alpha2? (in fact you can see this in the log output) The answer being this bean has been set at requestScope, not sessionScope, so the state of the internal values are not being copied across requests (which is a useful learning exercise with regards to bean scope but beyond the scope (no pun intended) of this blog post).
2) Two separate calls to getBetaValue() – as the second af:showDetailItem opens, similar to the original retrieval of the alpha value, the JSF lifecycle now calls the getter twice.
If we now press the submit button in the second af:showDetailItem we see the following in the logs:
So in conclusion, if the af:showDetailItem is closed, and not in the processing of being closed, then its children will not be activated.
Okay, but what's up with af:showDetailItems and af:regions?
Now that we know the default behaviour of the af:showDetailItem, let's extend the example to show where the behaviour changes.
Within JDev 11g we can make use of af:regions to call ADF bounded task flows. As example we may have the following page entitled ShowDetailItemWithRegion.jspx:
The task flows themselves are very simple. As example AlphaTaskFlow contains one fragment AlphaFragment which is the default activity:
 The AlphaFragment.jsff includes the following code:
 In terms of the 2nd task flow BetaTaskFlow, it's exactly the same as AlphaTaskFlow except it calls the beta equivalent. As such the BetaFragment.jsff:
 With the moving parts done, let's see what happens at runtime.
When we run the base page we see:
 From the log output we see:
An assumption you could make here is the framework is priming the BetaTaskFlow and calling the task flow initializer, but not actually running the task flow. We can disapprove this fact by extending the BetaTaskFlow to include a new Method Call as the task flow activity:
 ...where the Method Call simply calls a new method in the BetaBean1:
The conclusion we can draw here is even though you think you're hiding the BetaTaskFlow, and the af:showDetailItem documentation says it wont process the lifecyle of it's children, for af:regions using task flows, this is not the case, it is in fact processing them (up to a point). The implication of this is (at least some) unnecessary processing will occur even if the user never looks at the contents of the closed af:showDetailItem.
In the next post in this series, still using JSPX pages and JDev 11.1.1.4.0, we'll look at how we can programmatically control the activation of the hidden region to stop unnecessary processing.
The final post in the series will look at what options are available to us under JDev 11.1.2 using Facelets.
Sample Application
A sample application containing solutions for part 1 of this series is available here.
Thanks
This post was inspired by Oracle's Steve Davelaar who highlighted the new region processing in JDev 11.1.2. The introduction of the new 11.1.2 feature led me to explore the default behaviour under 11.1.1.4.0 without the new feature.
The showDetailItem component is used inside of a panelAccordion or panelTabbed component to contain a group of children. It is identified visually by the text attribute value and lays out its children. Note the difference between "disclosed" and "rendered": if "rendered" is false, it means that this the accordion header bar or tab link and its corresponding contents are not available at all to the user, whereas if "disclosed" is false, it means that the contents of the item are not currently visible, but may be made visible by the user since the accordion header bar or tab link are still visible.
The lifecycle (including validation) is not run for any components in a showDetailItem which is not disclosed. The lifecycle is only run on the showDetailItem(s) which is disclosed.I've never been a fan of the property "disclosed", why not just call it "open"? At least developers then don't have to deal with double negatives like disclosed="false". Regardless the last paragraph highlights an interesting point that the contents of the af:showDetailItem are not processed by the JSF lifecycle if the showDetailItem is currently closed (disclosed="false"). That's desired behaviour, particularly if you have a page with multiple af:showDetailItem tags that in turn query from the business service layer, potentially kicking off a large range of ADF BC queries. Ideally you don't want the queries to fire if their relating af:showDetailItem tag is currently closed.
This feature can be demonstrated via a simple example. Note the following BasicShowDetailItem.jspx page constructed under JDev 11.1.1.4.0:
<?xml version='1.0' encoding='UTF-8'?>This is backed by the following simple requestScope POJO bean entitled BasicBean.java:
<jsp:root xmlns:jsp="http://java.sun.com/JSP/Page" version="2.1" xmlns:f="http://java.sun.com/jsf/core"
xmlns:h="http://java.sun.com/jsf/html" xmlns:af="http://xmlns.oracle.com/adf/faces/rich">
<jsp:directive.page contentType="text/html;charset=UTF-8"/>
<f:view>
<af:document id="d1">
<af:form id="f1">
<af:panelAccordion id="pa1">
<af:showDetailItem text="Alpha" disclosed="true" id="sdi1">
<af:panelFormLayout id="pfl1">
<af:inputText label="Alpha Value" value="#{basicBean.alphaValue}" id="it1"/>
<af:commandButton text="Submit1" id="cb1"/>
</af:panelFormLayout>
</af:showDetailItem>
<af:showDetailItem text="Beta" disclosed="false" id="sdi2">
<af:inputText label="Beta Value" value="#{basicBean.betaValue}" id="it2"/>
<af:commandButton text="Submit2" id="cb2"/>
</af:showDetailItem>
</af:panelAccordion>
</af:form>
</af:document>
</f:view>
</jsp:root>
package test.view;(More information on the ADFLogger and enabling it can be found in Duncan Mill's recent 4 part blog).
import oracle.adf.share.logging.ADFLogger;
public class BasicBean {
public static ADFLogger logger = ADFLogger.createADFLogger(BasicBean.class);
private String alphaValue = "alpha";
private String betaValue = "beta";
public void setAlphaValue(String alphaValue) {
logger.info("setAlphaValue called(" + (alphaValue == null ? "<null>" : alphaValue) + ")");
this.alphaValue = alphaValue;
}
public String getAlphaValue() {
logger.info("getAlphaValue called(" + (alphaValue == null ? "<null>" : alphaValue) + ")");
return alphaValue;
}
public void setBetaValue(String betaValue) {
logger.info("setBetaValue called(" + (betaValue == null ? "<null>" : betaValue) + ")");
this.betaValue = betaValue;
}
public String getBetaValue() {
logger.info("getBetaValue called(" + (betaValue == null ? "<null>" : betaValue) + ")");
return betaValue;
}
}
To assist understanding what's happening we'll also include our own PhaseListener logs such that we can see the JSF lifecycle in action:
public class PhaseListener implements javax.faces.event.PhaseListener {

  public static ADFLogger logger = ADFLogger.createADFLogger(PhaseListener.class);

  public void beforePhase(PhaseEvent phaseEvent) {
    logger.info(phaseEvent.getPhaseId().toString());
  }

  public void afterPhase(PhaseEvent phaseEvent) {
    logger.info(phaseEvent.getPhaseId().toString());
  }

  public PhaseId getPhaseId() {
    return PhaseId.ANY_PHASE;
  }
}At runtime when the page is first rendered we see: Note that the first af:showDetailItem is disclosed (open) and the second af:showDetailItem is closed. Also note the first af:showDetailItem is showing the alpha value from our requestScope bean, but the beta value is hiding in the 2nd closed af:showDetailItem.
At this stage the logger class gives us an insight into how the requestScope Basicbean has been used. In the log window we can see:
<PhaseListener> <beforePhase> RESTORE_VIEW 1We can see the getter accessors for alphaValue have been called twice during the JSF render response phase to render the page. (Why twice? Essentially the JSF engine doesn't guarantee to call a getter once in a request-response cycle. JSF may use a getter for its own purposes such as checking if the value submitted with the request has changed, in order to fire a ValueChangeListener. Google abounds with further discussions on this and the JSF lifecylce including the following by BalusC).
<PhaseListener> <afterPhase> RESTORE_VIEW 1
<PhaseListener> <beforePhase> RESTORE_VIEW 1
<PhaseListener> <afterPhase> RESTORE_VIEW 1
<PhaseListener> <beforePhase> RENDER_RESPONSE 6
<BasicBean> <getAlphaValue> getAlphaValue called(alpha)
<BasicBean> <getAlphaValue> getAlphaValue called(alpha)
<PhaseListener> <afterPhase> RENDER_RESPONSE 6
As expected note that the getter for Beta was not called, as it's not displayed. To take the example one step further, if we hit the submit button available in first af:showDetailItem, the log output still shows no mention of the beta accessors, only calls to getAlphaValue():
<PhaseListener> <beforePhase> RESTORE_VIEW 1For the purpose of demonstration, if we change the alpha value and resubmit the logs show:
<PhaseListener> <afterPhase> RESTORE_VIEW 1
<PhaseListener> <beforePhase> APPLY_REQUEST_VALUES 2
<PhaseListener> <afterPhase> APPLY_REQUEST_VALUES 2
<PhaseListener> <beforePhase> PROCESS_VALIDATIONS 3
<BasicBean> <getAlphaValue> getAlphaValue called(alpha)
<PhaseListener> <afterPhase> PROCESS_VALIDATIONS 3
<PhaseListener> <beforePhase> UPDATE_MODEL_VALUES 4
<PhaseListener> <afterPhase> UPDATE_MODEL_VALUES 4
<PhaseListener> <beforePhase> INVOKE_APPLICATION 5
<PhaseListener> <afterPhase> INVOKE_APPLICATION 5
<PhaseListener> <beforePhase> RENDER_RESPONSE 6
<BasicBean> <getAlphaValue> getAlphaValue called(alpha)
<BasicBean> <getAlphaValue> getAlphaValue called(alpha)
<PhaseListener> <afterPhase> RENDER_RESPONSE 6
<PhaseListener> <beforePhase> RESTORE_VIEW 1In this case we see the additional setAlphaValue() call, and multiple getAlphaValue() calls, but no get/setBetaValue() calls. With this we can conclude that indeed the second af:showDetailItem is suppressing the lifecycle of its children.
<PhaseListener> <afterPhase> RESTORE_VIEW 1
<PhaseListener> <beforePhase> APPLY_REQUEST_VALUES 2
<PhaseListener> <afterPhase> APPLY_REQUEST_VALUES 2
<PhaseListener> <beforePhase> PROCESS_VALIDATIONS 3
<BasicBean> <getAlphaValue> getAlphaValue called(alpha)
<PhaseListener> <afterPhase> PROCESS_VALIDATIONS 3
<PhaseListener> <beforePhase> UPDATE_MODEL_VALUES 4
<BasicBean> <setAlphaValue> setAlphaValue called(alpha2)
<PhaseListener> <afterPhase> UPDATE_MODEL_VALUES 4
<PhaseListener> <beforePhase> INVOKE_APPLICATION 5
<PhaseListener> <afterPhase> INVOKE_APPLICATION 5
<PhaseListener> <beforePhase> RENDER_RESPONSE 6
<BasicBean> <getAlphaValue> getAlphaValue called(alpha2)
<BasicBean> <getAlphaValue> getAlphaValue called(alpha2)
<PhaseListener> <afterPhase> RENDER_RESPONSE 6
What's happens if we open the 2nd af:showDetailItem, which closes the 1st af:showDetailItem:
 In the log window we see:
<PhaseListener> <beforePhase> RESTORE_VIEW 1In this we can see:
<PhaseListener> <afterPhase> RESTORE_VIEW 1
<PhaseListener> <beforePhase> APPLY_REQUEST_VALUES 2
<PhaseListener> <afterPhase> APPLY_REQUEST_VALUES 2
<PhaseListener> <beforePhase> PROCESS_VALIDATIONS 3
<BasicBean> <getAlphaValue> getAlphaValue called(alpha)
<PhaseListener> <afterPhase> PROCESS_VALIDATIONS 3
<PhaseListener> <beforePhase> UPDATE_MODEL_VALUES 4
<BasicBean> <setAlphaValue> setAlphaValue called(alpha2)
<PhaseListener> <afterPhase> UPDATE_MODEL_VALUES 4
<PhaseListener> <beforePhase> INVOKE_APPLICATION 5
<PhaseListener> <afterPhase> INVOKE_APPLICATION 5
<PhaseListener> <beforePhase> RENDER_RESPONSE 6
<BasicBean> <getBetaValue> getBetaValue called(beta)
<BasicBean> <getBetaValue> getBetaValue called(beta)
<PhaseListener> <afterPhase> RENDER_RESPONSE 6
1) A single get and set of alpha value – why? – because the af:showDetailItem button still issues a submit to the midtier. At the point in time the second af:showDetailItem's button is pressed, alpha is still showing, and its changes need to be communicated back to the midtier. The getAlphaValue() is to test if the values changed to fire the ValueChangeListener, and the setAlphaValue() is a call to write the new value submitted to the midtier.
An observant reader might pick up the fact that in this log the getAlphaValue call returns a value of alpha rather than alpha2. Surely in the step prior to this one we had already set the value to alpha2? (in fact you can see this in the log output) The answer being this bean has been set at requestScope, not sessionScope, so the state of the internal values are not being copied across requests (which is a useful learning exercise with regards to bean scope but beyond the scope (no pun intended) of this blog post).
2) Two separate calls to getBetaValue() – as the second af:showDetailItem opens, similar to the original retrieval of the alpha value, the JSF lifecycle now calls the getter twice.
If we now press the submit button in the second af:showDetailItem we see the following in the logs:
<PhaseListener> <beforePhase> RESTORE_VIEW 1As previous when we pressed the submit button in the first af:showDetailItem, the log output and the calls to getBetaValue match the frequency and location of getAlphaValue. Again now that the first af:showDetailItem is fully closed, we see no JSF lifecycle on the get/setAlphaValue() methods.
<PhaseListener> <afterPhase> RESTORE_VIEW 1
<PhaseListener> <beforePhase> APPLY_REQUEST_VALUES 2
<PhaseListener> <afterPhase> APPLY_REQUEST_VALUES 2
<PhaseListener> <beforePhase> PROCESS_VALIDATIONS 3
<BasicBean> <getBetaValue> getBetaValue called(beta)
<PhaseListener> <afterPhase> PROCESS_VALIDATIONS 3
<PhaseListener> <beforePhase> UPDATE_MODEL_VALUES 4
<PhaseListener> <afterPhase> UPDATE_MODEL_VALUES 4
<PhaseListener> <beforePhase> INVOKE_APPLICATION 5
<PhaseListener> <afterPhase> INVOKE_APPLICATION 5
<PhaseListener> <beforePhase> RENDER_RESPONSE 6
<BasicBean> <getBetaValue> getBetaValue called(beta)
<BasicBean> <getBetaValue> getBetaValue called(beta)
<PhaseListener> <afterPhase> RENDER_RESPONSE 6
So in conclusion, if the af:showDetailItem is closed, and not in the processing of being closed, then its children will not be activated.
Okay, but what's up with af:showDetailItems and af:regions?
Now that we know the default behaviour of the af:showDetailItem, let's extend the example to show where the behaviour changes.
Within JDev 11g we can make use of af:regions to call ADF bounded task flows. As example we may have the following page entitled ShowDetailItemWithRegion.jspx:
<?xml version='1.0' encoding='UTF-8'?>Note the embedded regions within each af:showDetailItem. The setup of the rest of the page is the same, with the first af:showDetailItem being disclosed (open) and the closed when the page first renders.
<jsp:root xmlns:jsp="http://java.sun.com/JSP/Page" version="2.1" xmlns:f="http://java.sun.com/jsf/core"
xmlns:h="http://java.sun.com/jsf/html" xmlns:af="http://xmlns.oracle.com/adf/faces/rich">
<jsp:directive.page contentType="text/html;charset=UTF-8"/>
<f:view>
<af:document id="d1">
<af:form id="f1">
<af:panelAccordion id="pa1">
<af:showDetailItem text="Alpha" disclosed="true" id="sdi1">
<af:panelFormLayout id="pfl1">
<af:region value="#{bindings.AlphaTaskFlow1.regionModel}" id="r1"/>
<af:commandButton text="Submit1" id="cb1"/>
</af:panelFormLayout>
</af:showDetailItem>
<af:showDetailItem text="Beta" disclosed="false" id="sdi2">
<af:region value="#{bindings.BetaTaskFlow1.regionModel}" id="r2"/>
<af:commandButton text="Submit2" id="cb2"/>
</af:showDetailItem>
</af:panelAccordion>
</af:form>
</af:document>
</f:view>
</jsp:root>
The task flows themselves are very simple. As example AlphaTaskFlow contains one fragment AlphaFragment which is the default activity:
 The AlphaFragment.jsff includes the following code:
<?xml version='1.0' encoding='UTF-8'?>Of which references a backingBean scoped bean for the task flow named AlphaBean:
<jsp:root xmlns:jsp="http://java.sun.com/JSP/Page" version="2.1" xmlns:af="http://xmlns.oracle.com/adf/faces/rich">
<af:inputText label="Alpha value" value="#{backingBeanScope.alphaBean.alphaValue}" id="it1"/>
</jsp:root>
package test.view;This bean carries the alphaValue plus the associated getters and setters. The only addition here is the taskFlowInit() and taskFlowFinalizer() methods which we'll use in the task flow to log when the task flow is started and stopped:
import oracle.adf.share.logging.ADFLogger;
public class AlphaBean1 {
public static ADFLogger logger = ADFLogger.createADFLogger(AlphaBean.class);
private String alphaValue = "alpha1";
public void setAlphaValue(String alphaValue) {
logger.info("setAlphaValue called(" + (alphaValue == null ? "<null>" : alphaValue) + ")");
this.alphaValue = alphaValue;
}
public String getAlphaValue() {
logger.info("getAlphaValue called(" + (alphaValue == null ? "<null>" : alphaValue) + ")");
return alphaValue;
}
public void taskFlowInit() {
logger.info("Task flow initialized");
}
public void taskFlowFinalizer() {
logger.info("Task flow finalized");
}
}
 In terms of the 2nd task flow BetaTaskFlow, it's exactly the same as AlphaTaskFlow except it calls the beta equivalent. As such the BetaFragment.jsff:
<?xml version='1.0' encoding='UTF-8'?>The backingBeanScope BetaBean:
<jsp:root xmlns:jsp="http://java.sun.com/JSP/Page" version="2.1" xmlns:af="http://xmlns.oracle.com/adf/faces/rich">
<af:inputText label="Beta value" value="#{backingBeanScope.betaBean.betaValue}" id="it1"/>
</jsp:root>
package test.view;And the BetaTaskFlow initializer and finalizers set:
import oracle.adf.share.logging.ADFLogger;
public class BetaBean1 {
public static ADFLogger logger = ADFLogger.createADFLogger(BetaBean.class);
private String betaValue = "beta1";
public void setBetaValue(String betaValue) {
logger.info("setBetaValue called(" + (betaValue == null ? "<null>" : betaValue) + ")");
this.betaValue = betaValue;
}
public String getBetaValue() {
logger.info("getBetaValue called(" + (betaValue == null ? "<null>" : betaValue) + ")");
return betaValue;
}
public void taskFlowInit() {
logger.info("Task flow initialized");
}
public void taskFlowFinalizer() {
logger.info("Task flow finalized");
}
}
 With the moving parts done, let's see what happens at runtime.
When we run the base page we see:
 From the log output we see:
<PhaseListener> <beforePhase> RESTORE_VIEW 1In context of we saw in the previous example, this is an interesting result. While we see that only getAlphaValue() has been called similar to our previous example that didn't use regions, what we can also see in the RENDER_RESPONSE phase unexpectedly that the initializer for *both* task flows have been called. We expected the task flow initializer for the AlphaTaskFlow to be called, but the framework has decided to start the BetaTaskFlow as well. Another observation though is even though the BetaTaskFlow was started, somehow the framework didn't call getBetaValue?
<PhaseListener> <afterPhase> RESTORE_VIEW 1
<PhaseListener> <beforePhase> RESTORE_VIEW 1
<PhaseListener> <afterPhase> RESTORE_VIEW 1
<PhaseListener> <beforePhase> RENDER_RESPONSE 6
<AlphaBean> <taskFlowInit> Task flow initialized
<BetaBean> <taskFlowInit> Task flow initialized
<AlphaBean> <getAlphaValue> getAlphaValue called(alpha1)
<AlphaBean> <getAlphaValue> getAlphaValue called(alpha1)
<PhaseListener> <afterPhase> RENDER_RESPONSE 6
An assumption you could make here is the framework is priming the BetaTaskFlow and calling the task flow initializer, but not actually running the task flow. We can disapprove this fact by extending the BetaTaskFlow to include a new Method Call as the task flow activity:
 ...where the Method Call simply calls a new method in the BetaBean1:
public void logBegin() {
  logger.info("Task flow beginning");
}
If we re-run our application the current log output is shown when the page opens:<PhaseListener> <beforePhase> RESTORE_VIEW 1This proves that the activities within the BetaTaskFlow are actually being called. However the ADF engine seems to stop short at processing the BetaFragment, the effective viewable part of the task flow.
<PhaseListener> <afterPhase> RESTORE_VIEW 1
<PhaseListener> <beforePhase> RESTORE_VIEW 1
<PhaseListener> <afterPhase> RESTORE_VIEW 1
<PhaseListener> <beforePhase> RENDER_RESPONSE 6
<AlphaBean> <taskFlowInit> Task flow initialized
<BetaBean> <taskFlowInit> Task flow initialized
<BetaBea> <logBegin> Task flow beginning
<AlphaBean> <getAlphaValue> getAlphaValue called(alpha1)
<AlphaBean> <getAlphaValue> getAlphaValue called(alpha1)
<PhaseListener> <afterPhase> RENDER_RESPONSE 6
The conclusion we can draw here is even though you think you're hiding the BetaTaskFlow, and the af:showDetailItem documentation says it wont process the lifecyle of it's children, for af:regions using task flows, this is not the case, it is in fact processing them (up to a point). The implication of this is (at least some) unnecessary processing will occur even if the user never looks at the contents of the closed af:showDetailItem.
In the next post in this series, still using JSPX pages and JDev 11.1.1.4.0, we'll look at how we can programmatically control the activation of the hidden region to stop unnecessary processing.
The final post in the series will look at what options are available to us under JDev 11.1.2 using Facelets.
Sample Application
A sample application containing solutions for part 1 of this series is available here.
Thanks
This post was inspired by Oracle's Steve Davelaar who highlighted the new region processing in JDev 11.1.2. The introduction of the new 11.1.2 feature led me to explore the default behaviour under 11.1.1.4.0 without the new feature.
JDev 11g, Task Flows & ADF BC – one root Application Module to rule them all?
JDev 11.1.1.5.0
In my previous blog post I discussed the power of the ADF task flow functionality, and the devil in the detail for uninitiated developers using the transaction and data control scope options. This post will extend the discussion on task flows and the ADF Controller's interaction with ADF Business Components, in order to show another scenario where programmers must understand the underlying behaviour of the framework.
Developers who have worked with the ADF framework for some time, especially from the JDeveloper 10g edition and earlier, will likely have stumbled across the concepts of root and nested Application Modules (AM) in the ADF Business Component (ADF BC) layer. The Fusion Guide has the following to say on the two types of AMs:
Application modules support the ability to create software components that mimic the modularity of your use cases, for which your higher-level functions might reuse a "subfunction" that is common to several business work flows. You can implement this modularity by defining composite application modules that you assemble using instances of other application modules. This task is referred to as "application module nesting". That is, an application module can contain (logically) one or more other application modules, as well as view objects. The outermost containing application module is referred to as the "root application module".At runtime, your application works with a "main" — or what's known as a "root "— application module. Any application module can be used as a root application module; however, in practice the application modules that are used as root application modules are the ones that map to more complex end-user use cases, assuming you're not just building a straightforward CRUD application. When a root application module contains other nested application modules, they all participate in the root application module's transaction and share the same database connection and a single set of entity caches. This sharing is handled for you automatically by the root application module and its "Transaction" object.The inference is that if for a single user you want to support more than one transaction at a time, you must create 2 or more root AMs. However the implication of this is if you do so, as a transaction and database connection have a 1 to 1 relationship, a user exercising more than one root AM in the ADF BC layer during their session will take out the same amount of connections with the database. This implication further effects scalability, as the more connections a user takes out from the database, and more connections in our midtier pool will be tied up by each user too.
Task Flow transaction options
The transaction and data control scope behavioural options available to bounded task flows provide a sophisticated set of functionality for spawning and managing one or more transactions during an ADF user's session, an extension of the facilities provided by the ADF BC Application Module. Straight from the Fusion Developer's Guide the task flow transaction options are:
• <No Controller Transaction>: The called bounded task flow does not participate in any transaction management.
• Always Use Existing Transaction: When called, the bounded task flow participates in an existing transaction already in progress.
• Use Existing Transaction If Possible: When called, the bounded task flow either participates in an existing transaction if one exists, or starts a new transaction upon entry of the bounded task flow if one doesn't exist.
• Always Begin New Transaction: A new transaction starts when the bounded task flow is entered, regardless of whether or not a transaction is in progress. The new transaction completes when the bounded task flow exits.
Ignoring the "No Controller Transaction" option which defaults back to the letting the ADF BC layer manage its own transactions, the other task flow transaction options allow the developer to create and reuse transactions at a higher level of abstraction for relating web pages, page fragments and other task flow activities. As such the root AM doesn't constrain when the application establishes a new transaction and connection to the database.
Yet if now we've the option for spawning more transactions in our application, what's the implication on scalability and the number of connections that are taken out in the midtier and database for each user? Thanks to a previous OTN forum post and the kind assistance of Steve Muench this post will demonstrate how the ADF framework as a whole attempts to minimize this issue.
The "No Controller Transaction" option
Before investigating how the ADF framework addresses the scalability issue, it's useful to run through an example of using the "No Controller Transaction" bounded task flow option. This will demonstrate how the framework establishes database connections when defaulting back to the ADF BC layer's own transaction and database connection functionality.
As explained by Frank Nimphius in the following OTN Forum post the No Controller Transaction option infers that task flows are taking no control of the transactions established during the user's session when the task flow is called, all such functionality is delegated back to the underlying business services. In context of this blog post the business service layer is ADF Business Components.
As seen in the following picture overall the ADF BC layer for our example is application is a fairly simple one:

As can be seen the application is comprised of two ADF BC Application Modules (AM), named Root1AppModule & Root2AppModule. Both expose the same View Object (VO) OrganisationsView as two separate usages. In the following picture you see Root1AppModule exposes OrganisationsView as OrganisationsView1:

...and in the following picture Root2AppModule exposes OrganisationsView2 off the same OrganisationsView VO:

For what it's worth to the discussion, OrganisationsView is based on the same Organisations EO:

However as there are 2 root AMs at play in our example application, each AM will instantiate its own OrganisationsView (namely OrganisationsView1 and OrganisationsView2 respectively) and Organisation EO cache, implying the record sets in the midtier are distinctly different even though we're using the same underlying design time constructs.
Like that explained in the previous blog post, how do we know when an AM actually creates a connection? Without knowing this, in our trials with the transaction options supported by Bounded Task Flows, unless the ADFc explicitly throws an error, we'll have trouble discerning what the ADF BC layer is actually doing underneath the task flow transaction options.
While external tools like the Fusion Middleware Control will give you a good insight into this, the easiest mechanism is to extend each root Application Module's ApplicationModuleImpl's class with our own AppModuleImpl and override the create() and prepareSession() methods. The following code shows an example for the Root1AppModuleImpl:
Overriding the create() method allows us to see when the Application Module is not just instantiated, but ready to be used. This doesn't tell us when a transaction and connection is established with the database, but, is useful in identifying situations where the framework creates a root or nested AM.
The prepareSession() method is a chokepoint method the framework uses to set database session state when a connection is established with the database. As such overriding this method allows us to see when the AM does establish a new connection and transaction.
Once we've setup our ADF BC Model project, we'll now create two Bounded Task Flows (BTFs) to allow the user to work with the underlying AMs and VOs.
Both our task flows are comprised of only 2 activities, a page to view the underlying the Organisations data and an Exit Task Flow Activity. Root1AppModuleTaskFlow contains the following activities:

...and Root2AppModuleTaskFlow is virtually identical:

The OrganisationsTable1.jspx and OrganisationsTable2.jspx pages in each task flow show an editable table of Organisations data, visually there's no difference between them:

While the pages don't differ visually, underneath their pageDef files are completely different as they source their data from different root Application Modules and View Objects. In the following picture we can see the OrganisationsTable1PageDef.xml file makes use of the ADF BC OrganisationsView1 VO mapping to the Root1AppModuleDataControl:

And in the following picture we can see the OrganisationsTable2PageDef.xml file uses the ADF BC OrganisationsView2 VO mapping to the Root2AppModuleDataControl:

Finally we can see the No Controller Transaction option set for the first task flow:

..and the second:

Note I've deliberately set the data control scope to Shared to highlight a point in the future.
At this point we'll include a Start.jspx page in our Unbounded Task Flow (UTF) adfc-config.xml file with navigation rules to call each BTF, and navigation rules to return on the Exist Task Flow Return activity being called inside of each BTF:

On running our application starting with the Start.jspx page we see:

At this point inspecting the console output for the application in the JDeveloper log window, we don't see the System.out.println messages:

Returning to the Start page and selecting the Go Root1AppModuleTaskFlow button we then see:

Note in the above picture I've deliberately selected the 5th recorded and changed the Organisation's name to uppercase. Checking the log window we now see:

As such we can see that the Root1AppModule in the ADF BC layer has been instantiated, and has established a connection with the database, also establishing a transaction.
If we now return via the Exit button to the Start.jspx page in the UTF, then select the Go Root2AppModuleTaskFlow button we see:

Note that the 5th record hasn't been updated to capitals, and indeed the 1st record is the default selected record, not the 5th, implying that we're not seeing the same cache of data from the midtier, essentially 2 separate transactions with 2 separate Organisations EO caches, and in turn two separate VOs with their own current row record indicators. This last point shows that the Shared data control scope we set in the task flows has no use when the No Controller Transaction option is used.
Returning to the JDev log window we see that the second Root2AppModule was instantiated and has separately established its own connection and therefore transaction:

For completeness if we select the Exit button and return to the Start.jspx page, then return to the first task flow we can see the 5th record is still selected and updated:
The key point from this example is the fact that each Application Module is instantiated as a root AM and also creates its own connection.
A chained "No Controller Transaction" task flow example
With the previous example in hand, and building upto our final example, in this section I'd like to rearrange our example application such that rather than calling the two task flows separately, we'll instead chain them together, the 1st calling the 2nd.
The substantial change to the setup is that of the Root1AppModuleTaskFlow, where we now include a Task Flow Call to the Root2AppModuleTaskFlow, and a small modification to the OrganisationsTable1.jspx page to include a button to navigate to the Root2AppModuleTaskFlow:

In running the application, we first land in the Start.jspx page:

At this stage the log window shows no root AMs have been created:

On selecting the Go Root1AppModuleTaskFlow button we arrive at the OrganisationsTable1.jspx page:

The log window shows the Root1AppModule has been instantiated and a new connection/transaction created:

This time we'll select and change the 6th record to all caps:

Now we'll select the Go Root2AppModuleTaskFlow button that's located in the OrganisationsTable1.jspx page. On navigating to the new page we see:

As can be seen, the current row indicator lies on the first row and the 6th row hasn't been modified, exactly the same as the last example. In addition in the JDev log window we can see the establishment of the new root AM and connection/transaction:

The conclusion at this point of the blog post is chaining task flows when the No Controller Transaction options are used has no effect on the root AMs and the establishment of connections/transaction.
Always Begin New Transaction and Always Use Existing transaction example
With the previous 2 examples, we can see with the No Controller Transaction option in use for our bounded task flows, the design of our root Application Modules definitely has an effect on number of transactions and therefore connections taken out from the database.
With the following third and final example, we'll introduce BTF transaction options that relegate the transactional behaviour of the underlying ADF BC business services to the task flows themselves.
Taking our original Root1AppModuleTaskFlow, we'll now change its transaction options to use Always Begin New Transaction and an Isolated data control scope:

For our second task flow Root2AppModuleTaskFlow, which we intend to call from Root1AppModuleTaskFlow, we'll change its transaction options to use Always Use Existing Transaction. The IDE in this case enforces a Shared data control scope:

From the task flow transaction options described at the beginning of this post via the Fusion Dev Guide, the options we've selected here should mean the Root1AppModuleTaskFlow establishes the transaction and therefore connection, and the second Root2AppModuleTaskFlow should borrow/attach itself to the same transaction and connection. However from our previous examples with the No Controller Transaction option, surely the root Application Modules will enforce they both create their own transaction/connections?
Running this application we first hit out Start.jspx page:

And our log window shows no AMs have been created or established connections at this stage:

On navigating to Root1AppModuleTaskFlow via the associated button in the Start.jspx page we see very similar to previously:

Yet our log window shows something interesting:

We can see that the Root1AppModule has been created as a root AM, then it's established a connection via the prepareSession() method. Oddly however we can see a further Root1AppModule has been created? Even more oddly this secondary AM is not a root AM, but a nested AM? By deduction as there are no other log entries, this second instance of Root1AppModule must be nested under the root Root1AppModule? Interesting, but let's continue with the example.
Now that we've entered the Root1AppModuleTaskFlow, let's modify the 7th record:

Followed by selecting the button to navigate to the Root2AppModuleTaskFlow, we then see on visiting the OrganisationsTable2.jspx page of the second task flow:

Note the 7th record's data, and where the current row indicator is located! Before drawing conclusions, let's look at the log window's output:

From the log window we can see a 3rd AM has been instantiated, this time a Root2AppModule as a nested AM.
What's going on?
Without a key bit of information from Steve Muench's reply to my previous OTN Forum's post, it may be hard to determine the BTF behaviour in the last scenario. In context of ADF BC and BTFs given the right combination of transaction and data control scope options, the framework will automatically nest your AMs regardless if they're a root AM.
So when we're running our application, on calling the first task flow, we see:
a) A single root AM created based on Root1AppModule, as the framework needs at least a signle root AM to drive the transactions and connections. Let's refer to this as Root1AppModule1.
b) A second instance of Root1AppModule as a nested AM under its own root instance. Let's refer to this as Root1AppModule2. This is a little odd, but as the framework automatically nests the AMs of the called BTF under a root AM instance, it's using the first AM encountered for dual purposes, essentially nesting Root1AppModule2 under Root1AppModule1.
c) By the time we hit our second BTF, only one instance of Root2AppModule is created, nested under Root1AppModule1. Let's refer to this as Root2AppModule1.
To summarize at this point, our AM structure at runtime is:
(Root) Root1AppModule1
(Nested Level 1) Root1AppModule2
(Nested Level 1) Root2AppModule1
Given that we now know nesting is occurring, it does explain why we're seeing the changes to the 7th record in both BTF OrganisationTable pages. Only if separate root AMs were used would there be separate EO caches for the Organisations table. However as the BTFs have nested the AMs, they're essentially sharing the same EO cache. So a change to data in one BTF will be reflected in the second, as long as they share transactions and are ultimately based on the same EO.
The final mystery is why if we can see the data changes are reflected in each BTF, how come the current row indicators of the underlying VOs are out of sync? This is simply explained by the fact that with the two different VOs defined in each AM, namely OrganisationsView1 & OrganisationsView2, at runtime essentially they are both instantiated separately, even though ultimately they exist under the same Root1AppModule1 at runtime and share the same EO cache. As such both VOs maintain their own separate row currency, and other state carried by the ADF BC View Objects.
Changing AM connection configurations
At this point we may start to ask how the framework is deciding to nest the AMs under the one parent AM? Is the underlying framework being smart enough to look at the database connections for the separately defined root AMs, and in determining they're one and the same, nesting the AMs as it doesn't matter when they both connect to the same database?
From my testing it appears to make no difference if you change the connections. It's essentially the first AM whose connection details are used, and it's just assumed the second AM uses the same connection details. The further inference of this is it's just assumed that all the database objects required by the second root AM database connection are available to the first.
This has two knock on effects:
1) If both AMs did connect to the same database schema, if the first connection is missing privileges on objects required by the second AM's objects, you'll hit database privilege errors during runtime when those second AM objects interact with the database (e.q. at query and DML time).
2) If you actually use your root AMs to connect to entirely different data sources, such as different databases, this automatic nesting will cause your application to fail.
The first here is easily solved with some database privilege fixes. For the second, this implies you should move back to the No Controller Transaction options to return to an application where the root AMs use their own connections.
Some caveats
If the automatic nesting functionality proves useful to you, be warned of one caveat. From the OTN Forum replies from Steve Muench, even though he describes the fact the framework will automatically nest your AMs for the purposes of connections/transactions, don't assume this means other AM features are joined or always will display the same behaviour. To quote:
In fact, in a future release we will likely be changing that implementation detail so that the AMs are always used from their own AM pool, however they will share a transaction/connection.A second caveat is around the mixing of BTF transaction options. Notably the No Controller Transaction option because of its inherit different use of root AMs to that of the normal transaction options would imply that mixing No Controller Transaction with other BTFs not using this option could leave to some disturbing and unpredictable behaviour around transactions and connections. Either use No Controller Transaction exclusively, or not at all.
A third and final caveat is this and the previous post that describe the transaction behaviours is in context of the interaction with ADF Business Components. Readers should not assume that the same transaction behaviour will be exhibited by different underlying business services such as EJBs, POJOs or Web Services. As example Web Services don't have the concept of transactions, so we can probably guess that there's no point using anything but the No Controller Transaction option .... however again you need to experiment with these alternatives yourself, don't base your conclusions on this post.
The implication for ADF Libraries
In Andrejus Baranovski's blog post he shows a technique for mashing the Model projects of several ADF Libraries containing BTFs and their own AMs into a single Model project, such that a single root AM is defined across all BTFs at design time, to be reused by all ADF Libraries. With this blog post we see we while Andrejus's technique is fine for those relying on the No Controller Transaction options of BTFs, such an extended build of ADF Libraries and their AM Model projects is not essential to minimize the number of connections of our application.
Feedback
This blog post and the previous have taken a lot of research and testing to arrive at it's conclusions. If future readers find anything wrong, or find alternative scenarios where what's written here doesn't pan out, it would be greatly appreciated if you could leave a comment to that effect, such that this post doesn't mislead future readers.
In my previous blog post I discussed the power of the ADF task flow functionality, and the devil in the detail for uninitiated developers using the transaction and data control scope options. This post will extend the discussion on task flows and the ADF Controller's interaction with ADF Business Components, in order to show another scenario where programmers must understand the underlying behaviour of the framework.
Developers who have worked with the ADF framework for some time, especially from the JDeveloper 10g edition and earlier, will likely have stumbled across the concepts of root and nested Application Modules (AM) in the ADF Business Component (ADF BC) layer. The Fusion Guide has the following to say on the two types of AMs:
Application modules support the ability to create software components that mimic the modularity of your use cases, for which your higher-level functions might reuse a "subfunction" that is common to several business work flows. You can implement this modularity by defining composite application modules that you assemble using instances of other application modules. This task is referred to as "application module nesting". That is, an application module can contain (logically) one or more other application modules, as well as view objects. The outermost containing application module is referred to as the "root application module".At runtime, your application works with a "main" — or what's known as a "root "— application module. Any application module can be used as a root application module; however, in practice the application modules that are used as root application modules are the ones that map to more complex end-user use cases, assuming you're not just building a straightforward CRUD application. When a root application module contains other nested application modules, they all participate in the root application module's transaction and share the same database connection and a single set of entity caches. This sharing is handled for you automatically by the root application module and its "Transaction" object.The inference is that if for a single user you want to support more than one transaction at a time, you must create 2 or more root AMs. However the implication of this is if you do so, as a transaction and database connection have a 1 to 1 relationship, a user exercising more than one root AM in the ADF BC layer during their session will take out the same amount of connections with the database. This implication further effects scalability, as the more connections a user takes out from the database, and more connections in our midtier pool will be tied up by each user too.
Task Flow transaction options
The transaction and data control scope behavioural options available to bounded task flows provide a sophisticated set of functionality for spawning and managing one or more transactions during an ADF user's session, an extension of the facilities provided by the ADF BC Application Module. Straight from the Fusion Developer's Guide the task flow transaction options are:
• <No Controller Transaction>: The called bounded task flow does not participate in any transaction management.
• Always Use Existing Transaction: When called, the bounded task flow participates in an existing transaction already in progress.
• Use Existing Transaction If Possible: When called, the bounded task flow either participates in an existing transaction if one exists, or starts a new transaction upon entry of the bounded task flow if one doesn't exist.
• Always Begin New Transaction: A new transaction starts when the bounded task flow is entered, regardless of whether or not a transaction is in progress. The new transaction completes when the bounded task flow exits.
Ignoring the "No Controller Transaction" option which defaults back to the letting the ADF BC layer manage its own transactions, the other task flow transaction options allow the developer to create and reuse transactions at a higher level of abstraction for relating web pages, page fragments and other task flow activities. As such the root AM doesn't constrain when the application establishes a new transaction and connection to the database.
Yet if now we've the option for spawning more transactions in our application, what's the implication on scalability and the number of connections that are taken out in the midtier and database for each user? Thanks to a previous OTN forum post and the kind assistance of Steve Muench this post will demonstrate how the ADF framework as a whole attempts to minimize this issue.
The "No Controller Transaction" option
Before investigating how the ADF framework addresses the scalability issue, it's useful to run through an example of using the "No Controller Transaction" bounded task flow option. This will demonstrate how the framework establishes database connections when defaulting back to the ADF BC layer's own transaction and database connection functionality.
As explained by Frank Nimphius in the following OTN Forum post the No Controller Transaction option infers that task flows are taking no control of the transactions established during the user's session when the task flow is called, all such functionality is delegated back to the underlying business services. In context of this blog post the business service layer is ADF Business Components.
As seen in the following picture overall the ADF BC layer for our example is application is a fairly simple one:

As can be seen the application is comprised of two ADF BC Application Modules (AM), named Root1AppModule & Root2AppModule. Both expose the same View Object (VO) OrganisationsView as two separate usages. In the following picture you see Root1AppModule exposes OrganisationsView as OrganisationsView1:

...and in the following picture Root2AppModule exposes OrganisationsView2 off the same OrganisationsView VO:

For what it's worth to the discussion, OrganisationsView is based on the same Organisations EO:

However as there are 2 root AMs at play in our example application, each AM will instantiate its own OrganisationsView (namely OrganisationsView1 and OrganisationsView2 respectively) and Organisation EO cache, implying the record sets in the midtier are distinctly different even though we're using the same underlying design time constructs.
Like that explained in the previous blog post, how do we know when an AM actually creates a connection? Without knowing this, in our trials with the transaction options supported by Bounded Task Flows, unless the ADFc explicitly throws an error, we'll have trouble discerning what the ADF BC layer is actually doing underneath the task flow transaction options.
While external tools like the Fusion Middleware Control will give you a good insight into this, the easiest mechanism is to extend each root Application Module's ApplicationModuleImpl's class with our own AppModuleImpl and override the create() and prepareSession() methods. The following code shows an example for the Root1AppModuleImpl:
public class Root1AppModuleImpl extends ApplicationModuleImpl {
  // Other generated methods

  @Override
  protected void create() {
    super.create();
    if (isRoot())
      System.out.println("########Root1AppModuleImpl.create() called.  AM isRoot() = true");
    else
      System.out.println("########Root1AppModuleImpl.create() called.  AM isRoot() = false");
  }

  @Override
  protected void prepareSession(Session session) {
    super.prepareSession(session);
    if (isRoot())
      System.out.println("########Root1AppModuleImpl.prepareSession() called.  AM isRoot() = true");
    else
      System.out.println("########Root1AppModuleImpl.prepareSession() called.  AM isRoot() = false");
  }
}
Pretty much the code for the Root2AppModuleImpl is the same, except the name of the classes change in the System.out.println calls.Overriding the create() method allows us to see when the Application Module is not just instantiated, but ready to be used. This doesn't tell us when a transaction and connection is established with the database, but, is useful in identifying situations where the framework creates a root or nested AM.
The prepareSession() method is a chokepoint method the framework uses to set database session state when a connection is established with the database. As such overriding this method allows us to see when the AM does establish a new connection and transaction.
Once we've setup our ADF BC Model project, we'll now create two Bounded Task Flows (BTFs) to allow the user to work with the underlying AMs and VOs.
Both our task flows are comprised of only 2 activities, a page to view the underlying the Organisations data and an Exit Task Flow Activity. Root1AppModuleTaskFlow contains the following activities:

...and Root2AppModuleTaskFlow is virtually identical:

The OrganisationsTable1.jspx and OrganisationsTable2.jspx pages in each task flow show an editable table of Organisations data, visually there's no difference between them:

While the pages don't differ visually, underneath their pageDef files are completely different as they source their data from different root Application Modules and View Objects. In the following picture we can see the OrganisationsTable1PageDef.xml file makes use of the ADF BC OrganisationsView1 VO mapping to the Root1AppModuleDataControl:

And in the following picture we can see the OrganisationsTable2PageDef.xml file uses the ADF BC OrganisationsView2 VO mapping to the Root2AppModuleDataControl:

Finally we can see the No Controller Transaction option set for the first task flow:

..and the second:

Note I've deliberately set the data control scope to Shared to highlight a point in the future.
At this point we'll include a Start.jspx page in our Unbounded Task Flow (UTF) adfc-config.xml file with navigation rules to call each BTF, and navigation rules to return on the Exist Task Flow Return activity being called inside of each BTF:

On running our application starting with the Start.jspx page we see:

At this point inspecting the console output for the application in the JDeveloper log window, we don't see the System.out.println messages:

Returning to the Start page and selecting the Go Root1AppModuleTaskFlow button we then see:

Note in the above picture I've deliberately selected the 5th recorded and changed the Organisation's name to uppercase. Checking the log window we now see:

As such we can see that the Root1AppModule in the ADF BC layer has been instantiated, and has established a connection with the database, also establishing a transaction.
If we now return via the Exit button to the Start.jspx page in the UTF, then select the Go Root2AppModuleTaskFlow button we see:

Note that the 5th record hasn't been updated to capitals, and indeed the 1st record is the default selected record, not the 5th, implying that we're not seeing the same cache of data from the midtier, essentially 2 separate transactions with 2 separate Organisations EO caches, and in turn two separate VOs with their own current row record indicators. This last point shows that the Shared data control scope we set in the task flows has no use when the No Controller Transaction option is used.
Returning to the JDev log window we see that the second Root2AppModule was instantiated and has separately established its own connection and therefore transaction:

For completeness if we select the Exit button and return to the Start.jspx page, then return to the first task flow we can see the 5th record is still selected and updated:
The key point from this example is the fact that each Application Module is instantiated as a root AM and also creates its own connection.
A chained "No Controller Transaction" task flow example
With the previous example in hand, and building upto our final example, in this section I'd like to rearrange our example application such that rather than calling the two task flows separately, we'll instead chain them together, the 1st calling the 2nd.
The substantial change to the setup is that of the Root1AppModuleTaskFlow, where we now include a Task Flow Call to the Root2AppModuleTaskFlow, and a small modification to the OrganisationsTable1.jspx page to include a button to navigate to the Root2AppModuleTaskFlow:

In running the application, we first land in the Start.jspx page:

At this stage the log window shows no root AMs have been created:

On selecting the Go Root1AppModuleTaskFlow button we arrive at the OrganisationsTable1.jspx page:

The log window shows the Root1AppModule has been instantiated and a new connection/transaction created:

This time we'll select and change the 6th record to all caps:

Now we'll select the Go Root2AppModuleTaskFlow button that's located in the OrganisationsTable1.jspx page. On navigating to the new page we see:

As can be seen, the current row indicator lies on the first row and the 6th row hasn't been modified, exactly the same as the last example. In addition in the JDev log window we can see the establishment of the new root AM and connection/transaction:

The conclusion at this point of the blog post is chaining task flows when the No Controller Transaction options are used has no effect on the root AMs and the establishment of connections/transaction.
Always Begin New Transaction and Always Use Existing transaction example
With the previous 2 examples, we can see with the No Controller Transaction option in use for our bounded task flows, the design of our root Application Modules definitely has an effect on number of transactions and therefore connections taken out from the database.
With the following third and final example, we'll introduce BTF transaction options that relegate the transactional behaviour of the underlying ADF BC business services to the task flows themselves.
Taking our original Root1AppModuleTaskFlow, we'll now change its transaction options to use Always Begin New Transaction and an Isolated data control scope:

For our second task flow Root2AppModuleTaskFlow, which we intend to call from Root1AppModuleTaskFlow, we'll change its transaction options to use Always Use Existing Transaction. The IDE in this case enforces a Shared data control scope:

From the task flow transaction options described at the beginning of this post via the Fusion Dev Guide, the options we've selected here should mean the Root1AppModuleTaskFlow establishes the transaction and therefore connection, and the second Root2AppModuleTaskFlow should borrow/attach itself to the same transaction and connection. However from our previous examples with the No Controller Transaction option, surely the root Application Modules will enforce they both create their own transaction/connections?
Running this application we first hit out Start.jspx page:

And our log window shows no AMs have been created or established connections at this stage:

On navigating to Root1AppModuleTaskFlow via the associated button in the Start.jspx page we see very similar to previously:

Yet our log window shows something interesting:

We can see that the Root1AppModule has been created as a root AM, then it's established a connection via the prepareSession() method. Oddly however we can see a further Root1AppModule has been created? Even more oddly this secondary AM is not a root AM, but a nested AM? By deduction as there are no other log entries, this second instance of Root1AppModule must be nested under the root Root1AppModule? Interesting, but let's continue with the example.
Now that we've entered the Root1AppModuleTaskFlow, let's modify the 7th record:

Followed by selecting the button to navigate to the Root2AppModuleTaskFlow, we then see on visiting the OrganisationsTable2.jspx page of the second task flow:

Note the 7th record's data, and where the current row indicator is located! Before drawing conclusions, let's look at the log window's output:

From the log window we can see a 3rd AM has been instantiated, this time a Root2AppModule as a nested AM.
What's going on?
Without a key bit of information from Steve Muench's reply to my previous OTN Forum's post, it may be hard to determine the BTF behaviour in the last scenario. In context of ADF BC and BTFs given the right combination of transaction and data control scope options, the framework will automatically nest your AMs regardless if they're a root AM.
So when we're running our application, on calling the first task flow, we see:
a) A single root AM created based on Root1AppModule, as the framework needs at least a signle root AM to drive the transactions and connections. Let's refer to this as Root1AppModule1.
b) A second instance of Root1AppModule as a nested AM under its own root instance. Let's refer to this as Root1AppModule2. This is a little odd, but as the framework automatically nests the AMs of the called BTF under a root AM instance, it's using the first AM encountered for dual purposes, essentially nesting Root1AppModule2 under Root1AppModule1.
c) By the time we hit our second BTF, only one instance of Root2AppModule is created, nested under Root1AppModule1. Let's refer to this as Root2AppModule1.
To summarize at this point, our AM structure at runtime is:
(Root) Root1AppModule1
(Nested Level 1) Root1AppModule2
(Nested Level 1) Root2AppModule1
Given that we now know nesting is occurring, it does explain why we're seeing the changes to the 7th record in both BTF OrganisationTable pages. Only if separate root AMs were used would there be separate EO caches for the Organisations table. However as the BTFs have nested the AMs, they're essentially sharing the same EO cache. So a change to data in one BTF will be reflected in the second, as long as they share transactions and are ultimately based on the same EO.
The final mystery is why if we can see the data changes are reflected in each BTF, how come the current row indicators of the underlying VOs are out of sync? This is simply explained by the fact that with the two different VOs defined in each AM, namely OrganisationsView1 & OrganisationsView2, at runtime essentially they are both instantiated separately, even though ultimately they exist under the same Root1AppModule1 at runtime and share the same EO cache. As such both VOs maintain their own separate row currency, and other state carried by the ADF BC View Objects.
Changing AM connection configurations
At this point we may start to ask how the framework is deciding to nest the AMs under the one parent AM? Is the underlying framework being smart enough to look at the database connections for the separately defined root AMs, and in determining they're one and the same, nesting the AMs as it doesn't matter when they both connect to the same database?
From my testing it appears to make no difference if you change the connections. It's essentially the first AM whose connection details are used, and it's just assumed the second AM uses the same connection details. The further inference of this is it's just assumed that all the database objects required by the second root AM database connection are available to the first.
This has two knock on effects:
1) If both AMs did connect to the same database schema, if the first connection is missing privileges on objects required by the second AM's objects, you'll hit database privilege errors during runtime when those second AM objects interact with the database (e.q. at query and DML time).
2) If you actually use your root AMs to connect to entirely different data sources, such as different databases, this automatic nesting will cause your application to fail.
The first here is easily solved with some database privilege fixes. For the second, this implies you should move back to the No Controller Transaction options to return to an application where the root AMs use their own connections.
Some caveats
If the automatic nesting functionality proves useful to you, be warned of one caveat. From the OTN Forum replies from Steve Muench, even though he describes the fact the framework will automatically nest your AMs for the purposes of connections/transactions, don't assume this means other AM features are joined or always will display the same behaviour. To quote:
In fact, in a future release we will likely be changing that implementation detail so that the AMs are always used from their own AM pool, however they will share a transaction/connection.A second caveat is around the mixing of BTF transaction options. Notably the No Controller Transaction option because of its inherit different use of root AMs to that of the normal transaction options would imply that mixing No Controller Transaction with other BTFs not using this option could leave to some disturbing and unpredictable behaviour around transactions and connections. Either use No Controller Transaction exclusively, or not at all.
A third and final caveat is this and the previous post that describe the transaction behaviours is in context of the interaction with ADF Business Components. Readers should not assume that the same transaction behaviour will be exhibited by different underlying business services such as EJBs, POJOs or Web Services. As example Web Services don't have the concept of transactions, so we can probably guess that there's no point using anything but the No Controller Transaction option .... however again you need to experiment with these alternatives yourself, don't base your conclusions on this post.
The implication for ADF Libraries
In Andrejus Baranovski's blog post he shows a technique for mashing the Model projects of several ADF Libraries containing BTFs and their own AMs into a single Model project, such that a single root AM is defined across all BTFs at design time, to be reused by all ADF Libraries. With this blog post we see we while Andrejus's technique is fine for those relying on the No Controller Transaction options of BTFs, such an extended build of ADF Libraries and their AM Model projects is not essential to minimize the number of connections of our application.
Feedback
This blog post and the previous have taken a lot of research and testing to arrive at it's conclusions. If future readers find anything wrong, or find alternative scenarios where what's written here doesn't pan out, it would be greatly appreciated if you could leave a comment to that effect, such that this post doesn't mislead future readers.
JDev 11g, Task Flows & ADF BC – the Always use Existing Transaction option – it's not what it seems
JDev 11.1.1.5.0
Oracle's JDeveloper 11g introduces the powerful concept of task flows to the Application Development Framework (ADF). Task flows enable "Service Oriented Development" (akin to "Service Oriented Architecture") allowing developers to align web application development closely to the concept of business processes, rather than a disparate set of web pages strung loosely together by URLs.
Yet as the old saying goes, "with power comes great responsibility", or alternatively, "the devil is in the detail". Developers need to have a good grasp of the task flow capabilities and options in order to not paint themselves into a corner. This is particularly true of the transaction and data control scope behavioural options provided by "bounded" task flows.
The transaction and data control scope behavioural options available to bounded task flows provide a sophisticated set of functionality for spawning and managing one or more transactions during an ADF user's session. Straight from the Fusion Developer's Guide the transaction options are:
• <No Controller Transaction>: The called bounded task flow does not participate in any transaction management.
• Always Use Existing Transaction: When called, the bounded task flow participates in an existing transaction already in progress.
• Use Existing Transaction If Possible: When called, the bounded task flow either participates in an existing transaction if one exists, or starts a new transaction upon entry of the bounded task flow if one doesn't exist.
• Always Begin New Transaction: A new transaction starts when the bounded task flow is entered, regardless of whether or not a transaction is in progress. The new transaction completes when the bounded task flow exits.
In recently discussing the task flow transaction options on the OTN Forums (with the kind assistance of Frank Nimphius it's become apparent that the transaction options described in the Fusion Guide are written from the limited perspective of the ADF controller (ADFc). Why a limited perspective? Because the documentation doesn't consider how these transactions options are dealt with by the underlying business services layer – the controller makes no assumptions about the underlying layers, it is deliberate an abstraction that sits on top. As such if we consider ADF Business Components (ADF BC), ADFc can interpret the task flow transaction options as it sees fit. The inference being, ADF BC can introduce subtle nuances in how the transaction options work as called by the controller.
The vanilla "Always Use Existing Transaction" option
The Fusion Guide is clear in the use of the task flow "Always Use Existing Transaction" option:
• Always Use Existing Transaction: When called, the bounded task flow participates in an existing transaction already in progress.
The inference here is that the task flow won't create its own transaction, but rather will attach itself to an existing transaction established by its calling task flow (let's refer to this as the "parent" task flow), or a "grandparent" task flow somewhere up the task flow call stack.
To test this let's demonstrate how ADFc enforces this option.
In our first example application we have an extremely simple ADF BC model of a single Entity Object (EO), single View Object (VO) and Application Module (AM), serving data from a table of Organisations in my local database:

Oracle's JDeveloper 11g introduces the powerful concept of task flows to the Application Development Framework (ADF). Task flows enable "Service Oriented Development" (akin to "Service Oriented Architecture") allowing developers to align web application development closely to the concept of business processes, rather than a disparate set of web pages strung loosely together by URLs.
From the ViewController side we have a single Bounded Task Flow (BTF) OrgTaskFlow1 comprised of a single page:
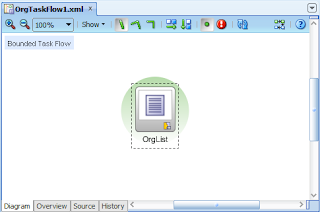
....where the single page displays a table of Organisations via the underlying ADF Business Components:

...and the transaction options of the BTF are set to Always Use Existing Transaction. By default the framework enforces the data control scope must be shared:

In order to call the BTF, from our Unbounded Task Flow (UTF) configured in the adfc-config.xml file, we have a simple Start.jspx page, which via a button invokes a Task Flow Call to the BTF OrgTaskFlow1:
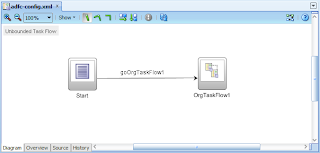
On starting the application, running the Start page, selecting the button to navigate to the Task Flow Call, we immediately hit the following error:
oracle.adf.controller.activity.ActivityLogicException: ADFC-00006: Existing transaction is required when calling task flow '/WEB-INF/OrgTaskFlow1.xml#OrgTaskFlow1'.
Via this error we can see ADFc is enforcing at runtime that the OrgTaskFlow1 BTF is unable to run as it requires its parent or grandparent task flow to have established a transaction on its behalf. With this enforcement we can (incorrectly?) conclude that Oracle's controller will never allow the BTF to run if a new transaction hasn't been established. However as you can probably guess, this post will demonstrate this isn't always the case.
A side note on transactions
Before showing how to create a transaction with the Always Use Existing Transaction option, a discussion on how we can identify transactions created via ADF BC is required.
Readers familiar with ADF Business Components will know that root Application Modules (AM) are responsible for the establishment of connections and transactional processing with the database. Ultimately the concept of transactions in context of the ADF Controller is that off the underlying business services, and by inference when ADF Business Components are used this means it's the root Application Modules that provide this functionality.
It should also be noted that by inference, that the concept of a transaction and a connection are the one in the same, in the idea that a connection with the database allows you to support a transaction, and if you have multiple transactions, you therefore have multiple connections. Simple you can't have one without the other.
Yet thanks to the Application Module providing the ability to create connections and transactions, how do we know when an AM actually creates a connection? Without knowing this, in our trials with the transaction options supported by Bounded Task Flows, unless the ADFc explicitly throws an error, we'll have trouble discerning what the ADF BC layer is actually doing underneath the task flow transaction options.
While external tools like the Fusion Middleware Control will give you a good insight into this, the easiest mechanism is to extend the Application Module's ApplicationModuleImpl's class with our AppModuleImpl and override the create() and prepareSession() methods:
The prepareSession() method is a chokepoint method the framework uses to set database session state when a connection is established with the database. As such overriding this method allows us to see when the AM does establish a new connection and transaction.
Bending the "Always Use Existing Transaction" option to create a transaction
Now that we have a mechanism for seeing when transactions are established, let's show a scenario where the Always Use Existing Transaction option does create a new transaction.
In our previous example our Unbounded Task Flow called our OrgTaskFlow1 Bounded Task Flow directly. This time let's introduce an intermediate Bounded Task Flow called the PregnantTaskFlow. As such our UTF Start page now calls the PregnantTaskFlow:

The PregnantTaskFlow will set its transaction option to Always Begin New Transaction and an Isolated data control scope:

By doing this we are setting up a scenario where the parent task flow will establish a transaction, which will be used by the OrgTaskFlow1 later on. Next within the PregnantTaskFlow we include a single page to land on called Pregnant.jspx, which includes a simple button to then navigate to the OrgTaskFlow1 task flow via a Task Flow Call in the PregnantTaskFlow itself:
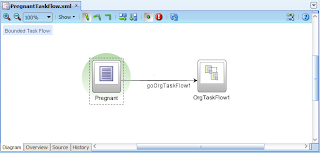
The Pregnant.jspx page is only necessary as it gives a useful landing page when the task flow is called, to see what the task flow has done with transactions before we call the OrgTaskFlow1 BTF.
The transaction options of the OrgTaskFlow1 remain the same, Always Use Existing Transaction and a Shared data control scope:
With the moving parts of our application established, if we now run our application starting with the Start page:
...clicking on the button we arrive on the Pregnant.jspx page within the PregnantTaskFlow BTF:

(Oops, looks like this picture has been lost... I'll attempt to restore this picture soon)
Remembering our PregnantTaskFlow is responsible for establishing the transaction, and therefore we should see our Application Module create() and prepareSession() methods write out System.out.println messages to the console in the JDev log window:

Hmmm, interesting, the log window is bare, no sign of our messages? So our PregnantTaskFlow was set to create a new transaction, but no such transaction or connection with the database for that matter was established?
Here's the interesting point of our demonstration. If we then select the button in the Pregnant.jspx page which will navigate to the OrgTaskFlow1 task flow call activity in the PregnantTaskFlow, firstly we see in the browser our OrgList.jspx page:

According to our previous tests at the beginning of this post we may have expected the ADFC-00006 error "Existing transaction is required", but instead the page has rendered?
In addition if we look at our log window:

...we now see our System.out.println messages in the console, showing that the AM create() methods were called and a new connection was established to the database via the prepareSession() method being called too.
(Why are there 2 calls to create() for AppModuleImpl? The following blog post on root AM interaction with task flows explains all.)
The contradictory results here are, that even though we set the Always Use Existing Transaction option for the OrgTaskFlow1 BTF are expected the ADFC-00006 error, that it in fact OrgTaskFlow1 did establish a new transaction?
What's going on?
An easy but incorrect conclusion to make is this is an ADF bug. However if you think through how the ADF framework works with bindings to the underlying services layer, in our context ADF BC, this actually makes sense.
From the point of view of a task flow, there is no inherit and directly configured relationship between the task flow and the business services layer/ADF BC. As example there is no option in the task flow properties to say which Data Control mapping to an ADF BC Application Module the task flow will use. The only point in the framework where the ADF view and controller layers touch the ADF BC side is through the pageDef bindings files, which are used by distinct task flow activities (including pages and page fragments) within the task flow as we navigate through the task flow (i.e. not the task flow itself). As such until the task flow hits an activity that calls a binding indirectly calling the ADF BC Application Module via a Data Control, the task flow has no way of actually establishing the transaction.
That's why in the demonstrations above I referred to the intermediate task flow as the "pregnant" task flow. This task flow knows it wants to establish a transaction with the underlying business services Application Module through a binding layer Data Control, it's effectively pregnant waiting for such the event, but it can't do so until one of its children activities exercises a pageDef file with a call to the business service (to take the analogy too far, you're in labour expecting your first child, you've rushed to the hospital, but you're told you'll have to wait as the widwife hasn't arrived yet ... you know at this point you're going to have this damned kid, but you've got to desperately wait until the midwife arrives ;-)
By chance in our example, the first activity in the PregnantTaskFlow that does have a pageDef file is the OrgList.jspx page that resides in the OrgTaskFlow1 task flow called via a task flow call in the PregnantTaskFlow. So in the sense even though the OrgTaskFlow1 says it won't create a transaction, it in fact does.
Why does this matter?
At this point of the discussion you might think this all a very interesting discussion, but rather an academic exercise too. Logically there's still only one transaction established for the combination of the PregnantTaskFlow and OrgTaskFlow1, regardless of where the transaction is actually established. Why does it matter?
Recently on the ADF Enterprise Methodology Group I started a discussion on building task flow for reuse. Of specific interest I asked the question on what's the most flexible data control scope and transactions options to pick such that we don't limit the reusability of our task flows? If we set the wrong options such as Always Use Existing Transaction, because of errors like ADFC-00006, it may make the task flow unreusable, or at least limited in reuse to specific scenarios.
The initial conclusion from the ADF EMG post was only the Use Existing Transaction if Possible and Shared data control scope options should be used, as, this option will reuse an existing transaction if available from the calling task flow, or, establish a new transaction if one isn't available.
However from the conclusion of this post we can see the Always Use Existing Transaction option is in fact more flexible than first thought as long as we at some point wrap it in a task flow that starts a transaction, giving us another option when building reusable task flows.
Some caveats
A caveat also shared by the next blog post on task flow transaction, is both posts describe the transaction behaviours in context of the interaction with ADF Business Components. Readers should not assume that the same transaction behaviour will be exhibited by different underlying business services such as EJBs, POJOs or Web Services. As example Web Services don't have the concept of transactions, so we can probably guess that there's no point using anything but the No Controller Transaction option .... however again you need to experiment with these alternatives yourself, don't base your conclusions on this post.
Further reading
If you've got this far, I highly recommend you follow up reading this post by reading my next blog post on root Application Modules and how the transaction options of task flows change their behaviour.
Oracle's JDeveloper 11g introduces the powerful concept of task flows to the Application Development Framework (ADF). Task flows enable "Service Oriented Development" (akin to "Service Oriented Architecture") allowing developers to align web application development closely to the concept of business processes, rather than a disparate set of web pages strung loosely together by URLs.
Yet as the old saying goes, "with power comes great responsibility", or alternatively, "the devil is in the detail". Developers need to have a good grasp of the task flow capabilities and options in order to not paint themselves into a corner. This is particularly true of the transaction and data control scope behavioural options provided by "bounded" task flows.
The transaction and data control scope behavioural options available to bounded task flows provide a sophisticated set of functionality for spawning and managing one or more transactions during an ADF user's session. Straight from the Fusion Developer's Guide the transaction options are:
• <No Controller Transaction>: The called bounded task flow does not participate in any transaction management.
• Always Use Existing Transaction: When called, the bounded task flow participates in an existing transaction already in progress.
• Use Existing Transaction If Possible: When called, the bounded task flow either participates in an existing transaction if one exists, or starts a new transaction upon entry of the bounded task flow if one doesn't exist.
• Always Begin New Transaction: A new transaction starts when the bounded task flow is entered, regardless of whether or not a transaction is in progress. The new transaction completes when the bounded task flow exits.
In recently discussing the task flow transaction options on the OTN Forums (with the kind assistance of Frank Nimphius it's become apparent that the transaction options described in the Fusion Guide are written from the limited perspective of the ADF controller (ADFc). Why a limited perspective? Because the documentation doesn't consider how these transactions options are dealt with by the underlying business services layer – the controller makes no assumptions about the underlying layers, it is deliberate an abstraction that sits on top. As such if we consider ADF Business Components (ADF BC), ADFc can interpret the task flow transaction options as it sees fit. The inference being, ADF BC can introduce subtle nuances in how the transaction options work as called by the controller.
The vanilla "Always Use Existing Transaction" option
The Fusion Guide is clear in the use of the task flow "Always Use Existing Transaction" option:
• Always Use Existing Transaction: When called, the bounded task flow participates in an existing transaction already in progress.
The inference here is that the task flow won't create its own transaction, but rather will attach itself to an existing transaction established by its calling task flow (let's refer to this as the "parent" task flow), or a "grandparent" task flow somewhere up the task flow call stack.
To test this let's demonstrate how ADFc enforces this option.
In our first example application we have an extremely simple ADF BC model of a single Entity Object (EO), single View Object (VO) and Application Module (AM), serving data from a table of Organisations in my local database:

Oracle's JDeveloper 11g introduces the powerful concept of task flows to the Application Development Framework (ADF). Task flows enable "Service Oriented Development" (akin to "Service Oriented Architecture") allowing developers to align web application development closely to the concept of business processes, rather than a disparate set of web pages strung loosely together by URLs.
From the ViewController side we have a single Bounded Task Flow (BTF) OrgTaskFlow1 comprised of a single page:

....where the single page displays a table of Organisations via the underlying ADF Business Components:

...and the transaction options of the BTF are set to Always Use Existing Transaction. By default the framework enforces the data control scope must be shared:

In order to call the BTF, from our Unbounded Task Flow (UTF) configured in the adfc-config.xml file, we have a simple Start.jspx page, which via a button invokes a Task Flow Call to the BTF OrgTaskFlow1:

On starting the application, running the Start page, selecting the button to navigate to the Task Flow Call, we immediately hit the following error:
oracle.adf.controller.activity.ActivityLogicException: ADFC-00006: Existing transaction is required when calling task flow '/WEB-INF/OrgTaskFlow1.xml#OrgTaskFlow1'.
Via this error we can see ADFc is enforcing at runtime that the OrgTaskFlow1 BTF is unable to run as it requires its parent or grandparent task flow to have established a transaction on its behalf. With this enforcement we can (incorrectly?) conclude that Oracle's controller will never allow the BTF to run if a new transaction hasn't been established. However as you can probably guess, this post will demonstrate this isn't always the case.
A side note on transactions
Before showing how to create a transaction with the Always Use Existing Transaction option, a discussion on how we can identify transactions created via ADF BC is required.
Readers familiar with ADF Business Components will know that root Application Modules (AM) are responsible for the establishment of connections and transactional processing with the database. Ultimately the concept of transactions in context of the ADF Controller is that off the underlying business services, and by inference when ADF Business Components are used this means it's the root Application Modules that provide this functionality.
It should also be noted that by inference, that the concept of a transaction and a connection are the one in the same, in the idea that a connection with the database allows you to support a transaction, and if you have multiple transactions, you therefore have multiple connections. Simple you can't have one without the other.
Yet thanks to the Application Module providing the ability to create connections and transactions, how do we know when an AM actually creates a connection? Without knowing this, in our trials with the transaction options supported by Bounded Task Flows, unless the ADFc explicitly throws an error, we'll have trouble discerning what the ADF BC layer is actually doing underneath the task flow transaction options.
While external tools like the Fusion Middleware Control will give you a good insight into this, the easiest mechanism is to extend the Application Module's ApplicationModuleImpl's class with our AppModuleImpl and override the create() and prepareSession() methods:
public class AppModuleImpl extends ApplicationModuleImpl {
  // Other generated methods

  @Override
  protected void create() {
    super.create();
    if (isRoot())
      System.out.println("######## AppModuleImpl.create() called.  AM isRoot() = true");
    else
      System.out.println("######## AppModuleImpl.create() called.  AM isRoot() = false");
  }

  @Override
  protected void prepareSession(Session session) {
    super.prepareSession(session);
    if (isRoot())
      System.out.println("######## AppModuleImpl.prepareSession() called.  AM isRoot() = true");
    else
      System.out.println("######## AppModuleImpl.prepareSession() called.  AM isRoot() = false");
  }
}
Overriding the create() method allows us to see when the Application Module is not just instantiated, but ready to be used. This doesn't tell us when a transaction and connection is established with the database, but, is useful in identifying situations where the framework creates a nested AM (which is useful for another discussion about task flows, stay tuned for another blog post).The prepareSession() method is a chokepoint method the framework uses to set database session state when a connection is established with the database. As such overriding this method allows us to see when the AM does establish a new connection and transaction.
Bending the "Always Use Existing Transaction" option to create a transaction
Now that we have a mechanism for seeing when transactions are established, let's show a scenario where the Always Use Existing Transaction option does create a new transaction.
In our previous example our Unbounded Task Flow called our OrgTaskFlow1 Bounded Task Flow directly. This time let's introduce an intermediate Bounded Task Flow called the PregnantTaskFlow. As such our UTF Start page now calls the PregnantTaskFlow:

The PregnantTaskFlow will set its transaction option to Always Begin New Transaction and an Isolated data control scope:

By doing this we are setting up a scenario where the parent task flow will establish a transaction, which will be used by the OrgTaskFlow1 later on. Next within the PregnantTaskFlow we include a single page to land on called Pregnant.jspx, which includes a simple button to then navigate to the OrgTaskFlow1 task flow via a Task Flow Call in the PregnantTaskFlow itself:

The Pregnant.jspx page is only necessary as it gives a useful landing page when the task flow is called, to see what the task flow has done with transactions before we call the OrgTaskFlow1 BTF.
The transaction options of the OrgTaskFlow1 remain the same, Always Use Existing Transaction and a Shared data control scope:
With the moving parts of our application established, if we now run our application starting with the Start page:

...clicking on the button we arrive on the Pregnant.jspx page within the PregnantTaskFlow BTF:

(Oops, looks like this picture has been lost... I'll attempt to restore this picture soon)
Remembering our PregnantTaskFlow is responsible for establishing the transaction, and therefore we should see our Application Module create() and prepareSession() methods write out System.out.println messages to the console in the JDev log window:

Hmmm, interesting, the log window is bare, no sign of our messages? So our PregnantTaskFlow was set to create a new transaction, but no such transaction or connection with the database for that matter was established?
Here's the interesting point of our demonstration. If we then select the button in the Pregnant.jspx page which will navigate to the OrgTaskFlow1 task flow call activity in the PregnantTaskFlow, firstly we see in the browser our OrgList.jspx page:

According to our previous tests at the beginning of this post we may have expected the ADFC-00006 error "Existing transaction is required", but instead the page has rendered?
In addition if we look at our log window:

...we now see our System.out.println messages in the console, showing that the AM create() methods were called and a new connection was established to the database via the prepareSession() method being called too.
(Why are there 2 calls to create() for AppModuleImpl? The following blog post on root AM interaction with task flows explains all.)
The contradictory results here are, that even though we set the Always Use Existing Transaction option for the OrgTaskFlow1 BTF are expected the ADFC-00006 error, that it in fact OrgTaskFlow1 did establish a new transaction?
What's going on?
An easy but incorrect conclusion to make is this is an ADF bug. However if you think through how the ADF framework works with bindings to the underlying services layer, in our context ADF BC, this actually makes sense.
From the point of view of a task flow, there is no inherit and directly configured relationship between the task flow and the business services layer/ADF BC. As example there is no option in the task flow properties to say which Data Control mapping to an ADF BC Application Module the task flow will use. The only point in the framework where the ADF view and controller layers touch the ADF BC side is through the pageDef bindings files, which are used by distinct task flow activities (including pages and page fragments) within the task flow as we navigate through the task flow (i.e. not the task flow itself). As such until the task flow hits an activity that calls a binding indirectly calling the ADF BC Application Module via a Data Control, the task flow has no way of actually establishing the transaction.
That's why in the demonstrations above I referred to the intermediate task flow as the "pregnant" task flow. This task flow knows it wants to establish a transaction with the underlying business services Application Module through a binding layer Data Control, it's effectively pregnant waiting for such the event, but it can't do so until one of its children activities exercises a pageDef file with a call to the business service (to take the analogy too far, you're in labour expecting your first child, you've rushed to the hospital, but you're told you'll have to wait as the widwife hasn't arrived yet ... you know at this point you're going to have this damned kid, but you've got to desperately wait until the midwife arrives ;-)
By chance in our example, the first activity in the PregnantTaskFlow that does have a pageDef file is the OrgList.jspx page that resides in the OrgTaskFlow1 task flow called via a task flow call in the PregnantTaskFlow. So in the sense even though the OrgTaskFlow1 says it won't create a transaction, it in fact does.
Why does this matter?
At this point of the discussion you might think this all a very interesting discussion, but rather an academic exercise too. Logically there's still only one transaction established for the combination of the PregnantTaskFlow and OrgTaskFlow1, regardless of where the transaction is actually established. Why does it matter?
Recently on the ADF Enterprise Methodology Group I started a discussion on building task flow for reuse. Of specific interest I asked the question on what's the most flexible data control scope and transactions options to pick such that we don't limit the reusability of our task flows? If we set the wrong options such as Always Use Existing Transaction, because of errors like ADFC-00006, it may make the task flow unreusable, or at least limited in reuse to specific scenarios.
The initial conclusion from the ADF EMG post was only the Use Existing Transaction if Possible and Shared data control scope options should be used, as, this option will reuse an existing transaction if available from the calling task flow, or, establish a new transaction if one isn't available.
However from the conclusion of this post we can see the Always Use Existing Transaction option is in fact more flexible than first thought as long as we at some point wrap it in a task flow that starts a transaction, giving us another option when building reusable task flows.
Some caveats
A caveat also shared by the next blog post on task flow transaction, is both posts describe the transaction behaviours in context of the interaction with ADF Business Components. Readers should not assume that the same transaction behaviour will be exhibited by different underlying business services such as EJBs, POJOs or Web Services. As example Web Services don't have the concept of transactions, so we can probably guess that there's no point using anything but the No Controller Transaction option .... however again you need to experiment with these alternatives yourself, don't base your conclusions on this post.
Further reading
If you've got this far, I highly recommend you follow up reading this post by reading my next blog post on root Application Modules and how the transaction options of task flows change their behaviour.